Lexmark C782 Help Menu Pages
Lexmark C782 Manual
 |
View all Lexmark C782 manuals
Add to My Manuals
Save this manual to your list of manuals |
Lexmark C782 manual content summary:
- Lexmark C782 | Help Menu Pages - Page 1
SE, Windows Me, Windows 2000, Windows XP, and Windows Server 2003 operating systems support USB connections. Some UNIX, Linux, and Macintosh computers also support USB connections. See the computer operating system documentation to see if your system supports USB. 8 Plug one end of the printer power - Lexmark C782 | Help Menu Pages - Page 2
servers • Wireless external print servers Detailed instructions for installation are shipped with the product. Network printing using Mac, UNIX/Linux, or NetWare For information about this support, see the User's Guide on the Software and Documentation CD that shipped with the printer. You can find - Lexmark C782 | Help Menu Pages - Page 3
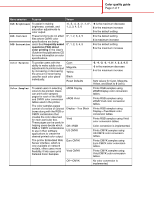
. The amount of Off* toner used to print graphics and images is reduced; however, text is printed with default toner usage. If selected, this setting overrides Toner Darkness settings. Color Saver is not supported in PPDS, and partially supported by the PCL emulation driver. Applies different color - Lexmark C782 | Help Menu Pages - Page 4
specifications are being used. See Frequently asked questions (FAQ) about color printing in the User's Guide printed output by increasing or decreasing the amount of toner being used for each color plane individually. Cyan Magenta Yellow Black Reset Defaults desired printed color output. The printer - Lexmark C782 | Help Menu Pages - Page 5
printed page. Color conversion of the data specified using RGB combinations can be customized based on object type (text, graphics, or image) through the printer operator panel. RGB Image only black toner for neutral Image CMYK Text CMYK Graphics US CMYK* (country/regionspecific factory default - Lexmark C782 | Help Menu Pages - Page 6
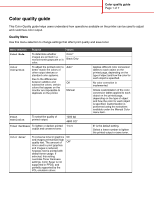
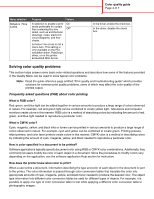
how some of the features provided in the Quality Menu can be used to solve typical color problems. Note: Read the quick reference page entitled "Print quality and troubleshooting guide" which provides solutions for common print quality problems, some of which may affect the color quality of the - Lexmark C782 | Help Menu Pages - Page 7
"Understanding paper and specialty media guidelines" in the User's Guide on the Software and Documentation CD. Color Saver must be Off to adjust Toner Darkness. What is Manual Color Correction? The color conversion tables applied to each object on the printed page when using the default Auto Color - Lexmark C782 | Help Menu Pages - Page 8
table identifies which Color Samples pages to use. Color specification of object being printed RGB Classification of object being printed Text Graphic Image Printer Color Correction setting Auto Manual Auto Manual Auto Manual Color Samples pages to print and use for color matching sRGB Vivid - Lexmark C782 | Help Menu Pages - Page 9
quality guide Page 7 of 7 Color specification of object being printed CMYK Classification of object being printed Text Graphic Printer Color Correction setting Auto Manual Auto Manual Image Auto Manual Color Samples pages to print and use for color matching US CMYK or EURO CMYK Manual Color - Lexmark C782 | Help Menu Pages - Page 10
drivers to get the printer up and running. It may also contain printer utilities, screen fonts, and additional documentation. The User's Guide provides information about loading media, ordering supplies, troubleshooting, clearing jams, and removing options. It also includes administrative support - Lexmark C782 | Help Menu Pages - Page 11
and options can be safely moved to another location by following these precautions: • Keep the printer in an upright position. • Any cart used to move the printer must be able to support the full footprint of the printer and remain stable during the move. Any cart used to move the options must be - Lexmark C782 | Help Menu Pages - Page 12
on the printer model or options installed. For more information about menu items, see the Menus and Messages Guide on the Software and Documentation CD. Supplies Menu Cyan Cartridge Magenta Cartridge Yellow Cartridge Black Cartridge Waste Toner Box Fuser ITU Paper Menu Default Source Paper Size - Lexmark C782 | Help Menu Pages - Page 13
Menu map Page 2 of 2 Printer operator panel Use the operator panel to change printer settings, cancel print jobs, print reports, and check the status of supplies. The operator panel displays troubleshooting information when appropriate. Display panel Back Menu Stop Indicator light Numeric pad USB - Lexmark C782 | Help Menu Pages - Page 14
Media guide Page 1 of 3 Media guide The printer supports the following media sizes. Select custom sizes up to the maximum specified for the Universal setting. Legend ✓ - supported with size sensing † - supported without size ✘- unsupported sensing* Media size Dimensions Dimensions 500sheet - Lexmark C782 | Help Menu Pages - Page 15
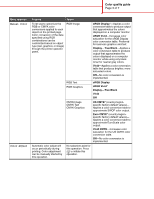
paper with tray size sensing turned off in the appropriate trays. ** When selected, the page is formatted for 215.9 x 355.6 mm (8.5 x 14 in.) unless otherwise specified. Storing media Use the following guidelines for proper media storage. These help avoid media feeding problems and uneven print - Lexmark C782 | Help Menu Pages - Page 16
positioned for the size of media loaded. Make sure the guides are not placed too tightly against the stack of media. • Make sure all cables that connect to the printer are correctly attached. See the Setup sheet for more information. • If a jam occurs, clear the entire media path. See the User - Lexmark C782 | Help Menu Pages - Page 17
by default for printer trays, but is not available for the multipurpose feeder. Loading paper Your printer supports a wide variety of paper types, sizes, and weights. Both standard and optional trays are marked with maximum stack height indicators. To help prevent jams: • Flex all stacks of print - Lexmark C782 | Help Menu Pages - Page 18
a manual bypass feeder, you can send a print job to the feeder while specifying the type and size of media from your computer. The printer then prompts you to load the appropriate print media before it prints. To load the multipurpose feeder: 1 Open the multipurpose feeder. 2 Squeeze the paper guide - Lexmark C782 | Help Menu Pages - Page 19
these instructions when you want to print on media such as transparencies, card stock, glossy paper, labels, or envelopes. 1 Load the print media as specified for the tray you are using. See "Loading paper" on page 1 for help. 2 From the printer operator panel, set the Paper Type and Paper Size - Lexmark C782 | Help Menu Pages - Page 20
Supplies guide Page 1 of 1 Supplies guide The following tables list the part numbers for ordering new print cartridges, toner waste containers, fusers, or image transfer units (ITU). Print cartridges Visit the lexmark Web site at www.lexmark.com for print cartridge ordering information. The - Lexmark C782 | Help Menu Pages - Page 21
Check the operator panel for a message about a printer consumable. Use the following table to find solutions to print quality problems. Symptom Cause Solution Repeating defects Either the print cartridges are defective, the image transfer unit and transfer roller are defective, or the fuser is - Lexmark C782 | Help Menu Pages - Page 22
transfer roller, the image transfer unit, or fuser as needed. Print the repetitive defects guide to determine what needs to be replaced. Streaked vertical lines ABCDE ABCDE ABCDE • Toner is smeared before fusing to the paper. • The print cartridge is defective. • If paper is stiff, try feeding - Lexmark C782 | Help Menu Pages - Page 23
transfer roller is worn or defective. • The image transfer unit is worn or defective. • The fuser is worn or defective. • Toner is in the paper path. • Replace the specified print cartridge. • Replace the transfer roller. • Replace the image transfer unit. • Replace the fuser. • Call for service - Lexmark C782 | Help Menu Pages - Page 24
"Media Specifications" in the User's Guide on the Software and Documentation CD. One or more print cartridges are defective or empty. Replace the defective print cartridges. • The print cartridges are defective. • Your printer requires servicing. • Replace the specified print cartridge. • Call - Lexmark C782 | Help Menu Pages - Page 25
between these two marks represents a repeating defect that occurs every 93.3 mm, which means the print cartridge is the component that needs replacing. Change fuser 120 mm (4.7 in.) Change fuser 148 mm (5.8 in.) Change cartridge 93.3 mm (3.7 in.) Change ITU transfer roll 59.4 mm (2.3 in.) Change
-
 1
1 -
 2
2 -
 3
3 -
 4
4 -
 5
5 -
 6
6 -
 7
7 -
8
-
9
-
10
-
11
-
12
-
13
-
14
-
15
-
16
-
17
-
18
-
19
-
20
-
21
-
22
-
23
-
24
-
25
 |
 |

Connection Guide
Page 1 of 2
Connection Guide
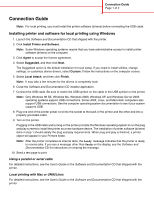
Note:
For local printing, you must install the printer software (drivers) before connecting the USB cable.
Installing printer and software for local printing using Windows
1
Launch the
Software and Documentation
CD that shipped with the printer.
2 Click
Install Printer and Software
.
Note:
Some Windows operating systems require that you have administrative access to install printer
software (drivers) on the computer.
3 Click
Agree
to accept the license agreement.
4 Select
Suggested
, and then click
Next
.
The Suggested option is the default installation for local setup. If you need to install utilities, change
settings, or customize device drivers, select
Custom
.
Follow the instructions on the computer screen.
5 Select
Local Attach
, and then click
Finish
.
Note:
It may take a few minutes for the drivers to completely load.
6
Close the
Software and Documentation
CD installer application.
7
Connect the USB cable. Be sure to match the USB symbol on the cable to the USB symbol on the printer.
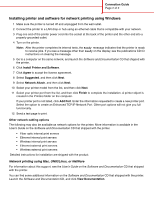
Note:
Only Windows 98 SE, Windows Me, Windows 2000, Windows XP, and Windows Server 2003
operating systems support USB connections. Some UNIX, Linux, and Macintosh computers also
support USB connections. See the computer operating system documentation to see if your system
supports USB.
8
Plug one end of the printer power cord into the socket at the back of the printer and the other end into a
properly grounded outlet.
9
Turn on the printer.
Plugging in the USB cable and turning on the printer prompts the Windows operating system to run the plug
and play screens to install the printer as a new hardware device. The installation of printer software (drivers)
done in step 1 should satisfy the plug and play requirements. When plug and play is finished, a printer
object will appear in your Printers folder.
Note:
After the printer completes its internal tests, the
Ready
message indicates that the printer is ready
to receive jobs. If you see a message other than
Ready
on the display, see the
Software and
Documentation
CD for instructions on clearing the message.
10
Send a test page to print.
Using a parallel or serial cable
For detailed instructions, see the
User’s Guide
on the
Software and Documentation
CD that shipped with the
printer.
Local printing with Mac or UNIX/Linux
For detailed instructions, see the
User’s Guide
on the
Software and Documentation
CD that shipped with the
printer.