Lexmark Consumer Inkjet Setup Guide - Page 20
Attaching a USB cable, Attaching an Ethernet cable, Plug one end of the Ethernet cable into
 |
View all Lexmark Consumer Inkjet manuals
Add to My Manuals
Save this manual to your list of manuals |
Page 20 highlights
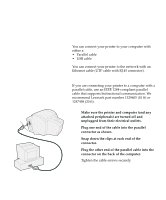
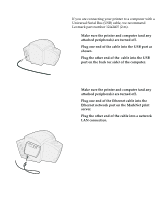
Attaching a USB cable If you are connecting your printer to a computer with a Universal Serial Bus (USB) cable, we recommend Lexmark part number 12A2405 (2 m). 1 Make sure the printer and computer (and any attached peripherals) are turned off. 2 Plug one end of the cable into the USB port as shown. 3 Plug the other end of the cable into the USB port on the back (or side) of the computer. Attaching an Ethernet cable 1 Make sure the printer and computer (and any attached peripherals) are turned off. 2 Plug one end of the Ethernet cable into the Ethernet network port on the MarkNet print server. 3 Plug the other end of the cable into a network LAN connection. Attach cables 17
-
 1
1 -
2
-
3
-
4
-
5
-
6
-
7
-
8
-
9
-
10
-
11
-
12
-
13
-
14
-
 15
15 -
 16
16 -
 17
17 -
 18
18 -
 19
19 -
 20
20 -
 21
21 -
 22
22 -
 23
23 -
 24
24 -
 25
25 -
26
-
27
-
28
-
29
-
30
-
31
-
32
-
33
-
34
-
35
-
36
-
37
-
38
-
39
-
40
-
41
-
42
-
43
-
44
-
45
-
46
-
47
-
48
 |
 |

17
Attach cables
Attaching a USB cable
If you are connecting your printer to a computer with a
Universal Serial Bus (USB) cable, we recommend
Lexmark part number 12A2405 (2 m).
1
Make sure the printer and computer (and any
attached peripherals) are turned off.
2
Plug one end of the cable into the USB port as
shown.
3
Plug the other end of the
cable into the USB
port on the back (or side) of the computer.
Attaching an Ethernet
cable
1
Make sure the printer and computer (and any
attached peripherals) are turned off.
2
Plug one end of the Ethernet cable into the
Ethernet network port on the MarkNet print
server.
3
Plug the other end of the cable into a network
LAN connection.