Lexmark S315 User's Guide - Page 28
Saving paper settings, Setup, Paper Setup, Paper Size
 |
View all Lexmark S315 manuals
Add to My Manuals
Save this manual to your list of manuals |
Page 28 highlights
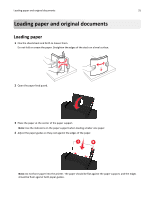
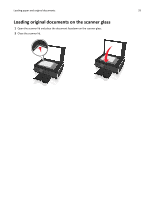
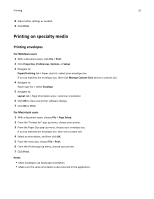
Loading paper and original documents 28 Load up to 25 sheets of photo/glossy paper 10 iron‑on transfers 50 transparencies Make sure that • The printable or glossy side of the paper is loaded faceup. If you are not sure which side is printable, then see the instructions that came with the paper. • The paper guides rest against the edges of the paper. • You do not touch or scratch the glossy surface of the unprinted paper to prevent smudges or marks that may affect the quality of your prints. Notes: - For best results, allow photos to dry at least 24 hours before stacking, displaying, or storing. - Draft mode is available but is not recommended for use with expensive paper such as heavyweight matte, labels, photo cards, and glossy paper. • You follow the loading instructions on the iron‑on transfer packaging. • The printable side of the transfer is faceup. • The paper guides rest against the edges of the transfer. Note: For best results, load transfers one at a time. • The rough side of the transparencies is faceup. • The paper guides rest against the edges of the transparencies. • You remove any paper backing sheets from the transparencies before loading. • You load A4- or letter-size transparencies. • If the transparencies have a removable strip, then each strip faces up. Note: Transparencies require more drying time. Remove each transparency as it exits, and allow it to dry before stacking or storing to avoid ink smudging. Saving paper settings You can adjust the settings for your print and copy jobs to match the paper size and type you have loaded in the printer. 1 From the printer control panel, press . 2 Adjust the settings as needed: • If you want to set the paper size, then navigate to: Setup > OK > Paper Setup > OK > Paper Size > OK > select the default paper size > OK • If you want to set the paper type, then navigate to: Setup > OK > Paper Setup > OK > Paper Type > OK > select the default paper type > OK
-
 1
1 -
2
-
3
-
4
-
5
-
6
-
7
-
8
-
9
-
10
-
11
-
12
-
13
-
14
-
15
-
16
-
17
-
18
-
19
-
20
-
21
-
22
-
 23
23 -
 24
24 -
 25
25 -
 26
26 -
 27
27 -
 28
28 -
 29
29 -
 30
30 -
 31
31 -
 32
32 -
 33
33 -
34
-
35
-
36
-
37
-
38
-
39
-
40
-
41
-
42
-
43
-
44
-
45
-
46
-
47
-
48
-
49
-
50
-
51
-
52
-
53
-
54
-
55
-
56
-
57
-
58
-
59
-
60
-
61
-
62
-
63
-
64
-
65
-
66
-
67
-
68
-
69
-
70
-
71
-
72
-
73
-
74
-
75
-
76
-
77
-
78
-
79
-
80
-
81
-
82
-
83
-
84
-
85
-
86
-
87
-
88
-
89
-
90
-
91
-
92
-
93
-
94
-
95
-
96
-
97
-
98
-
99
-
100
-
101
-
102
-
103
-
104
-
105
-
106
-
107
-
108
-
109
-
110
-
111
-
112
-
113
-
114
-
115
-
116
-
117
-
118
-
119
-
120
-
121
-
122
-
123
-
124
-
125
-
126
-
127
-
128
-
129
-
130
-
131
-
132
-
133
-
134
-
135
-
136
-
137
-
138
-
139
-
140
-
141
-
142
-
143
 |
 |
