Magnavox ZV420MW8 Owners Manual - Page 14
Settings For The Video Input - e1
 |
UPC - 053818570487
View all Magnavox ZV420MW8 manuals
Add to My Manuals
Save this manual to your list of manuals |
Page 14 highlights
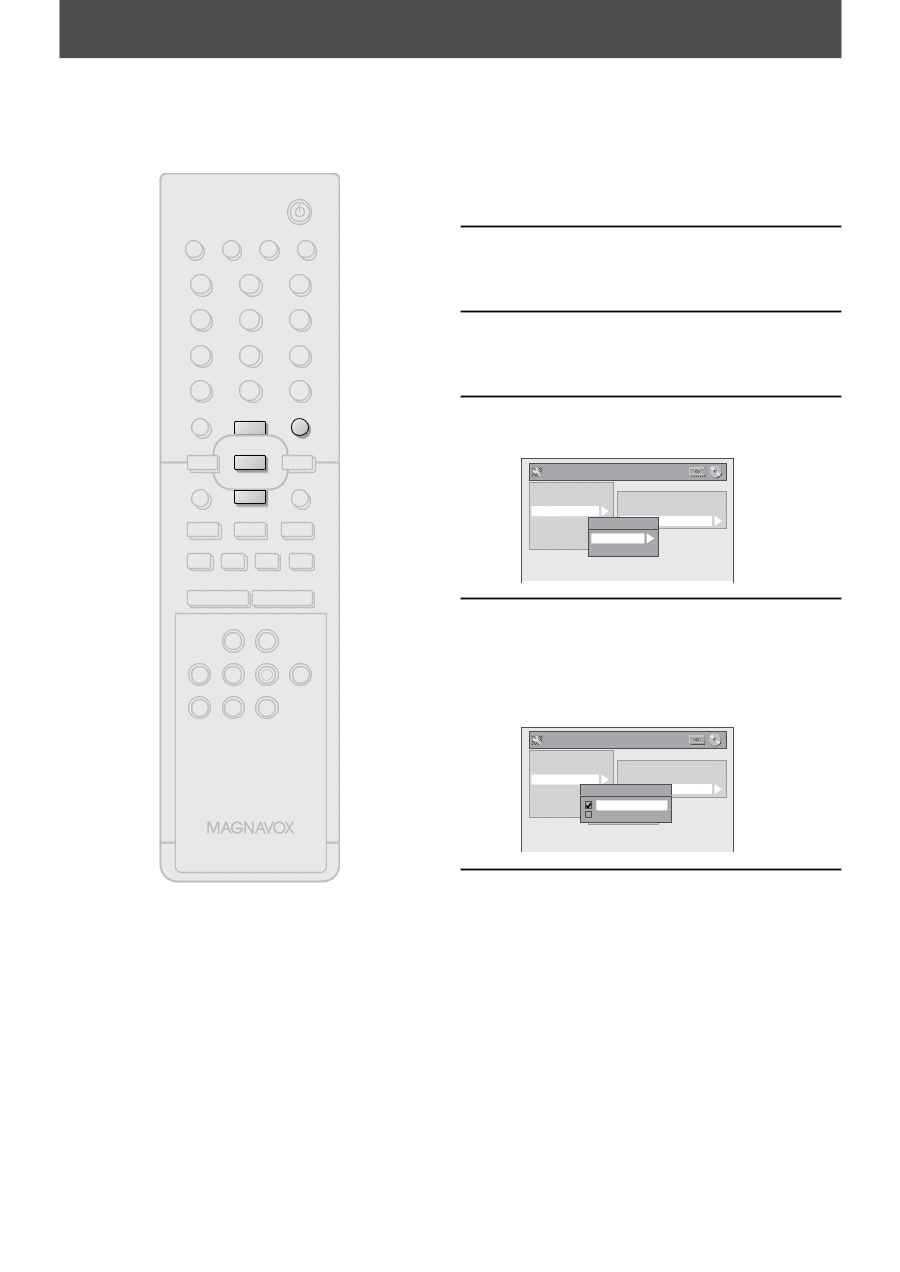
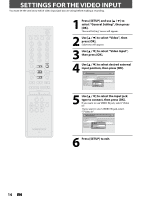
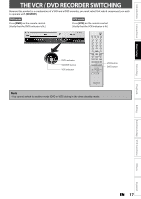
SETTINGS FOR THE VIDEO INPUT You must let the unit know which video input jack you are using before making a recording. STANDBY-ON SOURCE TIMER SET DISPLAY OPEN/CLOSE A .@/: 1 GHI 4 PQRS 7 TIMER DISC MENU ABC 2 JKL 5 TUV 8 SPACE 0 o DEF 3 MNO 6 WXYZ 9 CLEAR SETUP s OK B TITLE RETURN p j B i F h g C TRACKING -- + VCR DVD REC REC MODE D.DUBBING AUDIO I CM SKIP SEARCH RAPID PLAY NB552 1 Press [SETUP] and use [K / L] to select "General Setting", then press [OK]. "General Setting" menu will appear. 2 Use [K / L] to select "Video", then press [OK]. Submenu will appear. 3 Use [K / L] to select "Video Input", then press [OK]. 4 Use [K / L] to select desired external input position, then press [OK]. General Setting Playback Display Video Recording Clock Reset All Progressive Scan TV Aspect Video InpVuidteo Input E1 (Rear) E2 (Front) 5 Use [K / L] to select the input jack type to connect, then press [OK]. If you want to use VIDEO IN jack, select "Video In". If you want to use S-VIDEO IN jack, select "S-Video In". General Setting Playback Display Video Recording Clock Reset All Progressive Scan TV Aspect E1V(Rideeaor)InpVuidteo Input E1Vi(dReeoarIn) E2S-(VFirdoenot)In 6 Press [SETUP] to exit. 14 EN
-
 1
1 -
2
-
3
-
4
-
5
-
6
-
7
-
8
-
 9
9 -
 10
10 -
 11
11 -
 12
12 -
 13
13 -
 14
14 -
 15
15 -
 16
16 -
 17
17 -
 18
18 -
 19
19 -
20
-
21
-
22
-
23
-
24
-
25
-
26
-
27
-
28
-
29
-
30
-
31
-
32
-
33
-
34
-
35
-
36
-
37
-
38
-
39
-
40
-
41
-
42
-
43
-
44
-
45
-
46
-
47
-
48
-
49
-
50
-
51
-
52
-
53
-
54
-
55
-
56
-
57
-
58
-
59
-
60
-
61
-
62
-
63
-
64
-
65
-
66
-
67
-
68
-
69
-
70
-
71
-
72
-
73
-
74
-
75
-
76
-
77
-
78
-
79
-
80
-
81
-
82
-
83
-
84
-
85
-
86
-
87
-
88
-
89
-
90
-
91
-
92
-
93
-
94
-
95
-
96
 |
 |