Marantz SR9600 SR9600 User Guide - Page 59
Ch Input, Speaker A/b, Aux2 Input
 |
View all Marantz SR9600 manuals
Add to My Manuals
Save this manual to your list of manuals |
Page 59 highlights
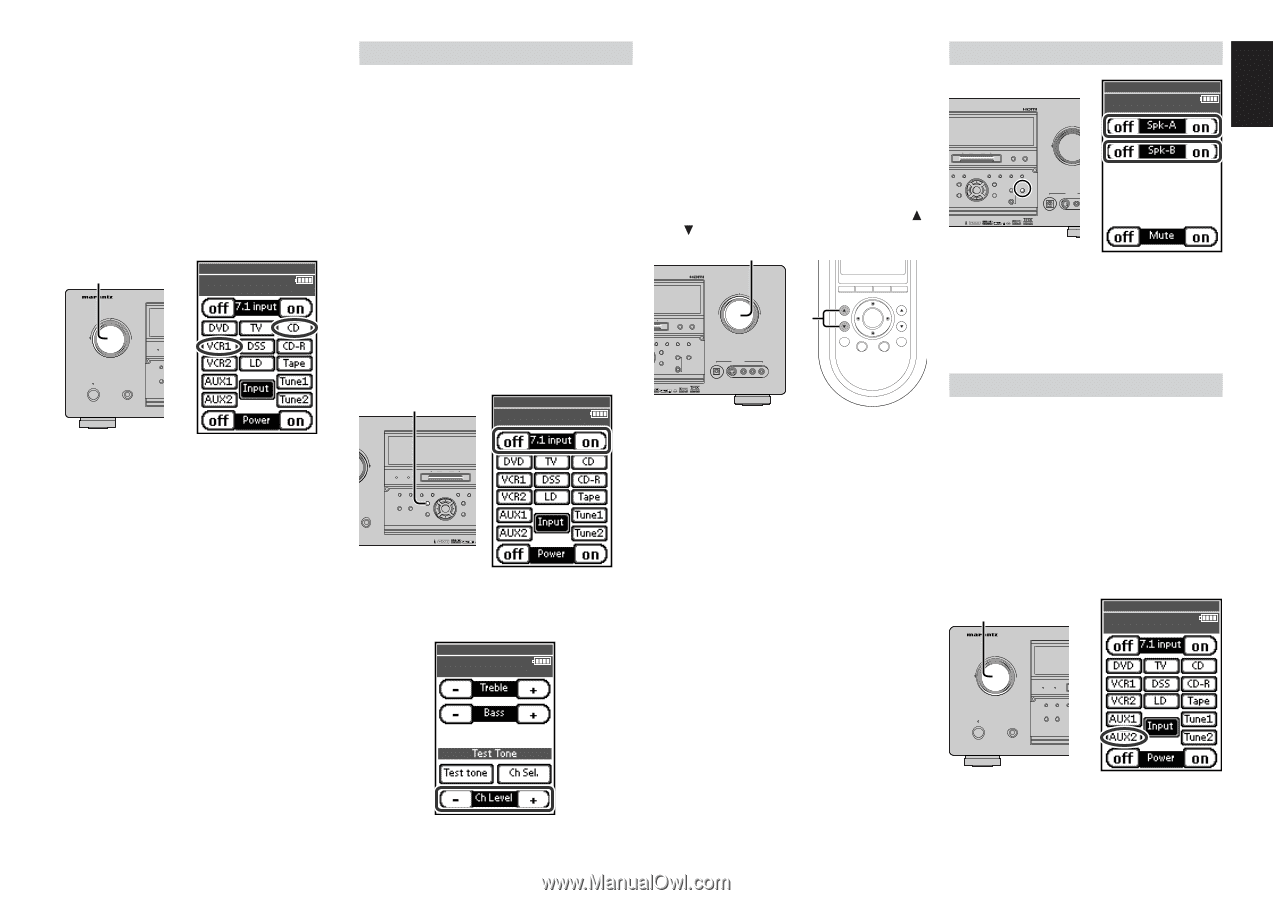
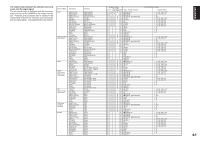
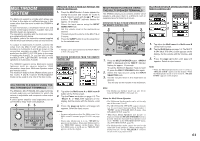
ENGLISH Recording the video from one source and the audio from another You can add the sound from one source to the video of another source to make your own video recordings. Below is an example of recording the sound from a compact disc player connected to CD IN and the video from a video camera connected to VCR1 to video cassette recorder connected to the VCR2/ DVD-R OUT jack. 1. Switch the video input source to VCR1 by tapping the VCR1 on page 1/8 on the remote control unit. 1. AV SURROUND RECEIVER SR9600 wed Jun 01 4:40pm 1/8 A/V Amp Source Select INPUT SELECTOR STANDBY POWER ON/STANDBY PHONES PURE DIRECT 1. THX DOWN TUNING UP BAND F/P SURROUND MODE AUTO MULTI MULTI SPEAKER AUTO TUNE T-MODE MEMORY CLEAR PURE DIRECT THX 7.1CH INPUT MENU ENTER DISPLAY EXIT MRAC SPEAKERS A/B MIC VOLUME 2. DOWN UP DIGITAL AUX 1 INPUT S-VIDEO VIDEO L AUDIO R 7.1 CH INPUT The SR9600 is equipped for future expansion through support for SACD multichannel or DVDAudio players. When this is selected, the input signals connected to the L (front left), R (front right), C (center), SL (surround left), SR (surround right), SBL (surround back left) and SBR (surround back right) channels Adjust the speaker output levels so that you SPEAKER A/B can hear the same sound level from each speaker at the listening position. For the front left, front right, center, surround left, surround right and surround back speakers, the output AVSURROUNDRECEIVERSR9600 levels can be adjusted between -12 to +12 INPUTSELECTOR dB. VOLUME The subwoofer can be adjusted between -18 and +12 dB. PURE DIRECT THX DOWN TUNING UP BAND F/P DOWN wed Jun 01 4:40pm 7/8 A/V Amp Speaker A/B UP of the 7.1 CH. In jacks are output directly to the front (left and right), center, surround (left and right) and surround back speaker systems as well as the pre-out jacks without passing through the surround circuitry. In addition, the signal input to the SW (subwoofer) jack is output to the PRE OUT SW (subwoofer) jack. The video input source for 7.1 channel input is set 3. These adjustments result will be stored to theSURROUND MODE AUTO MULTI MULTI SPEAKER AUTO TUNE T-MODE MEMORY CLEAR 7.1 CH. Input memory. STANDBY PURE DIRECT THX 7.1CH INPUT MENU ENTER DISPLAY EXIT MRAC SPEAKERS A/B Adjust the main volume with the VOLUME POWERON/STANDBY PHONES MIC control knob on the front panel or the VOL / buttons on the remote. DIGITAL AUX 1 INPUT S-VIDEO VIDEO L AUDIO R 3. The SR9600 allows you to select speaker system A on the 7.1 CH INPUT SETUP menu. (See page 33) AVSURROUNDRECEIVERSR9600 and speaker system B for the front L/R channels. This permits simultaneous viewing INPUTSELECTOR with video VOLUME You can select these systems by pressing the sources. 1. PURE DIRECT THX DOWN TUNING UP BAND F/P Press the 7.1 CH INPUT button on the front SURROUND MULTI MODE AUTO MULTI SPEAKER AUTO TUNE T-MODE MEMORY CLEAR panel or tap the 7.1 input on (page 1/8) on the7.1CHINPUT PURE DIRECT THX DISPLAY MRAC SPEAKERS A/B STANDBY ENTER MENU EXIT remote control unit to switch POWERON/STANDBY to 7.1 PHONES channel MIC DOWN UP DIGITAL AUX 1 INPUT S-VIDEO VIDEO L AUDIO R 3. VOL OK CH H Ex S M SPEAKERS A/B button on the front panel or by tapping Spk-A on/off and Spk-B on/off (page 7/8) on the remote control unit. input. AUX2 INPUT 2. 3. AV SURROUND RECEIVER SR9600 INPUT SELECTOR Switch the audio input source to CD by tapping the CD on page 1/8 on the remote control unit. "CD" is now selected as the audio input source and "VCR1" as the video input source.STANDBY POWER ON/STANDBY PHONES 1. wed Jun 01 4:40pm 1/8 A/V Amp Source Select VOLUME 1. PURE DIRECT THX DOWN TUNING UP BAND F/P SURROUND MODE AUTO MULTI MULTI SPEAKER AUTO TUNE T-MODE MEMORY CLEAR PURE DIRECT THX 7.1CH INPUT MENU ENTER DISPLAY EXIT MRAC SPEAKERS A/B MIC DOWN UP DIGITAL AUX 1 INPUT S-VIDEO VIDEO L AUDIO R Notes: • If you change the input source during recording, you will record the signals from the newly selected input source. • You cannot record surround effects. • Digital input signals are only output to the digital outputs. There is no conversion from digital to analog. 2. If it is necessary to adjust the output level of each channel, tap the CH Sel and Ch Level (PAGE6/8) on the remote control unit. When connecting CD players and other digital components, do not connect only the digital terminals, but the analog ones as well. wed Jun 01 4:40pm 6/8 A/V Amp Tone Adjust To cancel the 7.1 CH. Input setting, press the 7.1 CH INPUT button on the front panel or tap the 7.1 input off on the remote control unit. Notes: • When the 7.1 CH. Input mode is activated, you may not select a surround mode, as the external decoder determines processing. • In addition, there is no signal sent to the record outputs when the 7.1 CH. Input mode is activated. • The SR9600 has two input modes: 5.1 channel and 7.1 channel. Set the input mode on the 7.1 CH INPUT SETUP menu. (See page 33) 5.1 Channel Input mode: Surround processing such as for THX music is performed for 5.1 channel input, excluding surround back left and right channels. 7.1 Channel Input mode: Surround processing is not performed for 7.1 If you don't need to connect 7.1 channel input terminals for multichannel decoding, the L (front left) and R (front right) input terminals can be used for AUX2 input. In this case, you can connect additional audio sources to AUX2. 1. To select AUX2, turn the INPUT SELECTOR knob on the front panel. Tap the A/V Amp on the remote control unit and press the page up button until page 1/8 is displayed. Tap the AUX2 on the remote control unit. 1. AV SURROUND RECEIVER SR9600 INPUT SELECTOR wed Jun 01 4:40pm 1/8 A/V Amp Source Select VOLUME PURE DIRECT THX DOWN TUNING UP BAND F/P DOWN UP channel analog input. SURROUND MODE AUTO MULTI MULTI SPEAKER AUTO TUNE T-MODE MEMORY CLEAR STANDBY POWER ON/STANDBY PHONES PURE DIRECT THX 7.1CH INPUT MENU ENTER 1. DISPLAY EXIT MRAC SPEAKERS A/B MIC DIGITAL AUX 1 INPUT S-VIDEO VIDEO L AUDIO R 2. 57
-
 1
1 -
2
-
3
-
4
-
5
-
6
-
7
-
8
-
9
-
10
-
11
-
12
-
13
-
14
-
15
-
16
-
17
-
18
-
19
-
20
-
21
-
22
-
23
-
24
-
25
-
26
-
27
-
28
-
29
-
30
-
31
-
32
-
33
-
34
-
35
-
36
-
37
-
38
-
39
-
40
-
41
-
42
-
43
-
44
-
45
-
46
-
47
-
48
-
49
-
50
-
51
-
52
-
53
-
 54
54 -
 55
55 -
 56
56 -
 57
57 -
 58
58 -
 59
59 -
 60
60 -
 61
61 -
 62
62 -
 63
63 -
 64
64 -
65
-
66
-
67
-
68
 |
 |