Maytag MEDE900VJ Use and Care Guide
Maytag MEDE900VJ - Performance 7.5 cu. Ft. Steam Electric Dryer Manual
 |
UPC - 883049144764
View all Maytag MEDE900VJ manuals
Add to My Manuals
Save this manual to your list of manuals |
Maytag MEDE900VJ manual content summary:
- Maytag MEDE900VJ | Use and Care Guide - Page 1
orrnance [] ELECTRIC DRYER USE & CARE GUIDE p p SECHEUSE ELECTRIQUE GUIDE D'UTILISATION ET D'ENTRETIEN FOR QUESTIONS ABOUI FEATURES, OPER,a(IION/PERFORMANCE, PARTS, ACCESSORIES OR SERVICE CAI.I.: 1.800.688.9900 IN CANADA, CAll: 1.800.807.6777 VISIT OUR WEBSITE AT WWW.MAYTAG.COM IN CANADA, WWW. - Maytag MEDE900VJ | Use and Care Guide - Page 2
INDICE DRYER SAFETY 3 INSTALLATION INSTRUCTIONS 4 Tools and Parts 4 Optional Pedestal 4 TROUBLESHOOTING 30 Dryer Operation 30 Dryer Results 31 ASSISTANCE OR SERVICE 33 In the U.S.A 33 In Canada 33 WARRANTY 34 SI_CURITI_ DE LA SI_CHEUSE 35 INSTRUCTIONS - Maytag MEDE900VJ | Use and Care Guide - Page 3
We have provided many important safety messages in this manual and on your appliance. Always read and obey all safety messages. This repair or replace any part of the dryer or attempt any servicing unless specifically recommended in this Use and Care Guide or in published user-repair instructions - Maytag MEDE900VJ | Use and Care Guide - Page 4
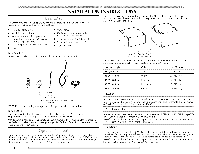
or Service" section. Pedestal Height Color Part Number 10" (25.4 cm) White MH P1000SQ 15.5" (39.4 cm) 15.5" (39.4 cm) White Crimson XHP1550VW XHP1550VF 15.5" (39.4 cm) 15.5" (39.4 cm) Evergreen Oxide XH P1550VP XHP1550VJ Stack Kit Are you planning to stack your washer and dryer? To - Maytag MEDE900VJ | Use and Care Guide - Page 5
floor to support the total dryer weight of 200 Ibs (90.7 kg). The combined weight of a companion appliance should also be considered. • A level floor with a maximum slope of 1" (2.5 cm) under entire dryer. If slope is greater than 1" (2.5 cm), install Extended Dryer Feet Kit, Part Number 279810 - Maytag MEDE900VJ | Use and Care Guide - Page 6
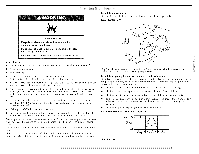
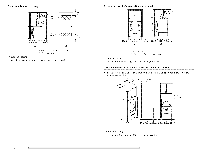
B. Closet door with vents * Required spacing **For side or bottom venting, 0" (0 cm) spacing is allowed. (7.6cm) Recessed or closet installation - Dryer on pedestal (2.5cm) 27-,q, 1,,*b1- (58.6cm) (2,5cm) (2,5crn) (82.7cm) (12,7cm) B A. Recessed area B. Side view - closet or confined area - Maytag MEDE900VJ | Use and Care Guide - Page 7
with stacked washer and dryer The dimensions shown are Part 3280 (formerly the Federal Standard for Mobile Home Construction and Safety, Title 24, HUD Part supply, if specified on the serial/rating plate) on a separate 30-amp instructions provided for it here. • This dryer the appliance is - Maytag MEDE900VJ | Use and Care Guide - Page 8
use with clothes dryers. The kit should contain: • A U L listed 30-amp power supply cord, rated 120/240 m) long. GROUNDING INSTRUCTIONS [] For a grounded, cord-connected dryer: This dryer must be grounded. In or service representative or personnel if you are in doubt as to whether the dryer is - Maytag MEDE900VJ | Use and Care Guide - Page 9
that you use Power Supply Cord Replacement Part Number 983131 7. For further information, please reference the service numbers located in the "Assistance or Service" section. GROUNDING INSTRUCTIONS m For a grounded, cord-connected dryer: This dryer must be grounded, in the event of malfunction - Maytag MEDE900VJ | Use and Care Guide - Page 10
Power Supply Cord (USA° (nly Direct Wire Fire Hazard Use a new UL listed 30 amp power supply cord. Use a UL listed strain relief. Disconnect power before making electrical connections. Connect neutral wire (white or center wire) to center terminal (silver). Ground wire (green or bare wire) must - Maytag MEDE900VJ | Use and Care Guide - Page 11
the strain relief. The strain relief should have a tight fit with the dryer cabinet and be in a horizontal position. Do not further tighten strain relief :}-wire (if 4-wire is not available) Electrical Connection Options instructions for your type of electrical connection: If your home has: - Maytag MEDE900VJ | Use and Care Guide - Page 12
center wire) E. Y4" (1.9 cm) UL listed strain relief 5. Tighten strain relief screws. 6. Insert tab of terminal block cover into slot of dryer rear panel. Secure cover with hold-down screw. 7. You have completed your electrical connection. Now go to "Venting Requirements." 4-wire connection: Direct - Maytag MEDE900VJ | Use and Care Guide - Page 13
Neutral wire (white or center wire) E. 3/4" ( 1.9 cm) UL listed strain relief 5. Tighten strain relief screw. 6. Insert tab of terminal block cover into slot of dryer rear panel. Secure cover with hold-down screw. 7. You have completed your electrical connection. Now go to "Venting Requirements." - Maytag MEDE900VJ | Use and Care Guide - Page 14
wire Use where local codes permit connecting cabinet-ground conductor to neutral wire. Direct wire cable must have 5 ft (1.52 m) of extra length so dryer can be moved if needed. Strip 3V2' (8.9 cm) of outer covering from end of cable. Strip insulation back 1" (2.5 cm). If using 3-wire cable with - Maytag MEDE900VJ | Use and Care Guide - Page 15
right). Squeeze hooked ends together. Tighten screws. !! !I 4. Tighten strain relief screw. 5. Insert tab of terminal block cover into slot of dryer rear panel. Secure cover with hold- down screw. 6. You have completed your electrical connection. Now go to "Venting Requirements." A. External ground - Maytag MEDE900VJ | Use and Care Guide - Page 16
instructions or fire. can result in death WARN I NG" To reduce the risk of fire, this dryer MUST BE EXHAUSTED OUTDOORS. IMPORTANT: Observe all governing codes and ordinances. The dryer Maytag Services. For more information, see the "Assistance or Service" section. Rigid metal vent • For best - Maytag MEDE900VJ | Use and Care Guide - Page 17
dryer from the rear of the dryer problems and health problems. A. Dryer B. Elbow C. Wall D. Exhaust hood E. Clamps £ Rigid metal or flexible C. Vent length necessary H. Exhaust outlet metal vent to connect elbows Optional exhaust installations This dryer the dryer converted - Maytag MEDE900VJ | Use and Care Guide - Page 18
. Select the type best for your installation. clearance installations are shown. Refer to the manufacturer's instructions. Two close- 'x\ or Service" section to orden • Over-the-Top Installation: Part Number 4396028 • Periscope Installation (For use with dryer vent to wall vent mismatch): Part - Maytag MEDE900VJ | Use and Care Guide - Page 19
panel). Gent['/[a,/the cardboard. See illustration. dryer on the The dryer must be connected to the cold water faucet using the new inlet hoses. Do not use old hoses. 1. Turn cold water faucet off and remove washer inlet hose. 2. Remove old rubber washer from inlet hose and replace with new - Maytag MEDE900VJ | Use and Care Guide - Page 20
an L2 code, there may be a problem with your home power supply keeping the dryer's heater from turning on. See "Troubleshooting." If you receive an AF code, your dryer vent may be crushed or blocked. See "Troubleshooting." NOTE: You may notice an odor when the dryer is first heated. This odor is - Maytag MEDE900VJ | Use and Care Guide - Page 21
, read the IMPORTANT SAFETY INSTRUCTIONS before operating this appliance. This manual covers several different models. Your dryer may not have all of the cycles and features described. The following is a guide to starting your dryer. Please refer to specific sections of this manual for more detailed - Maytag MEDE900VJ | Use and Care Guide - Page 22
if this option is desired. • Press the SIGNAl. ON/OFF button to set the end of cycle signal • Press and hold START/PAUSE button until dryer starts (about 1 second). The Wrinkle Prevent and Cycle Signal features can be adjusted during a Sensor Cycle. If you want to select another Sensor Cycle or - Maytag MEDE900VJ | Use and Care Guide - Page 23
add a fabric softener sheet. Follow package instructions. Remove the load from the dryer as soon as tumbling stops to reduce wrinkling. or Timed Preset Cycle Settings chart (in the "Cycles" section) for a guide to drying various loads. • Drying temperature and Sensor Cycles Dryness are preset when - Maytag MEDE900VJ | Use and Care Guide - Page 24
10 minutes, the Sensing light will turn off and the dryer will shut down. • In a Timed Cycle, if Prevent option is selected and that part of the cycle is occurring. are drying. See Sensor Preset or Manual Preset Cycle Settings chart. norma| ensure sanitization. For best results, do not interrupt - Maytag MEDE900VJ | Use and Care Guide - Page 25
Use Timed Cycles to select a specific amount of drying time and a need a short drying time. Manual Preset Cycle Settings Timed Cycles Load cause Rapid Refresh This cycle is best for smoothing to four dry smooth out wrinkles in loads [eft in the dryer for an extended period. *NOTE: The Custom - Maytag MEDE900VJ | Use and Care Guide - Page 26
Feature When you are unable to remove a load of clothes from the dryer as soon as it stops, wrinkles can form. The WRINKI_E PREVENT feature periodically cycle.) NOTE: If you do not select the WRINKI E PREVENT feature, the dryer stops after the cool down period. Damp Dry Signal The I)amp I)ry Signal - Maytag MEDE900VJ | Use and Care Guide - Page 27
on ordering, @ease refer to the front page of the manual or contact the dealer from whom you purchased your dryer. To use the drying rack Do not remove the lint screen. 1. Open dryer door. A. Front edge 2. Place drying rack inside dryer drum, positioning the back wire on the Hedge of the inner - Maytag MEDE900VJ | Use and Care Guide - Page 28
, e×piosion, or fire. 6eann 8 t se L - Maytag MEDE900VJ | Use and Care Guide - Page 29
. 5. Make sure leveling legs are secure in dryer base. 6. Use masking tape to secure dryer door. Reinstalling the dryer Follow the "Installation Instructions" to locate, level and connect the dryer. The dryer light automatically turns on inside the dryer drum when you open the door. 1o change - Maytag MEDE900VJ | Use and Care Guide - Page 30
service call... In U.S.A. http://maytag.custhelp.com - In Canada www.maytag.ca Dryer dryer level front to back and side to side? The dryer may vibrate if not properly installed. See the Installation Instructions problem with your home power supply keeping the dryer's heater from turning on. The dryer - Maytag MEDE900VJ | Use and Care Guide - Page 31
too long or has too many turns. I.ong venting will increase drying times. See the Installation Instructions. Explosion Hazard Keep flammable materials and vapors, such as gasoline, away from dryer. Place dryer at least 18 inches (46 cm) above the floor for a garage installation. Failure to do so - Maytag MEDE900VJ | Use and Care Guide - Page 32
ending early? The load may not be contacting the sensor strips. I.evel the dryer. Change the dryness [eve[ setting on Sensor Cycles. Increasing or decreasing the transfer to other clothing. Loads are wrinkled Was the load removed from dryer at the end of the cycle? Select the Custom Refresh Cycle - Maytag MEDE900VJ | Use and Care Guide - Page 33
assistance with: • Features and specifications on our full line of appliances. • Use and maintenance procedures. • Accessory and repair parts sales. • Referrals to local dealers, repair parts distributors and service companies. Maytag appliances designated service technicians are trained to - Maytag MEDE900VJ | Use and Care Guide - Page 34
appliance is operated and maintained according to instructions attached to or furnished with the product, Maytag brand of WhMpool Corporation or Whirlpool Canada I P (hereafter "Maytag") will Ray for factory specified parts and repair labor to correct defects in materials or workmanship. Service - Maytag MEDE900VJ | Use and Care Guide - Page 35
signifient • Risque possible de d_cbs ou de blessure grave si vous ne suivez pas imm_diatement les instructions. Risque possible de d_cbs ou de blessure grave si vous ne suivez pas les instructions. Tousles messages de s_curit_ vous diront quel est le danger potentiel et vous disent comment r_duire - Maytag MEDE900VJ | Use and Care Guide - Page 36
Iorsque la secheuse est utilisee pres d'eux. [] Avant d'enlever la secheuse du service ou la jeter, enlever la porte du compartiment de sechage. [] Ne pas d'une recommandation specifique dans le guide d'utilisation et d'entretien, ou publiee dans les instructions de reparation par I'utilisateur que - Maytag MEDE900VJ | Use and Care Guide - Page 37
les outils et pi_ces n6cessaires avant de commencer les instructions fournies avec les outils indiqu6s ici. I'installation. I.ire au marchand chez qui vous avez achet6 votre s6cheuse ou consulter [a section "Assistance ou service". Hauteur du pi_destal 10" (25,4 cm) 15,5" (39,4 cm) 15,5" - Maytag MEDE900VJ | Use and Care Guide - Page 38
consulter [a section "Assistance ou service". Demander [a pi6ce num6ro Le non-respect de ces instructions peut causer un d_c_s, une Voir "Sp6cifications 61ectriques". Un plancher robuste capable de supporter le poids total de 200 Ib (90,7 kg On recommande les dimensions d'espacement suivantes pour - Maytag MEDE900VJ | Use and Care Guide - Page 39
• Pour I'installation dans un placard avec porte, on doit pr6voir des orifices d'entr6e d'air en haut eten bas de la porte. I.es portes _ claire-voie offrant une surface 6quivalente de passage de ['air sont acceptables. • II faut aussi prendre en compte I'espace requis entre les appareils voisins. - Maytag MEDE900VJ | Use and Care Guide - Page 40
ou dans un placard, avec une laveuse et une s_cheuse superpos_es I.es dimensions indiqu6es sont pour I'espacement recommand6. 48 [002* (310cm2) T 3"*(7,6cm 4 aiv_oies reii_e & la terre. Le non-respect de cette instruction peut causer un d_c_s ou un choc _lectrique. C'est _ I'utilisateur - Maytag MEDE900VJ | Use and Care Guide - Page 41
[e cordon d'a[imentation de rechange num6ro de piece 9831317. Pour plus d'information, veui[[ez consulter [es num6ros de service qui se trouvent _ [a section "Assistance ou service". iNSTRUCTiONS DE LiAiSON A LA TERRE [] Pour une s6cheuse reli6e & la terre et connect6e par un cordon : Cette s6cheuse - Maytag MEDE900VJ | Use and Care Guide - Page 42
aupr6s du marchand ou en t6[6phonant b_ Maytag Services. Pour plus de renseignements, voir [a section "Assistance ou service". Conduit m_tallique rigide • Pour un mei[[eur meubles, peinture, papier-peint, tapis, etc. [] Problemes de nettoyage dans la maison et problemes de sante. Bride de serrage 42 - Maytag MEDE900VJ | Use and Care Guide - Page 43
gris de minuit) Contacter votre marchand local. Le non=respect de ces instructions peut causer un d6c_s, un incendie, un choc _[ectrique ou une biessure le d6gagement est r6duit. Veui[[ez consulter [a section "Assistance ou service" pour passer une commande. • Installation au-dessus de la s6cheuse - Maytag MEDE900VJ | Use and Care Guide - Page 44
Dispositions sp6ciales pour les installations dans une maison mobile I.e syst&me d'6vacuation doit &tre solidernent fix6 _ une section non combustible structure de [a maison mobile et ne doit passe terminer en dessous de [a maison en sorte que [e syst6me d'6vacuation se termine _ ['ext6rieur. de la - Maytag MEDE900VJ | Use and Care Guide - Page 45
Risque du poids excessif UtJliser deu× ou plus de personnes pour d6piacer et installer la s6cheuse. Le non=respect de cette instruction peut causer une biessure au dos ou d'autre biessure. 1. Pour prot6ger le plancher, utiliser une grande pi6ce de carton de la bo?te de la - Maytag MEDE900VJ | Use and Care Guide - Page 46
8. Terminer le serrage des raccords - deux tiers de tour suppl6mentaire avec une pince. A A. Afimentation du robinet d'eau h'oide REMARQUE : Ne pas serrer excessivement. I.e raccord risque d'6tre endommag6. 9. Fixer ['extr6mit6 inc[inde du long tuyau au robinet de remp[issage au bas du panneau - Maytag MEDE900VJ | Use and Care Guide - Page 47
, caoutchouc ou plastique doJvent _tre s_ch_s sur une corde & linge ou par le programme de s_chage & Fair. Le non-respect de ces instructions peut causer un d_c_s ou un incendie. ...).p......... {dii_i',_'il 3. Appuyer sur le bouton POWER/CANCEl_ (mise sous tension/annulation) puis faire tourner - Maytag MEDE900VJ | Use and Care Guide - Page 48
I.edegrd6es6chagpeard6fauestt Normal pour tousles programmes de d6tection. Ce degr6 de s6chage permettra de s6cher [a p[upart des charges de fa_:on ad6quate en uti[isant [e moins d'6nergie possible. Vous pouvez s6[ectionner un autre degr6 de s6chage en appuyant sur SENSOR CYCI_E DRYNESS (degr6 de - Maytag MEDE900VJ | Use and Care Guide - Page 49
• Appuyer sur le bouton SIGNAl. ON/OFF (signal de fin de programme) pour r6gler le volume au niveau d6sir6. • Appuyer une fois sur le bouton START/PAUSE pour arr@er la s6cheuse et permettre I'utilisateur de sdlectionner un autre programme. REMARQUE : I_e degr6 de s6chage des programmes de d6tection - Maytag MEDE900VJ | Use and Care Guide - Page 50
. • Ajouter une feuille d'assouplissant de tissus, si d6sir6. Suiwe les instructions sur ['emba[[age. • Retirer la charge de la s6cheuse aussitBt que d6tection ou des programmes minut6s (_ [a section "Programmes") pour un guide de s6chage de charges diverses. I.es temp6ratures de s6chage et le - Maytag MEDE900VJ | Use and Care Guide - Page 51
optimaux, ne pas interrompre [e programme. Protocole NSF P154 Performance d'assainissement des sdcheuses de v_tements pour les particuliers Heavy Duty (service intense) Utiliser ce programme pour le s6chage 5_temp6rature serviettes en coton ou des jeans. 6lev6e des charges rnixtes Iourdes, des - Maytag MEDE900VJ | Use and Care Guide - Page 52
Programmes Steam (vapeur) I)ans ces programmes, une petite quantit6 d'eau est vaporis6e dans le tambour de la s6cheuse apr6s quelques minutes de culbutage avec chaleur. I_a s6cheuse continuera _ culbuter avec une chaleur ordinaire pendant la dur6e du programme. Les programmes Steam (vapeur) - Maytag MEDE900VJ | Use and Care Guide - Page 53
Damp Dry Signal (signal de s_chage humlde) I.e signal de sdchage humide peut @re sdlectionn6 pour vous informer que vos v6tements sont secs b_environ 80 %. Cette option est utile [orsqu'on d6sire retirer des articles [6gers d'une charge mixte pour 6viter de [es s6cher b_['exc6s ou pour sortir des - Maytag MEDE900VJ | Use and Care Guide - Page 54
[ement). 6. I[ faut s6[ectionner une dur6e de s6chage en appuyant sur [es boutons (- ou +) MANUAl .... DRY TIME (dur6e de s6chage manuel). R6g[er de nouveau [a dur6e au besoin pour comp[6ter [e un garage. Le non-respect de ces instructions peut causer un d_c_s, une explosion ou un incendie. - Maytag MEDE900VJ | Use and Care Guide - Page 55
Nettoyag_e. chaque charge l e filtre _ charpie se trouve dans la porte de la s6cheuse. Un filtre obstru6 de charpie peut augmenter le temps de s6chage. Nettoyage 1. Enlever le filtre _ charpie en le tirant directement vers le haut Enlever la charpie du filtre en la roulant avec les doigts. Ne pas - Maytag MEDE900VJ | Use and Care Guide - Page 56
Hiverisation de la s_cheuse 1. D6brancher la s6cheuse ou d6connecter la source de courant 61ectrique. 2. Ferrner le robinet d'eau. 3. I])6connecter le tuyau d'arriv6e d'eau du robinet et le vider. R_utillsation de la s_cheuse 1. Vidanger les canalisations d'eau. Reconnecter le tuyau d'arriv6e d' - Maytag MEDE900VJ | Use and Care Guide - Page 57
Aux Questions), ce qul vous _vitera peut-@tre le co_t d'une visite de service...www.whlrlpool.ca _N%.,%,. N %o,%2__N%o, La s_cheuse ne fonctionne pas Un s6cheuse peut vibrer si elle n'est pas correctement install6e. Voir les Instructions d'insta[[ation. Les v_tements sont-ils emm_l_s ou en boule? - Maytag MEDE900VJ | Use and Care Guide - Page 58
de programme trop court Risque du poids excessif Utiiiser deux ou plus de personnes pour d_piacer et installer [a s_cheuse. Le non=respect de cette instruction peut causer une blessure au dos ou d autre blessure. Le programme automatique se termine-t-il trop t6t? La charge n'est peut-_tre pas en - Maytag MEDE900VJ | Use and Care Guide - Page 59
vous faire 6conomiser [e coot d'une visite de service. Si vous avez encore besoin d'aide, suivez [es instructions ci-dessous. I.ors d'un appe[, veui[[ez question ou prob[_me _ : vous pouvez 6crire _ Maytag _ en soumettant route Maytag Services, I.LC ATTN: CAIR' Center P.O. Box 2370 Cleveland, - Maytag MEDE900VJ | Use and Care Guide - Page 60
situ6 dans une r6gion 61oignde o_ un service d'entretien Maytag autoris6 n'est pas disponible. 10. I_a d6pose et la r6installation de votre gros appareil si celui-ci est install6 dans un endroit inaccessible ou n'est pas install6 conform6ment aux instructions d'installation fournies. 11. I.es gros - Maytag MEDE900VJ | Use and Care Guide - Page 61
61 - Maytag MEDE900VJ | Use and Care Guide - Page 62
W10057353A © 2008 All rights reserved. ®Registered trademark/fM Trademark of Maytag Corporation or its related companies. Used under license by Maytag I_imited in Canada ®Marque d6pos6efr"_Marque de commerce of Maytag Corporation ou de ses compagnies affili6es. 5/08 Printed in U.S.A. Imprim6 aux
-
 1
1 -
 2
2 -
 3
3 -
 4
4 -
 5
5 -
 6
6 -
 7
7 -
8
-
9
-
10
-
11
-
12
-
13
-
14
-
15
-
16
-
17
-
18
-
19
-
20
-
21
-
22
-
23
-
24
-
25
-
26
-
27
-
28
-
29
-
30
-
31
-
32
-
33
-
34
-
35
-
36
-
37
-
38
-
39
-
40
-
41
-
42
-
43
-
44
-
45
-
46
-
47
-
48
-
49
-
50
-
51
-
52
-
53
-
54
-
55
-
56
-
57
-
58
-
59
-
60
-
61
-
62
 |
 |

orrnance
[]
ELECTRIC DRYER
USE & CARE GUIDE
p
p
SECHEUSE ELECTRIQUE
GUIDE
D'UTILISATION
ET D'ENTRETIEN
FOR
QUESTIONS
ABOUI
FEATURES,
OPER,a(IION/PERFORMANCE,
PARTS, ACCESSORIES
OR
SERVICE
CAI.I.:
1.800.688.9900
IN
CANADA,
CAll:
1.800.807.6777
VISIT
OUR
WEBSITE
AT WWW.MAYTAG.COM
IN CANADA,
WWW.MAYIAG.CA
SI TIENE
PREGUNFAS
RESPECTO
A IAS
CARACTERiSTICAS,
FUNCIONAMIENTO,
RENDIMIENTO,
PARTES,
ACCESORIOS
O
SERVICIO
TECNICO,
IIAME
AI.:
1.800.688.9900
EN CANADA,
IIAME
AI:
1.800.807.6777
VISITE
NUESTRO
SITIO
WEB
EN
WWW.
M AYTAG. COM
EN CANAl)A,
WWW.MAYTAG.CA
AU
CANADA,
POUR
ASSISTANCE,
INSTAI.I
ATION
OU
SERVICE,
COMPOSE
IE
: 1.800.807.6777
OU
VISITEZ
NOTRE
SITE INTERNET
,_
WWW.
MAYTAG.
CA
W10057353A