NEC LCD2490WUXI-BK User Manual - Page 12
Controls - 24
 |
UPC - 805736016413
View all NEC LCD2490WUXI-BK manuals
Add to My Manuals
Save this manual to your list of manuals |
Page 12 highlights
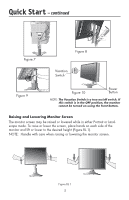
Controls OSM® (On-Screen Manager) control buttons, located on the front of the monitor, function as follows: To access OSM menu, press any of the following control buttons: EXIT, LEFT, RIGHT, UP, or DOWN. To change the input source signal when the OSM is closed, press the INPUT/SELECT button. 8 7 Landscape 1 23 4 5 6 9 Portrait 1 AMBIBRIGHT SENSOR Detects the level of ambient lighting allowing the monitor to make adjustments to various settings resulting in a more comfortable viewing experience. Do not cover this sensor. 2 POWER 3 LED 4 INPUT/SELECT 5 EXIT 6 LEFT/RIGHT 7 UP/DOWN 8 RESET/ROTATE OSM 9 KEY GUIDE Turns the monitor on and off. Indicates that the power is on. Can be changed between blue and green in the Advanced OSM Control menu. Enters the OSM Control menu. Enters OSM sub menus. Changes the input source when not in the OSM Control menu. Exits the OSM sub menu. Exits OSM Control menu. Navigates to the left or right through the OSM Control menu. Navigates up or down through the OSM Control menu. Resets the OSM back to factory settings. Pressing when the OSM is not showing rotates the OSM Control menu between portrait and landscape mode.* See page 24 Tag9 OSM ROTATION. The Key Guide appears on screen when the OSM control menu is accessed. The Key Guide will rotate when the OSM control menu is rotated. *The "LEFT/RIGHT" and "UP/DOWN" buttons functionality is interchangeable depending on the orientation (landscape/portrait) of the OSM. 9
-
 1
1 -
2
-
3
-
4
-
5
-
6
-
 7
7 -
 8
8 -
 9
9 -
 10
10 -
 11
11 -
 12
12 -
 13
13 -
 14
14 -
 15
15 -
 16
16 -
 17
17 -
18
-
19
-
20
-
21
-
22
-
23
-
24
-
25
-
26
-
27
-
28
-
29
-
30
-
31
-
32
-
33
-
34
-
35
-
36
-
37
-
38
-
39
-
40
-
41
-
42
-
43
-
44
-
45
-
46
-
47
-
48
-
49
-
50
-
51
-
52
-
53
-
54
-
55
-
56
-
57
-
58
-
59
-
60
-
61
-
62
-
63
-
64
-
65
-
66
-
67
-
68
-
69
-
70
-
71
-
72
-
73
-
74
-
75
-
76
-
77
-
78
-
79
-
80
-
81
-
82
-
83
-
84
-
85
-
86
-
87
-
88
-
89
-
90
-
91
-
92
-
93
-
94
-
95
-
96
-
97
-
98
-
99
-
100
-
101
-
102
-
103
-
104
-
105
-
106
-
107
-
108
-
109
-
110
-
111
-
112
-
113
-
114
-
115
-
116
-
117
-
118
-
119
-
120
-
121
-
122
-
123
-
124
-
125
-
126
-
127
-
128
-
129
-
130
-
131
-
132
-
133
-
134
-
135
-
136
 |
 |
