NEC LCD2490WUXI-BK User Manual - Page 28
DAYLIGHT SAVING: For those timezones where Daylight
 |
UPC - 805736016413
View all NEC LCD2490WUXI-BK manuals
Add to My Manuals
Save this manual to your list of manuals |
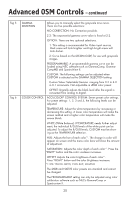
Page 28 highlights
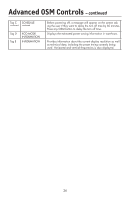
Advanced OSM Controls - continued Tag A TILE MATRIX continued continued TILECOMP: Works in tandem with "TILE MATRIX" to compensate for the bezel width of the tiled monitors in order to accurately display the image. TileComp using 4 monitors (black area shows monitor frames). monitor1 monitor2 monitor1 monitor2 Tag B DATE & TIME Tag C SCHEDULE monitor3 monitor4 monitor3 monitor4 TileComp OFF TileComp ON The EXPANSION mode will be set to "FULL" when the "TILE MATRIX" is activated. Sets the current date and time for the internal clock. Date and Time has to be set in order for the "SCHEDULE" feature to work properly. DAYLIGHT SAVING: For those timezones where Daylight Saving Time (Summertime) is observed. Programs the monitor's working schedule. Sets the hour and day of the week when the monitor powers on or off. Also sets the input port. Select "EXIT" to set schedule. Using the "SCHEDULE" function allows you to set up to seven different scheduled time intervals when the LCD Monitor will be activated. You can select the time the monitor turns on and turns off, the day of week the monitor is activated, and which input source the monitor will use for each scheduled activation period. A check mark in the box next to the number of the schedule indicates that the selected schedule is in effect. To select which schedule to set, use the up/down arrows to move the cursor vertically to select a schedule (1 to 7) to be set. Use the "down" or "up" buttons to move the red bar horizontally within the particular schedule. The "SELECT" button is used to make a selection . If you create a schedule but do not want to use a power on time, select "--" in the "ON" time slot. If you do not want to use a power off time select "--" in the OFF time slot. If there is no input selected ("-----" showing in the input spot) the input from the previous schedule will be used. Selecting EVERY DAY within a schedule takes priority over other schedules that are set up to operate weekly. Schedules are numbered 1-7. If two schedules are programmed for the same time, then the highest numbered schedule has priority. For example schedule #7 will take priority over schedule #5. When schedules are overlapping, a scheduled Power ON time has priority over a scheduled Power OFF time. When the "OFF TIMER" (see page 21) is set, the "SCHEDULE" function is disabled. 25
-
 1
1 -
2
-
3
-
4
-
5
-
6
-
7
-
8
-
9
-
10
-
11
-
12
-
13
-
14
-
15
-
16
-
17
-
18
-
19
-
20
-
21
-
22
-
 23
23 -
 24
24 -
 25
25 -
 26
26 -
 27
27 -
 28
28 -
 29
29 -
 30
30 -
 31
31 -
 32
32 -
 33
33 -
34
-
35
-
36
-
37
-
38
-
39
-
40
-
41
-
42
-
43
-
44
-
45
-
46
-
47
-
48
-
49
-
50
-
51
-
52
-
53
-
54
-
55
-
56
-
57
-
58
-
59
-
60
-
61
-
62
-
63
-
64
-
65
-
66
-
67
-
68
-
69
-
70
-
71
-
72
-
73
-
74
-
75
-
76
-
77
-
78
-
79
-
80
-
81
-
82
-
83
-
84
-
85
-
86
-
87
-
88
-
89
-
90
-
91
-
92
-
93
-
94
-
95
-
96
-
97
-
98
-
99
-
100
-
101
-
102
-
103
-
104
-
105
-
106
-
107
-
108
-
109
-
110
-
111
-
112
-
113
-
114
-
115
-
116
-
117
-
118
-
119
-
120
-
121
-
122
-
123
-
124
-
125
-
126
-
127
-
128
-
129
-
130
-
131
-
132
-
133
-
134
-
135
-
136
 |
 |
