NEC LCD2490WUXI-BK User Manual - Page 6
Quick Start - monitor
 |
UPC - 805736016413
View all NEC LCD2490WUXI-BK manuals
Add to My Manuals
Save this manual to your list of manuals |
Page 6 highlights
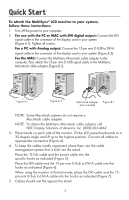
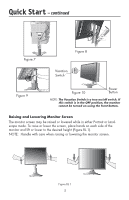
Quick Start To attach the MultiSync® LCD monitor to your system, follow these instructions: 1. Turn off the power to your computer. 2. For use with the PC or MAC with DVI digital output: Connect the DVI signal cable to the connector of the display card in your system (Figure A.1). Tighten all screws. For a PC with Analog output: Connect the 15-pin mini D-SUB to DVI-A signal cable to the connector of the display card in your system (Figure A.2). For the MAC: Connect the MultiSync Macintosh cable adapter to the computer, then attach the 15-pin mini D-SUB signal cable to the MultiSync Macintosh cable adapter (Figure B.1). Figure A.1 Figure A.2 Macintosh Adapter Figure B.1 (not included) NOTE: Some Macintosh systems do not require a Macintosh cable adapter. NOTE: To obtain the MultiSync Macintosh cable adapter call NEC Display Solutions of America, Inc. (800) 632-4662. 3. Place hands on each side of the monitor. Tilt the LCD panel backwards to a 30-degree angle and lift up to the highest position. Connect all cables to appropriate connectors (Figure 4). 4. To keep the cables neatly organized, place them into the cable management system that is built into the stand. Place the D-Sub cable and the power cable into the specific hooks as indicated (Figure 5). Place the DVI cable and the 15-pin mini D-Sub to DVI-A cable into the hooks as indicated (Figure 6). When using the monitor in Portrait mode, place the DVI cable and the 15pin mini D-Sub to DVI-A cable into the hooks as indicated (Figure 7). 5. Cables should rest flat against the stand. 3
-
 1
1 -
 2
2 -
 3
3 -
 4
4 -
 5
5 -
 6
6 -
 7
7 -
 8
8 -
 9
9 -
 10
10 -
 11
11 -
 12
12 -
13
-
14
-
15
-
16
-
17
-
18
-
19
-
20
-
21
-
22
-
23
-
24
-
25
-
26
-
27
-
28
-
29
-
30
-
31
-
32
-
33
-
34
-
35
-
36
-
37
-
38
-
39
-
40
-
41
-
42
-
43
-
44
-
45
-
46
-
47
-
48
-
49
-
50
-
51
-
52
-
53
-
54
-
55
-
56
-
57
-
58
-
59
-
60
-
61
-
62
-
63
-
64
-
65
-
66
-
67
-
68
-
69
-
70
-
71
-
72
-
73
-
74
-
75
-
76
-
77
-
78
-
79
-
80
-
81
-
82
-
83
-
84
-
85
-
86
-
87
-
88
-
89
-
90
-
91
-
92
-
93
-
94
-
95
-
96
-
97
-
98
-
99
-
100
-
101
-
102
-
103
-
104
-
105
-
106
-
107
-
108
-
109
-
110
-
111
-
112
-
113
-
114
-
115
-
116
-
117
-
118
-
119
-
120
-
121
-
122
-
123
-
124
-
125
-
126
-
127
-
128
-
129
-
130
-
131
-
132
-
133
-
134
-
135
-
136
 |
 |
