NEC LCD2490WUXI-BK User Manual - Page 20
Analog input only, Digital input only
 |
UPC - 805736016413
View all NEC LCD2490WUXI-BK manuals
Add to My Manuals
Save this manual to your list of manuals |
Page 20 highlights
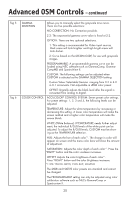
Advanced OSM Controls - continued Tag 1 Tag 2 Tag 3 LOW BRIGHT MODE The BRIGHTNESS setting can lower the brightness level. LOW BRIGHT MODE can be used to lower the brightness even further, if desired. ON: Brightness is reduced by an additional 50%. ADVANCED: Brightness is reduced by an additional 25%. NOTE: When PROGRAMABLE is set for the Gamma Selection (tag5), LOW BRIGHT MODE is disabled. R-H. POSITION Adjusts the position of the RED component of the image. (Analog input only) Press "Left" or "Right" to adjust. G-H. POSITION Adjusts the position of the GREEN component of the image. Press (Analog input only) "Left" or "Right" to adjust. B-H. POSITION Adjusts the position of the BLUE component of the image. (Analog input only) Press "Left" or "Right" to adjust. R-FINE Adjusts the "FINE" setting of the RED component of the image. Press (Analog input only) "Left" or "Right" to adjust. G-FINE (Analog input only) Adjusts the "FINE" setting of the GREEN component of the image. Press "Left" or "Right" to adjust. B-FINE Adjusts the "FINE" setting of the BLUE component of the image. Press (Analog input only) "Left" or "Right" to adjust. R-SHARPNESS (Analog input only) Adjusts the "SHARPNESS" setting of the RED component of the image. Press "Left" or "Right" to adjust. G-SHARPNESS Adjusts the "SHARPNESS" setting of the GREEN component of the (Analog input only) image. Press "Left" or "Right" to adjust. B-SHARPNESS (Analog input only) Adjusts the "SHARPNESS" setting of the BLUE component of the image. Press "Left" or "Right" to adjust. DVI LONG CABLE (Digital input only) Compensates for image degradation caused by using a long DVI cable. There are 4 possible settings, with "0" being the lowest level of compensation and "3" being the highest level. The default setting is "1". AUTO ADJUST Automatically adjusts the Image Position, H. Size, and (Analog input only) Fine settings. SIGNAL AD- JUST (Analog input only) Determines what settings are adjusted when Auto Adjust is performed. The choices are "SIMPLE" and "FULL". Press "Left" or "Right" to select. SIMPLE FULL H-size, Fine, H/V Position O O Contrast X O O: Automatic Adjustment X: No Automatic Adjustment NOTE: Automatic Adjustment does not work at resolutions less than 800 x 600 resolution. 17
-
 1
1 -
2
-
3
-
4
-
5
-
6
-
7
-
8
-
9
-
10
-
11
-
12
-
13
-
14
-
 15
15 -
 16
16 -
 17
17 -
 18
18 -
 19
19 -
 20
20 -
 21
21 -
 22
22 -
 23
23 -
 24
24 -
 25
25 -
26
-
27
-
28
-
29
-
30
-
31
-
32
-
33
-
34
-
35
-
36
-
37
-
38
-
39
-
40
-
41
-
42
-
43
-
44
-
45
-
46
-
47
-
48
-
49
-
50
-
51
-
52
-
53
-
54
-
55
-
56
-
57
-
58
-
59
-
60
-
61
-
62
-
63
-
64
-
65
-
66
-
67
-
68
-
69
-
70
-
71
-
72
-
73
-
74
-
75
-
76
-
77
-
78
-
79
-
80
-
81
-
82
-
83
-
84
-
85
-
86
-
87
-
88
-
89
-
90
-
91
-
92
-
93
-
94
-
95
-
96
-
97
-
98
-
99
-
100
-
101
-
102
-
103
-
104
-
105
-
106
-
107
-
108
-
109
-
110
-
111
-
112
-
113
-
114
-
115
-
116
-
117
-
118
-
119
-
120
-
121
-
122
-
123
-
124
-
125
-
126
-
127
-
128
-
129
-
130
-
131
-
132
-
133
-
134
-
135
-
136
 |
 |
