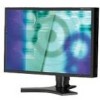
NEC LCD2490WUXI-BK User Manual - Page 27
Tag 9, Tag
 |
UPC - 805736016413
View all NEC LCD2490WUXI-BK manuals
Add to My Manuals
Save this manual to your list of manuals |
Page 27 highlights
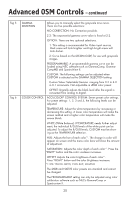
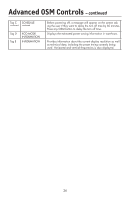
Advanced OSM Controls - continued Tag 9 OSM ROTATION continued IMAGE ROTATION PORTRAIT WARNING DDC/CI SCREEN SAVER INPUT SETTING Tag A TILE MATRIX AUTO: The OSM rotates automatically when the monitor is rotated. OSM ROTATION is set to AUTO by default. MANUAL: To rotate the OSM, press the ROTATE OSM button when the OSM is not showing. AUTO: The display image automatically rotates according to the orientation of the OSM. If "AUTO" is selected in the "OSM ROTATION" menu, the display image rotates according to the orientation of the monitor. OFF: The display image is not rotated. IMAGE ROTATION is set to OFF by default. ON: The display image always rotated. When the monitor is used in the portrait position, the brightness value will be reduced to 300 cd/m2. If the Portrait Warning is ON, a message will appear on the screen for10 seconds. DDC/CI ENABLE/DISABLE: Turns on or off the two way communication and control of the monitor. Use the SCREEN SAVER to reduce the risk of image persistence. MOTION (Default OFF): Screen image moves periodically in 4 directions in order to reduce the risk of image retention. Timing for MOTION can be set so the screen image moves in intervals from every 10 to 900 seconds. Timing is set in 10-second increments. OPTION (Default REDUCED): There are two optional selections. REDUCED: Screen image is reduced to 95% size and is moved periodically in 4 directions. Screen may appear slightly less sharp than normal. The full image appears on the display. FULL: Screen image is set to FULL and is moved periodically in 4 directions. Screen image goes outside of the display area in the direction that it shifts so that a portion of the image may appear to be cut off. GAMMA (Default OFF): When OFF, the GAMMA selection that the display uses is the same as the GAMMA selection in Tag5 (page 20). When ON is selected, the GAMMA curve (except PROGRAMMABLE) becomes narrow, reducing the contrast and cutting down the risk of image retention. NOTE: SCREEN SAVER does not function when the TILE MATRIX function is enabled. VIDEO BAND WIDTH (Analog input only): Adjusts the bandwidth of the video signal. Can be used to eliminate undesired video noise from a poor signal. Press "Left" or "Right" to select. SYNC THRESHOLD (Analog input only): Adjusts the slice level of a synchronization signal. Press "SELECT" to move the adjustment menu. Adjusts the sensitivity of the separate or composite input signals. Try this option if the FINE adjustment does not successfully eliminate the noise. SOG THRESHOLD (Analog input only): Adjusts the sensitivity of the Sync On Green input signals. Adjusts the slice level when separating a synchronization from Sync On Green signal input. Press "Left" or "Right" to select. EDGE LOCK: Operating your monitor at a non-standard timing may cause images to appear darker than normal or to have color distortion. Use of the Edge Lock control will adjust images to their normal state. The "TILE MATRIX" feature allows one image to be displayed over multiple screens.This feature can be used with up to 25 monitors. (5 horizontal x 5 vertical) Using the Tile Matrix function requires the PC output signal to be sent through a distribution amplifier to each of the individual monitors. ENABLE: Select "ON", to expand the signal to the selected TILE MATRIX settings. H MONITOR: Selects the number of horizontal displays. V MONITOR: Selects the number of vertical displays. MONITOR NO.: Selects a position to expand the screen. 24
-
 1
1 -
2
-
3
-
4
-
5
-
6
-
7
-
8
-
9
-
10
-
11
-
12
-
13
-
14
-
15
-
16
-
17
-
18
-
19
-
20
-
21
-
 22
22 -
 23
23 -
 24
24 -
 25
25 -
 26
26 -
 27
27 -
 28
28 -
 29
29 -
 30
30 -
 31
31 -
 32
32 -
33
-
34
-
35
-
36
-
37
-
38
-
39
-
40
-
41
-
42
-
43
-
44
-
45
-
46
-
47
-
48
-
49
-
50
-
51
-
52
-
53
-
54
-
55
-
56
-
57
-
58
-
59
-
60
-
61
-
62
-
63
-
64
-
65
-
66
-
67
-
68
-
69
-
70
-
71
-
72
-
73
-
74
-
75
-
76
-
77
-
78
-
79
-
80
-
81
-
82
-
83
-
84
-
85
-
86
-
87
-
88
-
89
-
90
-
91
-
92
-
93
-
94
-
95
-
96
-
97
-
98
-
99
-
100
-
101
-
102
-
103
-
104
-
105
-
106
-
107
-
108
-
109
-
110
-
111
-
112
-
113
-
114
-
115
-
116
-
117
-
118
-
119
-
120
-
121
-
122
-
123
-
124
-
125
-
126
-
127
-
128
-
129
-
130
-
131
-
132
-
133
-
134
-
135
-
136
 |
 |
