Netgear WPN802v2 WPN802v2 Reference Manual - Page 25
Deploy the WPN802 and Verify Wireless Connectivity - wpn802 default ip
 |
View all Netgear WPN802v2 manuals
Add to My Manuals
Save this manual to your list of manuals |
Page 25 highlights
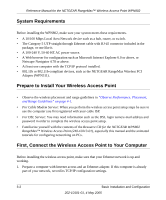
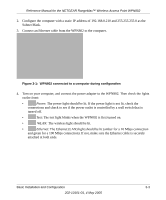
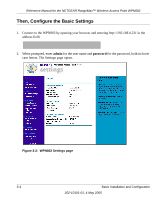
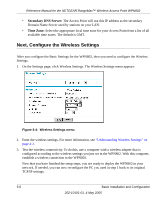
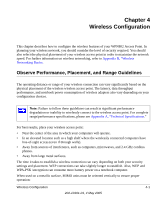
Reference Manual for the NETGEAR RangeMax™ Wireless Access Point WPN802 Deploy the WPN802 and Verify Wireless Connectivity When you have configured the Basic Settings and the Wireless Settings, then you can deploy the WPN802. 1. Disconnect the WPN802 and position it where you will deploy it. The best location is elevated, such as wall mounted or on the top of a cubicle, at the center of your wireless coverage area, and within line of sight of all the mobile devices. Use the plastic clips provided to place the WPN802 vertically if it is on a metal surface. Figure 3-5: WPN802 placed in a vertical orientation 2. Connect an Ethernet cable from your WPN802 Access Point to a LAN port on your router, switch, or hub. WPN802 Router Figure 3-6: WPN802 connected to a router Note: By default, the WPN802 is set with the DHCP client disabled. If your network uses dynamic IP addresses, you will need to change this setting. Basic Installation and Configuration 3-7 202-10101-01, 4 May 2005
-
 1
1 -
2
-
3
-
4
-
5
-
6
-
7
-
8
-
9
-
10
-
11
-
12
-
13
-
14
-
15
-
16
-
17
-
18
-
19
-
 20
20 -
 21
21 -
 22
22 -
 23
23 -
 24
24 -
 25
25 -
 26
26 -
 27
27 -
 28
28 -
 29
29 -
 30
30 -
31
-
32
-
33
-
34
-
35
-
36
-
37
-
38
-
39
-
40
-
41
-
42
-
43
-
44
-
45
-
46
-
47
-
48
-
49
-
50
-
51
-
52
-
53
-
54
-
55
-
56
-
57
-
58
-
59
-
60
-
61
-
62
-
63
-
64
-
65
-
66
-
67
-
68
-
69
-
70
-
71
-
72
-
73
-
74
-
75
-
76
-
77
-
78
-
79
-
80
-
81
-
82
-
83
-
84
-
85
-
86
-
87
-
88
 |
 |
