Oki B4600 B4400 4500 4550 4600 User Guide (English) - Page 62
Click Add Add the printer, for Mac OS X 10.1.5 or
 |
View all Oki B4600 manuals
Add to My Manuals
Save this manual to your list of manuals |
Page 62 highlights
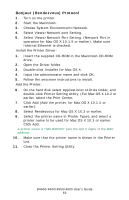
NOTE: Proceed to Install the Printer Driver if the IP address has been set in Windows or obtained automatically. 1. Turn on the printer. 2. Press the Menu button several time to display NETWORK. 3. Press the Item+ or Item- several times to display TCP/IP ENABLE. 4. Press the Select to set TCP/ENABLE (an * appears to the right. 5. Press Item+ or Item- to indicate IP1/4. 6. Press Value+ or Value- to display the first digit value of the IP address. 7. Press Select to add * to the value. 8. Repeat steps 3 to 5 to set IP 2/4 to IP 4/4, MASK 1/4 to Mask 4/4, (Subnet mask), Gate 1/4 to Gate 4/4, (Gateway address). 9. Press On-line. Install the Printer Driver: 1. Insert the supplied CD-ROM in the Macintosh CD-ROM drive. 2. Open the Driver folder. 3. Double-click Installer for Mac OS X. 4. Input the administrator name and click OK. 5. Follow the onscreen instructions to install. Add the Printer: 1. On the hard disk select Applications>Utilities folder, and double-click Printer Setting Utility. (For Mac OS X 10.2 or earlier, select the Print Center. 2. Click Add (Add the printer, for Mac OS X 10.1.5 or earlier). 3. Click Other Printers. 4. Select OKI TCP/IP. 5. Select the printer name and click Add. 6. Make sure that the printer name is shown in the Printer List. 7. Close the Printer Setting Utility. B4400/4500/4550/4600 User's Guide 62
-
 1
1 -
2
-
3
-
4
-
5
-
6
-
7
-
8
-
9
-
10
-
11
-
12
-
13
-
14
-
15
-
16
-
17
-
18
-
19
-
20
-
21
-
22
-
23
-
24
-
25
-
26
-
27
-
28
-
29
-
30
-
31
-
32
-
33
-
34
-
35
-
36
-
37
-
38
-
39
-
40
-
41
-
42
-
43
-
44
-
45
-
46
-
47
-
48
-
49
-
50
-
51
-
52
-
53
-
54
-
55
-
56
-
 57
57 -
 58
58 -
 59
59 -
 60
60 -
 61
61 -
 62
62 -
 63
63 -
 64
64 -
 65
65 -
 66
66 -
 67
67 -
68
-
69
-
70
-
71
-
72
-
73
-
74
-
75
-
76
-
77
-
78
-
79
-
80
-
81
-
82
-
83
-
84
-
85
-
86
-
87
-
88
-
89
-
90
-
91
-
92
-
93
-
94
-
95
-
96
-
97
-
98
-
99
-
100
-
101
-
102
-
103
-
104
-
105
-
106
 |
 |
