Olympus SP-550UZ SP-550UZ Instruction Manual (English) - Page 17
Arrow pad, button
 |
UPC - 050332159853
View all Olympus SP-550UZ manuals
Add to My Manuals
Save this manual to your list of manuals |
Page 17 highlights
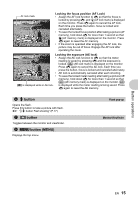
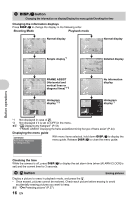
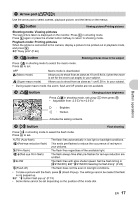
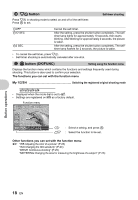
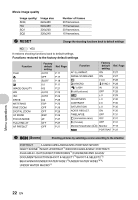
Button operations a Arrow pad (124 3) Use the arrow pad to select scenes, playback picture, and the items on the menus. b q button Viewing pictures/Printing pictures Shooting mode: Viewing pictures The last picture taken is displayed on the monitor. Press q in shooting mode. Press q again or press the shutter button halfway to return to shooting mode. Playback mode: Printing pictures When the printer is connected to the camera, display a picture to be printed out in playback mode, and press q. g"Easy print" (P.46) c 4& button Shooting pictures close to the subject Press 4& in shooting mode to select the macro mode. Press o to set. OFF & (Macro mode) % (Super macro mode) Macro mode is deactivated. Allows you to shoot from as close as 10 cm/3.94 in. (when the zoom is set for the zoom-out angle) to your subject. Allows you to shoot from as close as 1 cm/0.39 in. to your subject. • During super macro mode, the zoom, flash and AF predict are not available. d 1 F button P 1/1000 F8.0 +2.0 Changing picture brightness Press 1 F in shooting mode, set using 4 3 then press o. • Adjustable from -2.0 EV to +2.0 EV. [] 3 : Brighten. 4 : Darken. SET OK Activate the setting contents. e 3# button Flash shooting Press 3# in shooting mode to select the flash mode. Press o to set. AUTO (Auto-flash) The flash fires automatically in low light or backlight conditions. !(Red-eye reduction flash) This emits pre-flashes to reduce the occurrence of red-eye in your pictures. #(Fill-in flash) The flash fires regardless of the available light. H(Red-eye fill-in flash) The flash always fires after pre-flashes for red-eye reduction are emitted. #SLOW The flash fires with slow shutter speed. Set the flash timing in [#SYNCRO]. g"#SYNCRO Selecting the flash timing" (P.28) $(Flash off) The flash does not fire even in low light conditions. • To take a picture with the flash, press # (Flash Popup). The settings cannot be made if the flash is not popped up. g "# button Flash pop-up" (P.15) • Some items cannot be set depending on the position of the mode dial. EN 17
-
 1
1 -
2
-
3
-
4
-
5
-
6
-
7
-
8
-
9
-
10
-
11
-
 12
12 -
 13
13 -
 14
14 -
 15
15 -
 16
16 -
 17
17 -
 18
18 -
 19
19 -
 20
20 -
 21
21 -
 22
22 -
23
-
24
-
25
-
26
-
27
-
28
-
29
-
30
-
31
-
32
-
33
-
34
-
35
-
36
-
37
-
38
-
39
-
40
-
41
-
42
-
43
-
44
-
45
-
46
-
47
-
48
-
49
-
50
-
51
-
52
-
53
-
54
-
55
-
56
-
57
-
58
-
59
-
60
-
61
-
62
-
63
-
64
-
65
-
66
-
67
-
68
-
69
-
70
-
71
-
72
-
73
-
74
-
75
-
76
-
77
-
78
-
79
-
80
-
81
-
82
-
83
-
84
-
85
-
86
-
87
-
88
-
89
-
90
-
91
-
92
-
93
-
94
-
95
-
96
-
97
-
98
-
99
-
100
 |
 |
