Olympus SP-550UZ SP-550UZ Instruction Manual (English) - Page 29
Panorama - parts
 |
UPC - 050332159853
View all Olympus SP-550UZ manuals
Add to My Manuals
Save this manual to your list of manuals |
Page 29 highlights
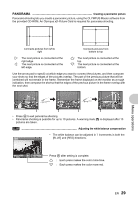
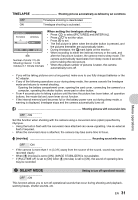
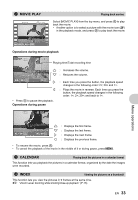
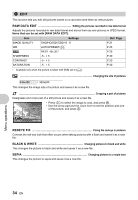
PANORAMA Creating a panoramic picture Panorama shooting lets you create a panoramic picture, using the OLYMPUS Master software from the provided CD-ROM. An Olympus xD-Picture Card is required for panorama shooting. Connects pictures from left to right Connects pictures from bottom to top 3: The next picture is connected at the right edge. 4: The next picture is connected at the left edge. 1 : The next picture is connected at the top. 2: The next picture is connected at the bottom. Use the arrow pad to specify at which edge you want to connect the pictures, and then compose your shots so that the edges of the pictures overlap. The part of the previous picture that will be combined will not remain in the frame. Remember the frame displayed on the monitor as a rough indication, then compose the shot so that the edges of the previous picture in the frame overlap with the next shot. Menu operations • Press o to exit panorama shooting. • Panorama shooting is possible for up to 10 pictures. A warning mark g is displayed after 10 pictures are taken. Adjusting the white balance compensation • The white balance can be adjusted in 7 increments in both the > [BLUE] and [RED] directions. BLUE BACK MENU RED SET OK Press o after setting is complete. 1 : Each press makes the color more blue. 2 : Each press makes the color more red. EN 29
-
 1
1 -
2
-
3
-
4
-
5
-
6
-
7
-
8
-
9
-
10
-
11
-
12
-
13
-
14
-
15
-
16
-
17
-
18
-
19
-
20
-
21
-
22
-
23
-
 24
24 -
 25
25 -
 26
26 -
 27
27 -
 28
28 -
 29
29 -
 30
30 -
 31
31 -
 32
32 -
 33
33 -
 34
34 -
35
-
36
-
37
-
38
-
39
-
40
-
41
-
42
-
43
-
44
-
45
-
46
-
47
-
48
-
49
-
50
-
51
-
52
-
53
-
54
-
55
-
56
-
57
-
58
-
59
-
60
-
61
-
62
-
63
-
64
-
65
-
66
-
67
-
68
-
69
-
70
-
71
-
72
-
73
-
74
-
75
-
76
-
77
-
78
-
79
-
80
-
81
-
82
-
83
-
84
-
85
-
86
-
87
-
88
-
89
-
90
-
91
-
92
-
93
-
94
-
95
-
96
-
97
-
98
-
99
-
100
 |
 |
