Olympus SP-550UZ SP-550UZ Instruction Manual (English) - Page 67
Selecting the appropriate image quality, Restoring default settings, Confirming the exposure when
 |
UPC - 050332159853
View all Olympus SP-550UZ manuals
Add to My Manuals
Save this manual to your list of manuals |
Page 67 highlights
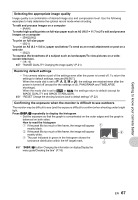
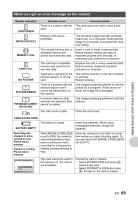
Getting to know your camera better Selecting the appropriate image quality Image quality is a combination of desired image size and compression level. Use the following examples to help determine the optimal record mode when shooting. To edit and process images on a computer • [RAW] To make high quality prints on full-size paper such as A3 (16.5 × 11.7 in.)/To edit and process images on a computer • [SHQ] [HQ] To print on full-size paper • [SQ1] To print on A5 (8.3 × 5.8 in.) paper and below/ To send as an e-mail attachment or post on a web site • [SQ2] To express the broadness of a subject such as landscapes/To view pictures on a widescreen television. • [16 : 9] g "IMAGE QUALITY Changing the image quality" (P.21) Restoring default settings • This camera retains a part of the settings even after the power is turned off. To return the settings to default settings, execute [RESET]. When the mode dial is set to P, A, S, M or n: the settings are retained even after the power is turned off (except for the settings of Y, PANORAMA and TIMELAPSE shootings). When the mode dial is set to h or s: the settings return to default (except for IMAGE QUALITY and IMAGE STABILIZER). g "RESET Change the shooting functions back to default settings" (P.22) Confirming the exposure when the monitor is difficult to see outdoors The monitor may be difficult to see (and the exposure difficult to confirm) when shooting under bright light. Press DISP./E repeatedly to display the histogram • Set the exposure so that the graph is concentrated on the outer edges and the graph is balanced on both sides. How to read the histogram 1 If the peak fills too much of the frame, the image will appear mostly black. 2 If the peak fills too much of the frame, the image will appear mostly white. 3 The part indicated in green in the histogram shows the luminance distribution within the AF target mark. g "DISP./E button Changing the information on display/Display the menu guide/Checking the time" (P.16) EN 67
-
 1
1 -
2
-
3
-
4
-
5
-
6
-
7
-
8
-
9
-
10
-
11
-
12
-
13
-
14
-
15
-
16
-
17
-
18
-
19
-
20
-
21
-
22
-
23
-
24
-
25
-
26
-
27
-
28
-
29
-
30
-
31
-
32
-
33
-
34
-
35
-
36
-
37
-
38
-
39
-
40
-
41
-
42
-
43
-
44
-
45
-
46
-
47
-
48
-
49
-
50
-
51
-
52
-
53
-
54
-
55
-
56
-
57
-
58
-
59
-
60
-
61
-
 62
62 -
 63
63 -
 64
64 -
 65
65 -
 66
66 -
 67
67 -
 68
68 -
 69
69 -
 70
70 -
 71
71 -
 72
72 -
73
-
74
-
75
-
76
-
77
-
78
-
79
-
80
-
81
-
82
-
83
-
84
-
85
-
86
-
87
-
88
-
89
-
90
-
91
-
92
-
93
-
94
-
95
-
96
-
97
-
98
-
99
-
100
 |
 |
