Olympus SP-550UZ SP-550UZ Instruction Manual (English) - Page 30
Sharpness, Contrast, Saturation, Noise Reduct. - timelapse does not work
 |
UPC - 050332159853
View all Olympus SP-550UZ manuals
Add to My Manuals
Save this manual to your list of manuals |
Page 30 highlights
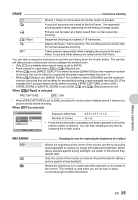
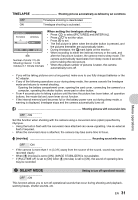
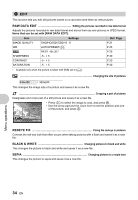
SHARPNESS Adjusting the sharpness of the image CAMERA MENU 1R 2 PANORAMA 3> 4 SHARPNESS 0 5 CONTRAST BACK MENU SET OK 1 (Toward +) 2 (Toward -) : The image contours are emphasized, making the image appear sharper and more vivid. Use this setting when you want to print pictures. If you adjust the sharpness too far toward +, noise may become conspicuous in the picture. : The image contours are softened. Use this setting when you want to edit images on a computer. CONTRAST Adjusting the contrast of the image CAMERA MENU 1R 2 PANORAMA 3> 4 SHARPNESS 5 CONTRAST 0 BACK MENU SET OK 1 (Toward +) 2 (Toward -) : The light and dark areas are defined more clearly, making the image look crisper. : The light and dark areas become less defined, giving the image a softer impression. Use this setting when you want to edit images on a computer. SATURATION Adjusting the saturation of the image CAMERA MENU 1 SATURATION 0 2 NOISE REDUCT. 3 TIMELAPSE 4 5 BACK MENU SET OK 1 (Toward +) 2 (Toward -) : Colors become stronger. : Colors become weaker. NOISE REDUCT Reducing the noise during long exposures OFF Noise is not reduced. Noise may be conspicuous at slow shutter speeds. ON Noise is reduced. Shooting time takes twice as long as usual. Shooting is not available during noise reduction. Noise reduction can only be used when the shutter speed is slower than 1/2 sec. • This function may not work effectively with some shooting conditions or subjects. Menu operations 30 EN
-
 1
1 -
2
-
3
-
4
-
5
-
6
-
7
-
8
-
9
-
10
-
11
-
12
-
13
-
14
-
15
-
16
-
17
-
18
-
19
-
20
-
21
-
22
-
23
-
24
-
 25
25 -
 26
26 -
 27
27 -
 28
28 -
 29
29 -
 30
30 -
 31
31 -
 32
32 -
 33
33 -
 34
34 -
 35
35 -
36
-
37
-
38
-
39
-
40
-
41
-
42
-
43
-
44
-
45
-
46
-
47
-
48
-
49
-
50
-
51
-
52
-
53
-
54
-
55
-
56
-
57
-
58
-
59
-
60
-
61
-
62
-
63
-
64
-
65
-
66
-
67
-
68
-
69
-
70
-
71
-
72
-
73
-
74
-
75
-
76
-
77
-
78
-
79
-
80
-
81
-
82
-
83
-
84
-
85
-
86
-
87
-
88
-
89
-
90
-
91
-
92
-
93
-
94
-
95
-
96
-
97
-
98
-
99
-
100
 |
 |
