Olympus SP-550UZ SP-550UZ Instruction Manual (English) - Page 35
Frame, Label, Calendar, Layout
 |
UPC - 050332159853
View all Olympus SP-550UZ manuals
Add to My Manuals
Save this manual to your list of manuals |
Page 35 highlights
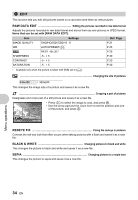
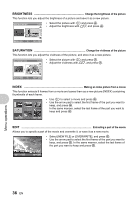
FRAME Add a frame to your picture This function lets you select a frame, integrate the frame with an image, and save it as a new picture. FRAME O W T MOVE SET OK • Select a frame with 4 3 and press o. • Select the picture to be synthesized with the frame with 4 3, and press o. (Press 12 to turn the picture 90 degrees clockwise or 90 degrees counterclockwise.) • Use the arrow pad and the zoom lever to adjust the position and size of the picture, and press o. LABEL Add a label to your picture This function lets you select a label, integrate the label with an image, and save it as a new picture. LABEL SET OK • Select the picture with 4 3 and press o. • Select the label with 4 3, and press o. (Press 12 to rotate the picture 90° clockwise or counterclockwise.) • Use the arrow pad and the zoom lever to adjust the position and size of the picture, and press o. • Set the color of the title with the arrow pad, and press o. CALENDAR Create a calendar print with your picture This function lets you select a calendar format, integrate the calendar with a picture, and save it as a new file. CALENDAR • Select the picture with 4 3 and press o. • Select the calendar with 4 3, and press o. (Press 12 to rotate the picture 90° clockwise or counterclockwise.) • Set the date of the calendar, and press o. SET OK LAYOUT Creating an index layout of pictures ALL IMAGES CALENDAR SEL. IMAGE All pictures in the internal memory or the card are added to the layout. A monthly calendar appears and the pictures you want to make layout are selected by the date. Pictures that you want to make layout are specified one by one. L AY O U T ALL IMAGES CALENDER SEL.IMAGE • Press 4 3 to select a layout, and press o. • Select the type of layout picture, and press o. • Select the pictures and press o. (When [SEL. IMAGE] is selected in [LAYOUT] screen, press 12 to rotate the picture 90° clockwise or counterclockwise.) BACK MENU SET OK Menu operations EN 35
-
 1
1 -
2
-
3
-
4
-
5
-
6
-
7
-
8
-
9
-
10
-
11
-
12
-
13
-
14
-
15
-
16
-
17
-
18
-
19
-
20
-
21
-
22
-
23
-
24
-
25
-
26
-
27
-
28
-
29
-
 30
30 -
 31
31 -
 32
32 -
 33
33 -
 34
34 -
 35
35 -
 36
36 -
 37
37 -
 38
38 -
 39
39 -
 40
40 -
41
-
42
-
43
-
44
-
45
-
46
-
47
-
48
-
49
-
50
-
51
-
52
-
53
-
54
-
55
-
56
-
57
-
58
-
59
-
60
-
61
-
62
-
63
-
64
-
65
-
66
-
67
-
68
-
69
-
70
-
71
-
72
-
73
-
74
-
75
-
76
-
77
-
78
-
79
-
80
-
81
-
82
-
83
-
84
-
85
-
86
-
87
-
88
-
89
-
90
-
91
-
92
-
93
-
94
-
95
-
96
-
97
-
98
-
99
-
100
 |
 |
