Olympus SP-550UZ SP-550UZ Instruction Manual (English) - Page 48
Select [CUSTOM PRINT] and press
 |
UPC - 050332159853
View all Olympus SP-550UZ manuals
Add to My Manuals
Save this manual to your list of manuals |
Page 48 highlights
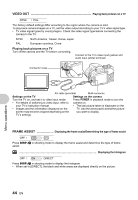
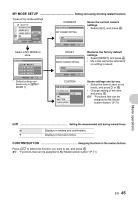
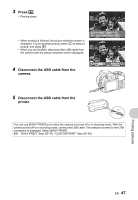
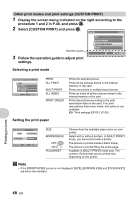
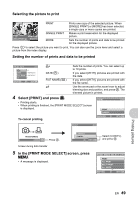
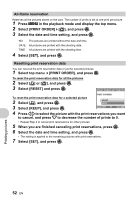
Other print modes and print settings (CUSTOM PRINT) 1 Display the screen being indicated on the right according to the procedure 1 and 2 in P.46, and press o. 2 Select [CUSTOM PRINT] and press o. USB [IN] Operation guide 3 Follow the operation guide to adjust print settings. PC EASY PRINT CUSTOM PRINT EXIT SET OK Selecting a print mode PRINT MODE SELECT [IN] PRINT ALL PRINT MULTI PRINT ALL INDEX EXIT MENU SET OK PRINT ALL PRINT MULTI PRINT ALL INDEX PRINT ORDER Prints the selected picture. Prints all the pictures stored in the internal memory or the card. Prints one picture in multiple layout format. Prints an index of all the pictures stored in the internal memory or the card. Prints the pictures according to the print reservation data on the card. If no print reservations have been made, this option is not available. g"Print settings (DPOF)" (P.50) Setting the print paper P R I N T PA P E R [IN] SIZE BORDERLESS STANDARD STANDARD BACK MENU SET OK SIZE BORDERLESS OFF ( ) ON ( ) PICS/SHEET Choose from the available paper sizes on your printer. Select with or without borders. In [MULTI PRINT] mode, you cannot print with a border. The picture is printed inside a blank frame. The picture is printed filling the entire page. Available in [MULTI PRINT] mode only. The number of prints that can be printed vary depending on the printer. Note • If the [PRINTPAPER] screen is not displayed, [SIZE], [BORDERLESS] and [PICS/SHEET] are set to the standard. Printing pictures 48 EN
-
 1
1 -
2
-
3
-
4
-
5
-
6
-
7
-
8
-
9
-
10
-
11
-
12
-
13
-
14
-
15
-
16
-
17
-
18
-
19
-
20
-
21
-
22
-
23
-
24
-
25
-
26
-
27
-
28
-
29
-
30
-
31
-
32
-
33
-
34
-
35
-
36
-
37
-
38
-
39
-
40
-
41
-
42
-
 43
43 -
 44
44 -
 45
45 -
 46
46 -
 47
47 -
 48
48 -
 49
49 -
 50
50 -
 51
51 -
 52
52 -
 53
53 -
54
-
55
-
56
-
57
-
58
-
59
-
60
-
61
-
62
-
63
-
64
-
65
-
66
-
67
-
68
-
69
-
70
-
71
-
72
-
73
-
74
-
75
-
76
-
77
-
78
-
79
-
80
-
81
-
82
-
83
-
84
-
85
-
86
-
87
-
88
-
89
-
90
-
91
-
92
-
93
-
94
-
95
-
96
-
97
-
98
-
99
-
100
 |
 |
