Onkyo TX-NR809 Owner Manual - Page 57
Audio Selector - reset
 |
View all Onkyo TX-NR809 manuals
Add to My Manuals
Save this manual to your list of manuals |
Page 57 highlights
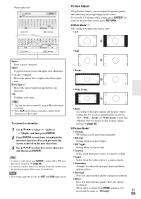
■ Saturation*1*3*5 ` -50 to 0 to +50 With this setting you can adjust saturation. "-50" is the weakest color. "+50" is the strongest color. ■ Color Temperature*3*5 ` Warm ` Normal ` Cool With this setting you can adjust the color temperature. ■ Gamma*3*5 ` -3 to 0 to +3 Adjust the balance of incoming picture R (red), G (green), and B (blue) color data signal to the output color data signal. ■ Red Brightness*3*5 ` -50 to 0 to +50 With this setting you can adjust the picture red brightness. "-50" is the darkest. "+50" is the brightest. ■ Red Contrast*3*5 ` -50 to 0 to +50 With this setting you can adjust red contrast. "-50" is the least. "+50" is the greatest. ■ Green Brightness*3*5 ` -50 to 0 to +50 With this setting you can adjust the picture green brightness. "-50" is the darkest. "+50" is the brightest. ■ Green Contrast*3*5 ` -50 to 0 to +50 With this setting you can adjust green contrast. "-50" is the least. "+50" is the greatest. ■ Blue Brightness*3*5 ` -50 to 0 to +50 With this setting you can adjust the picture blue brightness. "-50" is the darkest. "+50" is the brightest. ■ Blue Contrast*3*5 ` -50 to 0 to +50 With this setting you can adjust blue contrast. "-50" is the least. "+50" is the greatest. Note • "Picture Adjust" cannot be used with the NET input selector. *1 This procedure can also be performed on the remote controller by using the Home menu (➔ page 40). *2 When a 3D video source is input, "Wide Mode" is fixed to "Full". *3 When the "Picture Mode" setting is set to anything other than "Custom", this setting cannot be used. *4 If the "Resolution" setting is set to "4K Upscaling" (➔ pages 45, 56), this setting is fixed to "Off". *5 Press CLR if you want to reset to the default value. *6 If you are using the analog RGB input, this setting is not available. *7 When the "Noise Reduction" setting is set to anything other than "Off", this setting cannot be selected. Audio Selector You can set priorities of audio output when there are both digital and analog inputs. ■ Audio Selector ` ARC: The audio signal from your TV tuner can be sent to the HDMI OUT MAIN of the AV receiver.*1 With this selection, the TV's audio can be automatically selected as a priority among other assignments. ` HDMI: This can be selected when HDMI IN has been assigned as an input source. If both HDMI (HDMI IN) and digital audio inputs (COAXIAL IN or OPTICAL IN) have been assigned, HDMI input is automatically selected as a priority. ` COAXIAL: This can be selected when COAXIAL IN has been assigned as an input source. If both coaxial and HDMI inputs have been assigned, coaxial input is automatically selected as a priority. ` OPTICAL: This can be selected when OPTICAL IN has been assigned as an input source. If both optical and HDMI inputs have been assigned, optical input is automatically selected as a priority. ` Multich: The AV receiver always outputs analog signals from multichannel analog input. ` Analog: The AV receiver always outputs analog signals. Note • The setting is stored individually for each input selector. • This setting can be made only for the input source that is assigned as HDMI IN, COAXIAL IN, or OPTICAL IN. • The "Audio Selector" settings cannot be used with the NET, USB and PORT (with connected component) input selectors. • "Multich" can be selected only when the selector is set to "BD/DVD". • When using the Whole House Mode, "Audio Selector" is fixed to "Analog". *1 You can select "ARC" if you select the TV/CD input selector. But you cannot if you've selected "Off" in the "Audio Return Channel" setting (➔ page 61). En 57
-
 1
1 -
2
-
3
-
4
-
5
-
6
-
7
-
8
-
9
-
10
-
11
-
12
-
13
-
14
-
15
-
16
-
17
-
18
-
19
-
20
-
21
-
22
-
23
-
24
-
25
-
26
-
27
-
28
-
29
-
30
-
31
-
32
-
33
-
34
-
35
-
36
-
37
-
38
-
39
-
40
-
41
-
42
-
43
-
44
-
45
-
46
-
47
-
48
-
49
-
50
-
51
-
 52
52 -
 53
53 -
 54
54 -
 55
55 -
 56
56 -
 57
57 -
 58
58 -
 59
59 -
 60
60 -
 61
61 -
 62
62 -
63
-
64
-
65
-
66
-
67
-
68
-
69
-
70
-
71
-
72
-
73
-
74
-
75
-
76
-
77
-
78
-
79
-
80
-
81
-
82
-
83
-
84
-
85
-
86
-
87
-
88
-
89
-
90
-
91
-
92
-
93
-
94
-
95
-
96
-
97
-
98
-
99
-
100
 |
 |
