8
Contents
Read this first ! (for BT-LH1850P)
...........................................
2
Read this first ! (for BT-LH1850E)
...........................................
4
Transportation precautions
.....................................................
6
About this instruction manual
.................................................
7
Precautions for Use
..................................................................
7
Standard accessories · Optional units
...................................
8
About PDF manuals
.................................................................
9
Opening the Operating Instructions
.........................................
9
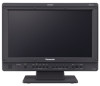
Outline
.......................................................................................
9
Dimensions
.............................................................................
10
Controls and Their Functions
...............................................
11
Video monitor
........................................................................
11
Front panel
............................................................................
11
Rear panel
.............................................................................
12
Power supply
..........................................................................
13
Connecting the power cable
..................................................
13
Adjusting monitor angle
........................................................
13
Detaching and Attaching the Tilt Stand
...............................
14
Detaching the tilt stand
..........................................................
14
Attaching the tilt stand
...........................................................
14
On-screen Display
..................................................................
14
Operating status display
........................................................
14
Main menu, FUNCTION menu,
INPUT SELECT menu indications
.....................................
15
Picture adjusting menu
..........................................................
15
Audio volume display
............................................................
15
Sharpness display
.................................................................
16
FUNCTION display
................................................................
16
Audio level meter display
......................................................
16
Time code (TC) display
.........................................................
17
Closed caption (CC) display
..................................................
17
In monitor display (IMD) display
............................................
17
How to Use the On Screen Menu
..........................................
18
Main menu
.............................................................................
18
FUNCTION menu
..................................................................
18
INPUT SELECT menu
...........................................................
18
Picture adjusting menu
..........................................................
19
Audio volume
.........................................................................
19
User Data
.................................................................................
20
Saving user data
...................................................................
20
Loading user data
..................................................................
20
Main menu
...............................................................................
21
Menu configuration
................................................................
21
MARKER
...............................................................................
22
Types of MARKER
................................................................
24
VIDEO CONFIG
....................................................................
25
SYSTEM CONFIG
.................................................................
27
Performing AUTO CALIBRATION
.........................................
29
RESET operation
..................................................................
30
FUNCTION
............................................................................
30
GPI
........................................................................................
37
INPUT SELECT
.....................................................................
38
AUDIO
...................................................................................
39
DISPLAY SETUP
..................................................................
40
CONTROL
.............................................................................
41
HOURS METER
....................................................................
41
Setting Item Restrictions
.......................................................
42
REMOTE Specifications
.........................................................
44
GPI input terminal
..................................................................
44
RS-232C input terminal
.........................................................
45
RS-485 input/output terminal
.................................................
46
Error and Warning Displays
..................................................
51
Maintenance
............................................................................
51
Specifications
.........................................................................
52
INDEX
.......................................................................................
56
Standard accessories · Optional units
±
Standard accessories
Power cable x 1(BT-LH1850P)
Power cable x 2(BT-LH1850E)
CD-ROM x 1
• The unit is shipped with the following accessories attached.
Tilt stand x 1
Tilt stand screws x 4
Protective panel mounting screws x 8, M3, 8 mm long
(The customer can use these screws for permanent attachment of a protective panel designed for the monitor.)
(Tighten the screws to a tightening torque not exceeding 30 N cm)
• After unpacking the monitor, dispose of the AC cord cap (BT-LH1850E only) and packaging material in an appropriate manner.
±
Optional units
• BT-WMA17G wall mount adapter (Leave installation of the wall mount adaptor to authorized personnel.)
 1
1 3
3 4
4 5
5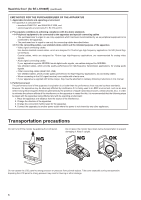 6
6 7
7 8
8 9
9 10
10 11
11 12
12 13
13

