Panasonic DMRE500 DMRE500 User Guide
Panasonic DMRE500 - DVD RECORDER DECK Manual
 |
View all Panasonic DMRE500 manuals
Add to My Manuals
Save this manual to your list of manuals |
Panasonic DMRE500 manual content summary:
- Panasonic DMRE500 | DMRE500 User Guide - Page 1
carefully. Before connecting, operating or adjusting this product, please read these instructions completely. Please keep this manual for future reference. Region number supported by this unit Region numbers are allocated to DVD players and software according to where they are sold. ≥The - Panasonic DMRE500 | DMRE500 User Guide - Page 2
operating and maintenance (servicing) instructions in the literature limits for a Class B digital device, pursuant to Part 15 Panasonic Corporation of North America One Panasonic Way Secaucus, NJ, 07094 USA Telephone No.: 1-800-211-7262 IMPORTANT SAFETY INSTRUCTIONS Read these operating instructions - Panasonic DMRE500 | DMRE500 User Guide - Page 3
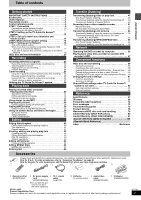
Recording 24 Timer recording 25 Using the TV Guide On ScreenTM system to make timer recordings . . 25 Manually programming timer recordings 26 Using VCR Plusi 68 Frequently asked questions 70 Error messages 72 Troubleshooting guide 73 Product Service 78 Maintenance/HDD, disc and card handling - Panasonic DMRE500 | DMRE500 User Guide - Page 4
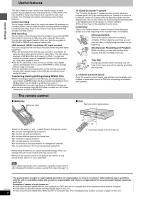
Panasonic DVD recorder for more video playback choice. ≥The SD/PC card slots of this unit let you transfer (dub) digital camera service may not be available in some areas. Instant play There is no need to rewind or search forward. Direct Navigator guides material due to a problem with the unit or - Panasonic DMRE500 | DMRE500 User Guide - Page 5
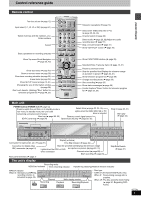
TOP MENU SUB MENU ENTER RETURN PROG/CHECK DISPLAY TIME SLIP TV GUIDE SETUP ERASE REC MODE REC Info DUBBING CHAPTER STATUS Television operations (➡ ) Display (➡ below) Time Slip indicator (➡ page 24) Connection for digital video (DV) camcorder (➡ page 51) Skip the specified time/Display the - Panasonic DMRE500 | DMRE500 User Guide - Page 6
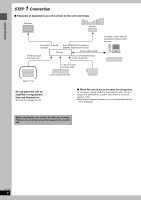
Amplifier From OUT1 or OUT2 terminals From AUDIO OUT terminals or DIGITAL AUDIO OUT terminal This unit Via the LAN terminal To IN3 IN1 (L1) input terminals (rear) Computer or other network compatible Panasonic DVD recorder Cable TV box Video cassette recorder Camcorder Do not place - Panasonic DMRE500 | DMRE500 User Guide - Page 7
off all equipment and read the appropriate operating instructions. ≥Peripheral equipment and optional cables sold PR IN1 (L1) IN3 (L3) OUT1 OUT2 G-LINK COMPONENT VIDEO OUT (480p/480i) OPTICAL DIGITAL AUDIO OUT (PCM/BITSTREAM) RF OUT VHF/UHF N Cooling fan O AC power supply cord Connect - Panasonic DMRE500 | DMRE500 User Guide - Page 8
service, the program guide in this unit will not receive program listings or channel information. Without this information, program-based recordings cannot be made. However, recordings can still be set manually OUT (480p/480i) OPTICAL DIGITAL AUDIO OUT (PCM/BITSTREAM) . instructions regarding - Panasonic DMRE500 | DMRE500 User Guide - Page 9
. There are two types of connection, digital and analog. ∫ Analog connection ∫ Digital connection To enjoy multi-channel surround sound suit the antenna terminals on your television. Refer to the television's operating instructions. ∫ A twin lead and coaxial plug terminal VHF/UHF band separator - Panasonic DMRE500 | DMRE500 User Guide - Page 10
that supports 100BASE-TX. ≥It may not be possible to connect this unit to the Internet depending upon router security settings. Visit Panasonic's homepage http://panasonic.co.jp/pavc/global/cs/dvd/index.html ≥Refer to the router's operating instructions or contact your Internet service provider for - Panasonic DMRE500 | DMRE500 User Guide - Page 11
S-VIDEO COMPONENT VIDEO OUT (480p/480i) OPTICAL DIGITAL AUDIO OUT (PCM/BITSTREAM) LAN cable (not . e.g., To router, other network compatible Panasonic DVD recorder, etc IN1 (L1) IN3 ∫ Service support It for any problems incurred as mentioned in these operating instructions are fulfilled, some - Panasonic DMRE500 | DMRE500 User Guide - Page 12
service, the program guide in this unit will not receive program listings or channel information. Without this information, program-based recordings cannot be made. However, recordings can still be set manually assistance is needed, In the U.S.A.: Contact Panasonic's Customer Call Center at 1-800-211 - Panasonic DMRE500 | DMRE500 User Guide - Page 13
one of these. Getting started To use immediately (Manual Clock Setting) Set the clock manually. Please note that the program list is not displayed OR USE OF ANY INFORMATION, EQUIPMENT, OR SERVICES RELATING TO THE TV GUIDE ON SCREEN SYSTEM. The TV Guide On Screen and VCR Plusr systems are protected - Panasonic DMRE500 | DMRE500 User Guide - Page 14
MENU SUB MENU ENTER RETURN PROG/CHECK DISPLAY TIME SLIP TV GUIDE SETUP ERASE REC MODE REC Info DUBBING CHAPTER STATUS TV code with the numbered buttons. e.g., 01: [0] ➡ [1] Manufacturer and Code No. Panasonic National QUASAR 01, 02 PHILIPS (RC-5) RCA SAMSUNG 03 05 14, 18, 19 FISHER - Panasonic DMRE500 | DMRE500 User Guide - Page 15
MENU SUB MENU ENTER RETURN PROG/CHECK DISPLAY TIME SLIP TV GUIDE SETUP ERASE REC MODE REC Info DUBBING CHAPTER STATUS 3,4,2,1 ENTER no sound is output, the front speakers will automatically be set to support low-frequency reproduction. Connect front speakers that can reproduce the bass range - Panasonic DMRE500 | DMRE500 User Guide - Page 16
PROG/CHECK DISPLAY TIME SLIP TV GUIDE SETUP ERASE REC MODE REC Info Channel Set Up Disc Video Audio Display TV Screen Network Automatic (DHCP) Manual IP Address : 192. 168. 0. 14 Subnet Mask : 255. names When more than one network compatible Panasonic DVD recorder is connected on the Home Network - Panasonic DMRE500 | DMRE500 User Guide - Page 17
as the server. Preparation ≥Connect to the Home Network or another network compatible Panasonic DVD recorder. ≥Confirm "TCP/IP Settings" is set to "Automatic ( Client Unit No. Unit Name Model No. 01 Bedroom DMR-E500H Add manually Set Up Disc Video Audio Previous 01/01 Next The unit names of - Panasonic DMRE500 | DMRE500 User Guide - Page 18
Please confirm the following were carried out correctly. 1 Check the computer's IP address (➡ right, step 4). 2 Enter the DVD recorder's IP address manually (➡ page 19). To check the computer's IP address On the computer 1 Click [start] ➡ [Control Panel]. Double-click [Network Connections]. 2 Right - Panasonic DMRE500 | DMRE500 User Guide - Page 19
After step 5 (➡ page 16) 1 Press [3, 4] to select "Manual" and press [ENTER]. SETUP Channel Set Up Disc Video Audio Display Gateway Enter the same set of digits as the computer's Default gateway (➡ page 18, step 4). DNS Server Enter the same set of digits as the computer's Preferred DNS server - Panasonic DMRE500 | DMRE500 User Guide - Page 20
digital camera etc. (➡ page 34, 52). ≥You can play and transfer (dub) MPEG4 motion pictures taken on a SD Video Camera recorded programs ≥We recommend using Panasonic discs and cards. DVD-R from as described in these operating instructions. Read the disc's instructions carefully. Regarding DVD-Audio - Panasonic DMRE500 | DMRE500 User Guide - Page 21
played Instructions ≥You can play and transfer (dub) still pictures taken on a digital camera etc. (➡ page 34, 52). ≥You can set the DPOF (Digital unit supports SD Memory Cards formatted in FAT 12 system and FAT 16 system based on SD Memory Card Specifications. ≥We recommend using a Panasonic SD - Panasonic DMRE500 | DMRE500 User Guide - Page 22
FUNCTIONS TOP MENU SUB MENU ENTER RETURN PROG/CHECK DISPLAY TIME SLIP TV GUIDE SETUP ERASE REC MODE REC Info DUBBING CHAPTER STATUS 1 3 AUDIO 1 RAM, remove the disc from the cartridge. ≥It is not possible to record digital broadcasts that allow "One time only recording" onto DVD-R or 2.8 GB DVD - Panasonic DMRE500 | DMRE500 User Guide - Page 23
5 Press [¥ REC] to start recording. HDD REC XP CH Recording will take place on open space on the HDD or on disc. Data will not be overwritten. ≥You cannot change the channel or recording mode during recording. ≥You can record while the unit is on standby for timer recording, but once the time - Panasonic DMRE500 | DMRE500 User Guide - Page 24
Recording Recording television programs Refer to the control reference on page 22. [HDD] [RAM] Playing while you are recording You can change the drive and play while recording on this unit. Also, while recording to the HDD or to DVD-RAM you can view the title being recorded from the beginning as - Panasonic DMRE500 | DMRE500 User Guide - Page 25
the cable TV box is turned on. To check, change or delete the program ➡ page 27 To utilize TV Guide On ScreenTM system, see also page 28. Notes on timer recording ➡ page 27 ∫ To cancel recording when recording list even if they are receivable. In this case set them manually (➡ page 26). RQT7394 25 - Panasonic DMRE500 | DMRE500 User Guide - Page 26
recording Refer to the control reference on page 25. Manually programming timer recordings 1 Press [PROG/CHECK]. MESSAGES recordings Press [3, 4, 2, 1] to select "RECORD" and repeat steps 2-4. 5 Press [TV GUIDE]. Returns to the television screen. ≥The unit is not off. To save power, turn the - Panasonic DMRE500 | DMRE500 User Guide - Page 27
To change the setting ➡ page 25, To change the setting, steps 3-4. 5 Press [TV GUIDE]. Returns to the television screen. ≥The unit is not off. To save power, turn the recorded ≥If you set DST (Daylight Saving Time) to ON when manually setting the clock (➡ page 13), timer recording may not work when - Panasonic DMRE500 | DMRE500 User Guide - Page 28
to the control reference on page 25. 1 Press [TV GUIDE]. Video window Navigation menu Panel Ads TODAY Last Channel SCHEDULE 8: Buttons SET TIMER: Show the manual timer recording screen (➡ page 26, Step 3) CANCEL: Cancel an entry on the manual timer recording screen FREQUENCY: Change - Panasonic DMRE500 | DMRE500 User Guide - Page 29
program or other information can be received and displayed by the TV Guide On ScreenTM system. If major changes to the program listings are scheduled be displayed in the message section. The serial number specific to your TV Guide On ScreenTM system can also be found on this screen. When there - Panasonic DMRE500 | DMRE500 User Guide - Page 30
DIRECT NAVIGATOR FUNCTIONS TOP MENU SUB MENU ENTER RETURN PROG/CHECK DISPLAY TIME SLIP TV GUIDE 3 4 2 1 ENTER 2; ;1 RETURN TIME SLIP SETUP ERASE REC MODE protected. Title that was not recorded due to recording protection (Digital broadcasts, etc.) t Title cannot be played [When transferring - Panasonic DMRE500 | DMRE500 User Guide - Page 31
Operations during play Stop Pause Search Skip Starting from a selected item Quick View [HDD] [RAM] The play speed can be increased without distorting the audio. Slow-motion [HDD] [RAM] [DVD-R] [DVD-A] (Motion picture parts only) [DVD-V] [VCD] Frame-by-frame [HDD] [RAM] [DVD-R] [DVD-A] (Motion - Panasonic DMRE500 | DMRE500 User Guide - Page 32
number each time you press the button. This allows you to change things like the soundtrack language (➡ page 38, Sound track). Sound track 1 ENG Î Digital 3/2.1ch e.g., English is selected. [Note] You cannot change the audio type in the following cases. ≥When a DVD-R disc is in the disc tray - Panasonic DMRE500 | DMRE500 User Guide - Page 33
NAVIGATOR FUNCTIONS TOP MENU SUB MENU ENTER RETURN PROG/CHECK DISPLAY TIME SLIP TV GUIDE SETUP ERASE REC MODE REC Info DUBBING CHAPTER STATUS 3 4 2 1 ENTER mp3". ≥At the time of recording, give folder and file names a 3-digit numeric prefix in the order you want them to play (this may not work - Panasonic DMRE500 | DMRE500 User Guide - Page 34
GUIDE HDD, DVD, SD/PC 3 4 2 1 ENTER ERASE SETUP ERASE REC MODE REC Info DUBBING CHAPTER STATUS STATUS Regarding still pictures (JPEG, TIFF) ≥Compatible formats:DCF§ compliant (Content recorded on a digital camera etc.) § Design rule for Camera JPEG is not supported. Inserting/Removing the - Panasonic DMRE500 | DMRE500 User Guide - Page 35
Playing back [HDD] [RAM] [SD] [PC] ≥You can use SD Memory Cards with capacities from 8 MB to 1 GB (➡ page 21). 1 Press [HDD], [DVD] or [SD/PC] to select the drive. ≥Each time you press [SD/PC]: SD card drive ,". PC card drive ≥On the main unit, press e.g., SD card drive [DRIVE SELECT] several - Panasonic DMRE500 | DMRE500 User Guide - Page 36
CM SKIP 0 SKIP SLOW/SEARCH STOP PAUSE PLAY/x1.3 DIRECT NAVIGATOR FUNCTIONS TOP MENU SUB MENU ENTER RETURN PROG/CHECK DISPLAY TIME SLIP TV GUIDE SETUP ERASE REC MODE REC Info DUBBING CHAPTER STATUS HDD, DVD, SD/PC CM SKIP 6 5 1 3 4 2 1 ENTER STATUS Regarding MPEG4 ≥Compatible formats: SD - Panasonic DMRE500 | DMRE500 User Guide - Page 37
Playing back Useful functions during MPEG4 title play Pause [HDD] [RAM] [SD] [PC] (Mobile hard disk only) Search [HDD] [RAM] [SD] [PC] (Mobile hard disk only) Skip [HDD] [RAM] [SD] [PC] (Mobile hard disk only) CM Skip [HDD] [RAM] [SD] [PC] (Mobile hard disk only) Play restarts from approximately a - Panasonic DMRE500 | DMRE500 User Guide - Page 38
FUNCTIONS TOP MENU SUB MENU ENTER RETURN PROG/CHECK DISPLAY TIME SLIP TV GUIDE SETUP ERASE REC MODE REC Info DUBBING CHAPTER STATUS FUNCTIONS 3 4 2 content. You cannot change when there is no recording. Audio attribute LPCM/PPCM/ÎDigital/DTS/MPEG: k (kHz): b (bit): ch (channel): Signal type - Panasonic DMRE500 | DMRE500 User Guide - Page 39
Audio menu-Change the sound effect V.S.S. [HDD] [RAM] [DVD-R] [DVD-V] (Dolby Digital, 2-channel or over only) Enjoy a surround-like effect if you are using two front 00 SP HDD Play back DIRECT NAVIGATOR Record TIMER RECORDING TV GUIDE EPG Dubbing / Edit Connect Set up DUBBING PLAY LIST NETWORK - Panasonic DMRE500 | DMRE500 User Guide - Page 40
SKIP 0 SKIP SLOW/SEARCH STOP PAUSE PLAY/x1.3 DIRECT NAVIGATOR FUNCTIONS TOP MENU SUB MENU ENTER RETURN PROG/CHECK DISPLAY TIME SLIP TV GUIDE SETUP ERASE REC MODE REC Info DUBBING CHAPTER STATUS HDD, DVD ; 1 3 4 2 1 ENTER RETURN [HDD] [RAM] [DVD-R] Title/Chapter Programs are recorded as - Panasonic DMRE500 | DMRE500 User Guide - Page 41
Editing Title operations Erase§ [HDD] [RAM] [DVD-R] Properties [HDD] [RAM] [DVD-R] Press [2, 1] to select "Erase" and press [ENTER]. ≥Once erased, the recorded contents are lost and cannot be restored. Make certain before proceeding. ≥The available recording time on DVD-R does not increase when - Panasonic DMRE500 | DMRE500 User Guide - Page 42
SEARCH STOP PAUSE PLAY/x1.3 HDD, DVD SUB MENU DIRECT NAVIGATOR FUNCTIONS TOP MENU SUB MENU ENTER RETURN PROG/CHECK DISPLAY TIME SLIP TV GUIDE SETUP ERASE REC MODE REC Info DUBBING CHAPTER STATUS FUNCTIONS 3 4 2 1 ENTER RETURN [HDD] [RAM] You can arrange the chapters (➡ page 40) to create - Panasonic DMRE500 | DMRE500 User Guide - Page 43
Editing and playing play lists/chapters 1 Press [FUNCTIONS]. 2 Press [3, 4, 2, 1] to select "PLAY LIST" and press [ENTER]. 3 Press [3, 4, 2, 1] to select the play list. To start play ➡ Press [ENTER]. To edit ➡ Step 4. PLAY LIST HDD 01 Play List View - - - - Play List View screen 10/27 Mon - Panasonic DMRE500 | DMRE500 User Guide - Page 44
Plus+ CM SKIP 0 SKIP SLOW/SEARCH STOP PAUSE PLAY/x1.3 DIRECT NAVIGATOR FUNCTIONS TOP MENU SUB MENU ENTER RETURN PROG/CHECK DISPLAY TIME SLIP TV GUIDE HDD, DVD, SD/PC 3 4 2 1 ENTER RETURN [HDD] [RAM] [SD] [PC] ≥You can use SD Memory Cards with capacities from 8 MB to 1 GB (➡ page 21 - Panasonic DMRE500 | DMRE500 User Guide - Page 45
Plus+ CM SKIP 0 SKIP SLOW/SEARCH STOP PAUSE PLAY/x1.3 DIRECT NAVIGATOR FUNCTIONS TOP MENU SUB MENU ENTER RETURN PROG/CHECK DISPLAY TIME SLIP TV GUIDE SETUP ERASE REC MODE REC Info DUBBING CHAPTER STATUS HDD, DVD, SD/PC 3 4 2 1 ENTER RETURN [HDD] [RAM] [SD] [PC] (Mobile hard disk only - Panasonic DMRE500 | DMRE500 User Guide - Page 46
SUB MENU ENTER RETURN PROG/CHECK DISPLAY TIME SLIP TV GUIDE SETUP ERASE REC MODE REC Info DUBBING CHAPTER STATUS 3,4,2,1 "Unit Name Setting" after step 2 on page 16. Select "Unit Name" in the "Add manually" screen on page 17. Name field: shows the text you have entered Enter Name _ Display in - Panasonic DMRE500 | DMRE500 User Guide - Page 47
multiple titles using FR recording mode ≥Play lists mixed with a variety of audio types (Dolby Digital and LPCM, etc.) ≥Titles that contain many erased segments. Regarding transferring (dubbing) of digital broadcasts that allow "One time only recording" You can transfer (dub) a recorded title to - Panasonic DMRE500 | DMRE500 User Guide - Page 48
0 SKIP SLOW/SEARCH STOP PAUSE PLAY/x1.3 DIRECT NAVIGATOR FUNCTIONS TOP MENU SUB MENU ENTER RETURN PROG/CHECK DISPLAY TIME SLIP TV GUIDE SETUP ERASE REC MODE REC Info DUBBING CHAPTER STATUS 1 FUNCTIONS 3,4,2,1 ENTER RETURN STATUS One Touch Transfer (dubbing) [HDD] > [RAM] [HDD] > [DVD - Panasonic DMRE500 | DMRE500 User Guide - Page 49
Transfer (Dubbing) 3 Press [3, 4, 2, 1] to select the titles or play lists and press [ENTER]. ≥To select a multiple number of items together, press [;] to add the check mark and press [ENTER] (➡ below, Multiple editing). ≥To show other pages (➡ below) ≥To edit the transferring (dubbing) list (➡ - Panasonic DMRE500 | DMRE500 User Guide - Page 50
Transfer (Dubbing) Transferring (dubbing) titles or play lists Refer to the control reference on page 48. Transferring (dubbing) a finalized DVD-R [DVD-V] > [HDD] While playing a disc, the content being played is transferred (dubbed) to the HDD according to the set time. ≥Operations and on - Panasonic DMRE500 | DMRE500 User Guide - Page 51
TOP MENU SUB MENU ENTER RETURN PROG/CHECK DISPLAY TIME SLIP TV GUIDE SETUP ERASE REC MODE REC Info DUBBING CHAPTER STATUS HDD, DVD AUDIO from "Select Audio CH for DV Input" in the SETUP menu (➡ page 63). Manual recording [HDD] [RAM] [DVD-R] Preparation ≥Connect a video cassette recorder to this - Panasonic DMRE500 | DMRE500 User Guide - Page 52
≥Only one piece of DV equipment (e.g., digital video camcorder) can be connected to the . If that does not work, follow the instructions for manual recording (➡ page 51). RQT7394 52 Transferring ] [SD] [PC] PROG/CHECK DISPLAY TIME SLIP TV GUIDE ≥You can use SD Memory Cards with capacities from 8 - Panasonic DMRE500 | DMRE500 User Guide - Page 53
∫ To register on a folder by folder basis 1 Press [3, 4] to select "Picture/Folder" and press [ENTER]. Dubbing Create a dubbing list. Cancel all 1 Dubbing direction SD card > DVD 2 Mode Picture High Speed Picture/Folder Picture Current capacity 4343MB No. Size Name New entry 2 Press [3, 4] - Panasonic DMRE500 | DMRE500 User Guide - Page 54
have been taken by a SD Video Camera, digital video camera etc, can be stored on HDD or check the equipment's operating instructions for more information. (Some recording a MPEG4 title on Panasonic SD Memory Card ≥Not all RETURN PROG/CHECK DISPLAY TIME SLIP TV GUIDE SETUP ERASE REC MODE REC Info - Panasonic DMRE500 | DMRE500 User Guide - Page 55
Transferring (dubbing) using the transferring (dubbing) list [HDD] [RAM] [SD] [PC] (Mobile hard disk only) Preparation Select the audio type to be used when transferring (dubbing) a video title by converting to MPEG4 format, from "Select MTS" in the SETUP menu (➡ page 63). 1 While stopped Press [ - Panasonic DMRE500 | DMRE500 User Guide - Page 56
TCP/ IP Settings" and press [ENTER]. TCP / IP Settings Automatic (DHCP) Manual IP Address : 192. 168. 0. 14 Subnet Mask : 255. 255. 255 display. Please follow the on-screen instructions for each operation. ≥Refer to "Help from the computer.) http://panasonic.jp/support/dvd/e500h/use_info/env_e.html - Panasonic DMRE500 | DMRE500 User Guide - Page 57
TOP MENU SUB MENU ENTER RETURN PROG/CHECK DISPLAY TIME SLIP TV GUIDE SETUP ERASE REC MODE REC Info DUBBING CHAPTER STATUS FUNCTIONS 3 4 NETWORK No. Server Name 01 Living room Model No. DMR-E500H Maker Panasonic Previous 01/01 Next Playback titles recorded on the server unit in the - Panasonic DMRE500 | DMRE500 User Guide - Page 58
CM SKIP 0 SKIP SLOW/SEARCH STOP PAUSE PLAY/x1.3 DIRECT NAVIGATOR FUNCTIONS TOP MENU SUB MENU ENTER RETURN PROG/CHECK DISPLAY TIME SLIP TV GUIDE SETUP ERASE REC MODE REC Info DUBBING CHAPTER STATUS HDD, DVD, SD/PC FUNCTIONS 3 4 2 1 ENTER RETURN ≥You can use SD Memory Cards with capacities - Panasonic DMRE500 | DMRE500 User Guide - Page 59
Erasing all titles, play lists and MPEG4 titles-Erase all titles [HDD] [RAM] [SD] Preparation ≥Press [HDD], [DVD] or [SD/PC] to select the drive. ≥Release protection (➡ page 58). 1 While stopped Press [FUNCTIONS]. 2 Press [3, 4, 2, 1] to select "DISC SETTING" or "CARD SETTING" and press [ENTER]. 3 - Panasonic DMRE500 | DMRE500 User Guide - Page 60
≥Finalizing takes up to 15 minutes. ≥You cannot finalize DVD-R recorded on other manufacturer's equipment. ≥If you finalize a recorded DVD-R on Panasonic equipment other than this unit, the background selected as "TOP MENU" may not display. Before finalizing After finalizing Disc display on this - Panasonic DMRE500 | DMRE500 User Guide - Page 61
Setting Set the TV Guide On ScreenTM system. Antenna System§2 Select to suit the type of antenna you are using. Auto Channel Setting§1 (➡ page 65) Preset Channel Captions§2 (➡ page 66) Manual Channel Captions§2 (➡ page 66) ≥TV ≥CATV j j j Set Up Off Timer Select how long the unit remains on - Panasonic DMRE500 | DMRE500 User Guide - Page 62
ratings level to limit DVD-Video play. Follow the on-screen instructions. Enter a 4-digit password with the numbered buttons when the password screen is shown. HDD (➡ page 54, Approximate recording time when recording a MPEG4 title on Panasonic SD Memory Card). ≥Extra Fine (XF) ≥Super Fine (SF) ≥ - Panasonic DMRE500 | DMRE500 User Guide - Page 63
over 96 kHz or 88.2 kHz, or the disc has copy protection. Dolby Digital DTS Select how to output the signal, to output "Bitstream" so the connected ≥Español ≥Français -Only English is displayed in the TV Guide On ScreenTM system regardless of the settings. Other languages cannot be displayed. - Panasonic DMRE500 | DMRE500 User Guide - Page 64
whether to use the network function. TCP/IP Settings Set this unit's IP address and other settings. There is usually no need to do anything manually. Unit Name Setting You can give a name to each unit to distinguish them on the network. Internet Connection This setting is for features that may - Panasonic DMRE500 | DMRE500 User Guide - Page 65
DVD POWER] to turn the unit on. OPEN/CLOSE 3 Complete the TV Guide On ScreenTM system setup (until [ENTER] is pressed after the "Watch TV" correctly with auto clock setting. You cannot change this setting if you set the clock manually. 1 Press [SETUP]. 2 Press [3, 4] to select "Set Up" and press - Panasonic DMRE500 | DMRE500 User Guide - Page 66
Press [SETUP]. SETUP Channel Set Up Disc Video Audio Display TV Screen Network TV GUIDE Setting Antenna System CATV Auto Channel Setting Channel Captions Preset Channel Captions Manual Channel Captions 2 Press [3, 4] to select "Channel" and press [1]. Preset Channel Captions 3 Press [3, 4] to - Panasonic DMRE500 | DMRE500 User Guide - Page 67
Laser power: No hazardous radiation is emitted with the safety protection Audio Recording system: Dolby Digital 2 ch, Linear PCM (XP mode, 2ch), G.726 (MPEG4) Input: LINE Image file format: JPEG conforming to DCF (Design rule for Camera File system), (sub sampling; 4:2:2 or 4:2:0) TIFF ( - Panasonic DMRE500 | DMRE500 User Guide - Page 68
system used for compressing/decoding color still pictures. If you select JPEG as the storage system on digital cameras etc., the data will be compressed to 1/10-1/100 of its original size. The feature of ratio) televisions. Two styles of picture, "Pan & Scan" and "Letterbox", deal with this problem. - Panasonic DMRE500 | DMRE500 User Guide - Page 69
Tag Image File Format) This is a system used for compressing/decoding color still pictures. A common format for storing high quality images on digital cameras and other devices. VBR (Variable bitrate) This is a method of video recording that adjusts the bit rate according to video signal. Reference - Panasonic DMRE500 | DMRE500 User Guide - Page 70
high speed transfer (dub) to a disc? Can I record digital audio signals using this unit? Can a digital audio signal from this unit be recorded to other equipment? Can output terminal outputs a progressive output signal. ≥All Panasonic televisions that have 480p input terminals are compatible. - Panasonic DMRE500 | DMRE500 User Guide - Page 71
GUIDE]. I do not want to use TV Guide On ScreenTM system. ≥Set the unit with "Auto Channel Setting" in the SETUP menu. Note that you can set timer recording only manually through the hub. Please read the hub's operating instructions for further information. ≥This may occur depending on computer - Panasonic DMRE500 | DMRE500 User Guide - Page 72
. No title. ≥Erase one or more items registered on the transfer (dubbing) list to ensure that the "Current capacity" is not exceeded. ≥There may be a problem with the disc. Press [< OPEN/CLOSE] on the main unit to remove it and check it for scratches or dirt. (The unit turns off automatically - Panasonic DMRE500 | DMRE500 User Guide - Page 73
Troubleshooting guide Before requesting service, make the following checks. If you are in doubt about some of the check points, or if the remedies indicated in the chart do not solve the problem, refer to the "Customer Services Directory" on page 80 if you reside in the U.S.A., or refer to the " - Panasonic DMRE500 | DMRE500 User Guide - Page 74
Troubleshooting guide set to "On" ≥You have used digital connection. Set "Dolby Digital" to "PCM" or connect using audio the unit's display.) ≥The unit may have a problem. While the unit is off, press and hold [∫] unit may not be recordable on other Panasonic DVD recorders. Timer recording does not - Panasonic DMRE500 | DMRE500 User Guide - Page 75
hours when using other Panasonic DVD recorders that are , this is not a problem. The DV automatic recording manually set timer recording after you set the unit using "Auto Channel Setting". ≥Consult your service box. Consult your service provider. - appears in the TV Guide On ScreenTM system - Panasonic DMRE500 | DMRE500 User Guide - Page 76
Troubleshooting guide TV Guide On ScreenTM system (Continued) Cannot receive some channels displayed on the television The cable TV box has no remote capability and is incompatible. Consult your service provider. ≥The user has an "after market" brand cable TV box which may be incompatible. Consult - Panasonic DMRE500 | DMRE500 User Guide - Page 77
One time only recording" title that was recorded to DVD- RAM using a different Panasonic DVD Recorder to this unit's HDD, but play is not possible due to copyright Audio & PLAY k1.3". ≥This does not work when audio is other than Dolby Digital. ≥This does not work when recording is in XP or FR mode. [ - Panasonic DMRE500 | DMRE500 User Guide - Page 78
Troubleshooting guide Servicing-Do not attempt to service the unit beyond that described in these operating instructions. Refer all other servicing to authorized servicing the U.S.A., refer to "Customer Services Directory" on page 80. In Canada, contact the Panasonic Canada Inc. Customer Care Centre - Panasonic DMRE500 | DMRE500 User Guide - Page 79
this unit. ≥Before using chemically treated cloth, read the instructions that came with the cloth carefully. Observe the following points Indemnity concerning recorded content Panasonic does not accept any responsibility for damages directly or indirectly due to any type of problems that result in - Panasonic DMRE500 | DMRE500 User Guide - Page 80
Purchases Purchase Parts, Accessories and Instruction Books online for all Panasonic Products by visiting our Web Site at: http://www.pasc.panasonic.com or, send your request by E-mail to: [email protected] You may also contact us directly at: 1-800-332-5368 (Phone) 1-800-237-9080 (Fax Only - Panasonic DMRE500 | DMRE500 User Guide - Page 81
a period as stated below from the date of original purchase. Panasonic DVD Recorder One (1) year, parts and labour LIMITATIONS AND EXCLUSIONS the above limitations and exclusions may not be applicable. WARRANTY SERVICE For product operation and information assistance, please contact your Dealer - Panasonic DMRE500 | DMRE500 User Guide - Page 82
de hacer la conexión, apague todos los equipos y lea los manuales de instrucciones apropiados. ≥El equipo periférico y los cables opcionales LINK. ≥Utilice solamente el IR Blaster suministrado. Q Para que el sistema TV Guide On Screen™ funcione resulta necesario hacer estas conexiones a IN3 (L3). R - Panasonic DMRE500 | DMRE500 User Guide - Page 83
Preparación del sistema de guía de TV en pantalla Consulte la ilustración que aparece en la página 12 de la sección en idioma inglés. Después de enchufar la unidad en una toma de CA de casa y pulsar [Í DVD POWER] para encender la unidad por primera vez, ésta inicia la preparación del sistema de guía - Panasonic DMRE500 | DMRE500 User Guide - Page 84
Title/play list 47 TV Guide On ScreenTM 25, 28 TV "DTS Digital Surround" are registered trademarks of Digital Theater Systems Panasonic Consumer Electronics Company, Division of Panasonic Corporation of North America One Panasonic Way Secaucus, New Jersey 07094 http://www.panasonic.com Panasonic
-
 1
1 -
 2
2 -
 3
3 -
 4
4 -
 5
5 -
 6
6 -
 7
7 -
8
-
9
-
10
-
11
-
12
-
13
-
14
-
15
-
16
-
17
-
18
-
19
-
20
-
21
-
22
-
23
-
24
-
25
-
26
-
27
-
28
-
29
-
30
-
31
-
32
-
33
-
34
-
35
-
36
-
37
-
38
-
39
-
40
-
41
-
42
-
43
-
44
-
45
-
46
-
47
-
48
-
49
-
50
-
51
-
52
-
53
-
54
-
55
-
56
-
57
-
58
-
59
-
60
-
61
-
62
-
63
-
64
-
65
-
66
-
67
-
68
-
69
-
70
-
71
-
72
-
73
-
74
-
75
-
76
-
77
-
78
-
79
-
80
-
81
-
82
-
83
-
84
 |
 |

Operating Instructions
DVD Video Recorder
Model No.
DMR-E500H
HDD
DVD
SD
PC
Dear customer
Thank you for purchasing this product. For optimum performance
and safety, please read these instructions carefully.
Before connecting, operating or adjusting this product, please read
these instructions completely.
Please keep this manual for future reference.
Region number supported by this unit
Region numbers are allocated to DVD players and software
according to where they are sold.
≥
The region number of this unit is “
1
”.
≥
The unit will play DVDs marked with labels containing “
1
” or
“
ALL
”.
Example:
1
ALL
2
4
1
[For\U.S.A.]only]
The warranty can be found on page 80.
[For\Canada]only]
The warranty can be found on page 81.
La referencia rápida en español se puede encontrar
en la página 82.
This manual was printed with soy based ink.
RQT7394-2P
PP