Panasonic DMRE500 DMRE500 User Guide - Page 24
Playing While You Are Recording, Flexible Recording, Press [direct Navigator].
 |
View all Panasonic DMRE500 manuals
Add to My Manuals
Save this manual to your list of manuals |
Page 24 highlights
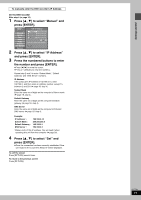
Recording Recording television programs Refer to the control reference on page 22. [HDD] [RAM] Playing while you are recording You can change the drive and play while recording on this unit. Also, while recording to the HDD or to DVD-RAM you can view the title being recorded from the beginning as well as play a recorded title. Playing from the beginning of the title you are recording-Chasing playback Press [1] (PLAY). Time Slip indicator on the main unit lights. Playing a title previously recorded while recording- Simultaneous rec and play 1 Press [DIRECT NAVIGATOR]. 2 Press [3, 4, 2, 1] to select a title and press [ENTER]. Time Slip indicator on the main unit lights. To exit the Direct Navigator screen Press [DIRECT NAVIGATOR]. Reviewing the recorded images while recording- Time Slip 1 Press [TIME SLIP]. Time Slip indicator on the main unit lights. PLAY 0 min REC Play starts from 30 seconds previous. The image currently being recorded ≥You will hear the playback audio. 2 Press [3, 4] to select the time and press [ENTER]. ≥Press [TIME SLIP] to show the play images in full. Press again to show the play and recording images. ∫ To stop play Press [∫]. ∫ To stop recording 2 seconds after play stops Press [∫]. ∫ To stop timer recording Press [∫], then [ENTER] within 5 seconds. ≥You can also press and hold [∫] on the main unit for more than 3 seconds to stop recording. [HDD] [RAM] [DVD-R] Flexible Recording The unit sets the best possible picture quality that fits the recording within the remaining disc space. The recording mode becomes FR mode. e.g., Recorded Remain 45 minutes in SP mode 60 minutes Program to be recorded Perfectly fit! Recording rate between SP and LP Preparation ≥Select the channel to record. ≥Press [HDD] or [DVD] to select the recording drive. 1 While stopped Press [FUNCTIONS]. 2 Press [3, 4, 2, 1] to select "FLEXIBLE RECORDING" and press [ENTER]. FLEXIBLE REC Record in FR mode Maximum rec time 3 Hour 00 Min. Set recording time 3 Hour 00 Min. Start Cancel 3 Press [2, 1] to select "Hour" and "Min." and press [3, 4] to set the recording time. ≥You can also set the recording time with the numbered buttons. ≥You cannot record more than 8 hours. 4 When you want to start recording Press [3, 4, 2, 1] to select "Start" and press [ENTER]. Recording starts. To exit the screen without recording Press [RETURN]. To stop recording partway Press [∫]. To show the remaining time Press [STATUS]. HDD REC 0:59 CH71 Stereo Remaining time RQT7394 24
-
 1
1 -
2
-
3
-
4
-
5
-
6
-
7
-
8
-
9
-
10
-
11
-
12
-
13
-
14
-
15
-
16
-
17
-
18
-
 19
19 -
 20
20 -
 21
21 -
 22
22 -
 23
23 -
 24
24 -
 25
25 -
 26
26 -
 27
27 -
 28
28 -
 29
29 -
30
-
31
-
32
-
33
-
34
-
35
-
36
-
37
-
38
-
39
-
40
-
41
-
42
-
43
-
44
-
45
-
46
-
47
-
48
-
49
-
50
-
51
-
52
-
53
-
54
-
55
-
56
-
57
-
58
-
59
-
60
-
61
-
62
-
63
-
64
-
65
-
66
-
67
-
68
-
69
-
70
-
71
-
72
-
73
-
74
-
75
-
76
-
77
-
78
-
79
-
80
-
81
-
82
-
83
-
84
 |
 |
