Panasonic DMRE500 DMRE500 User Guide - Page 18
TO BE ABLE TO OPERATE THIS UNIT FROM A COMPUTER ON THE HOME NETWORK, Right-click the [Local Area
 |
View all Panasonic DMRE500 manuals
Add to My Manuals
Save this manual to your list of manuals |
Page 18 highlights
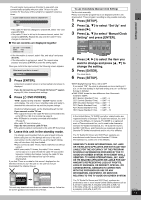
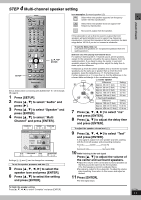
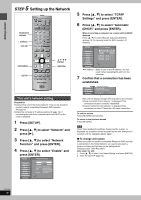
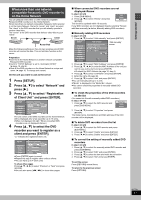
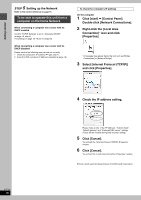
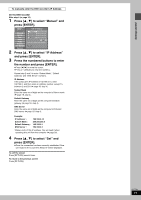
Getting started STEP 5 Setting up the Network Refer to the control reference on page 16. To be able to operate this unit from a computer on the Home Network When connecting a computer via a router with its DHCP enabled Confirm "TCP/IP Settings" is set to "Automatic (DHCP)" (➡ page 16, step 6). The settings on page 18-19 are not required. When connecting a computer via a router with its DHCP disabled Please confirm the following were carried out correctly. 1 Check the computer's IP address (➡ right, step 4). 2 Enter the DVD recorder's IP address manually (➡ page 19). To check the computer's IP address On the computer 1 Click [start] ➡ [Control Panel]. Double-click [Network Connections]. 2 Right-click the [Local Area Connection]§ icon and click [Properties]. §A message may appear below the icon such as [Bridge Connections] or [Network Bridge]. 3 Select [Internet Protocol (TCP/IP)] and click [Properties]. RQT7394 18 4 Check the IP address setting. Please make a note of the "IP address", "Subnet mask", "Default gateway" and "Preferred DNS server" settings (These will be needed during DVD recorder setting). 5 Click [Cancel]. You will exit the "Internet Protocol (TCP/IP) Properties" window. 6 Click [Cancel]. You will exit the "Local Area Connection Properties" window. ≥Screen shots reprinted by permission from Microsoft Corporation.
-
 1
1 -
2
-
3
-
4
-
5
-
6
-
7
-
8
-
9
-
10
-
11
-
12
-
 13
13 -
 14
14 -
 15
15 -
 16
16 -
 17
17 -
 18
18 -
 19
19 -
 20
20 -
 21
21 -
 22
22 -
 23
23 -
24
-
25
-
26
-
27
-
28
-
29
-
30
-
31
-
32
-
33
-
34
-
35
-
36
-
37
-
38
-
39
-
40
-
41
-
42
-
43
-
44
-
45
-
46
-
47
-
48
-
49
-
50
-
51
-
52
-
53
-
54
-
55
-
56
-
57
-
58
-
59
-
60
-
61
-
62
-
63
-
64
-
65
-
66
-
67
-
68
-
69
-
70
-
71
-
72
-
73
-
74
-
75
-
76
-
77
-
78
-
79
-
80
-
81
-
82
-
83
-
84
 |
 |
