Panasonic DMRE500 DMRE500 User Guide - Page 23
Recording Modes And Approximate Recording Times, Selecting Audio To Record, Press
 |
View all Panasonic DMRE500 manuals
Add to My Manuals
Save this manual to your list of manuals |
Page 23 highlights
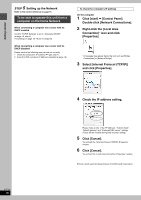
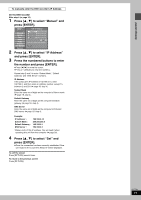
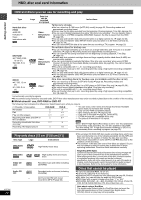
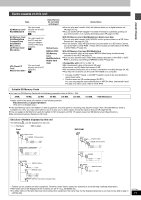
5 Press [¥ REC] to start recording. HDD REC XP CH Recording will take place on open space on the HDD or on disc. Data will not be overwritten. ≥You cannot change the channel or recording mode during recording. ≥You can record while the unit is on standby for timer recording, but once the time for the timer recording to begin is reached, any recording taking place will stop and the timer recording will begin. ∫ To pause recording Press [;]. Press again to restart recording. (Title is not split into separate titles.) ∫ To stop recording Press [∫]. From the start to the end of the recording is called one title. [HDD] When continuously recording for long durations, titles are automatically divided every 8 hours. [DVD-R] It takes about 30 seconds for the unit to complete recording management information after recording finishes. ∫ To specify a time to stop recording-One Touch Recording During recording Press [¥ REC] to select the recording time. Each time you press the button: 0:30 "# 1:00 "# 1:30 "# 2:00 "# 3:00 "# 4:00 Counter (cancel This does not work during timer recordings (➡ page 25) or while using Flexible Recording (➡ page 24). To stop recording partway Press [∫]. Off Timer The unit switches to standby after about 6 hours in the stop mode. You can turn this feature off or change the time to 2 hours (➡ page 61, "Off Timer"). Recording modes and approximate recording times Depending on the content being recorded, the recording times may become shorter than indicated. If you set simultaneous MPEG4 recording (➡ page 22), the available recording time to HDD is reduced. (Unit: hour) HDD DVD-RAM DVD- Mode (400 GB) Single- Double- R sided sided (4.7 (4.7 GB) (9.4 GB) GB) XP (High quality) 89 1 2 1 SP (Normal) 177 2 4 2 LP (Long play) 355 4 8 4 EP (Extra long play) 709 (532§) 8 (6§) 16 (12§) 8 (6§) Picture quality Recording XP SP LP EP (6H)§ EP (8H) Recording time § When "Recording Time in EP Mode" is set to "EP (6H)" in the SETUP menu. The sound quality is better when using "EP (6H)" than when using "EP (8H)". [Note] When recording to DVD-RAM using EP (8H) mode, play may not be possible on DVD players that are compatible with DVD-RAM. In this case use EP (6H) mode. FR (Flexible Recording Mode) The unit automatically selects a recording rate between XP and EP (8H) that will enable the recordings to fit in the remaining disc space with the best possible recording quality. ≥You can set when transferring (dubbing) or programming timer recordings. ≥When recording to the HDD, picture quality is automatically adjusted to precisely fit a transferred (dubbed) title on a 4.7 GB disc. ≥All the recording modes from XP to EP appear in the display. XP SP LP EP CH Selecting audio to record [HDD] [RAM] Press [AUDIO]. [. Stereo: Main audio (stereo) l v ≥If the broadcast is "MonoiSAP", audio will be l monaural even if you select Stereo mode. l SAP: Secondary audio program (SAP) l l v ≥If recorded in SAP mode, main audio is also recorded. a- Mono: Main audio (monaural) ≥Select "Mono" if reception is poor during a stereo broadcast. HDD CH 12 (( Stereo e.g., "Stereo" is selected "((" appears when the unit is receiving the audio type you selected. ≥If you change the sound setting while recording, the recorded sound will also change. [DVD-R] [HDD] [RAM] (When recording sound in LPCM) [HDD] [RAM] (When "DVD-R High-Speed Recording" is set to "On") Select the audio (Main or SAP) in "Select MTS" in the SETUP menu (➡ page 63). RQT7394 23
-
 1
1 -
2
-
3
-
4
-
5
-
6
-
7
-
8
-
9
-
10
-
11
-
12
-
13
-
14
-
15
-
16
-
17
-
 18
18 -
 19
19 -
 20
20 -
 21
21 -
 22
22 -
 23
23 -
 24
24 -
 25
25 -
 26
26 -
 27
27 -
 28
28 -
29
-
30
-
31
-
32
-
33
-
34
-
35
-
36
-
37
-
38
-
39
-
40
-
41
-
42
-
43
-
44
-
45
-
46
-
47
-
48
-
49
-
50
-
51
-
52
-
53
-
54
-
55
-
56
-
57
-
58
-
59
-
60
-
61
-
62
-
63
-
64
-
65
-
66
-
67
-
68
-
69
-
70
-
71
-
72
-
73
-
74
-
75
-
76
-
77
-
78
-
79
-
80
-
81
-
82
-
83
-
84
 |
 |
