Panasonic DMRE500 DMRE500 User Guide - Page 15
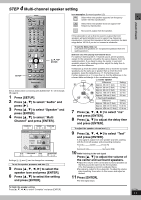
Step 4 Multi-channel Speaker Setting
 |
View all Panasonic DMRE500 manuals
Add to My Manuals
Save this manual to your list of manuals |
Page 15 highlights
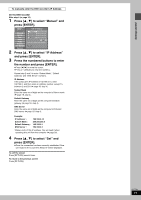
Getting started 4 STEP Multi-channel speaker setting SETUP DVD POWER TV POWER INPUT SELECT TV/VIDEO CH VOLUME HDD 1 4 DVD 23 56 SD/PC PAGE CH AUDIO 789 CANCEL VCR Plus+ CM SKIP 0 SKIP SLOW/SEARCH STOP PAUSE PLAY/x1.3 DIRECT NAVIGATOR FUNCTIONS TOP MENU SUB MENU ENTER RETURN PROG/CHECK DISPLAY TIME SLIP TV GUIDE SETUP ERASE REC MODE REC Info DUBBING CHAPTER STATUS 3,4,2,1 ENTER Set as follows when connecting with AUDIO OUT 5.1 ch terminals (➡ page 9). 1 Press [SETUP]. 2 Press [3, 4] to select "Audio" and press [1]. 3 Press [3, 4] to select "Speaker" and press [ENTER]. 4 Press [3, 4] to select "Multi Channel" and press [ENTER]. Front (L) a Center b a c Multi Channel Setting Front (R) a L ms C dB R 0.0 0 Complete Test dB SW 0 LS d B 0 m s 0.0 d B 0 RS (LS) - Surround - (RS) a c b c a Subwoofer c a Settings a, b, and c can be changed as necessary. To set the speaker presence and size (a) 5 Press [3, 4, 2, 1] to select the speaker icon and press [ENTER]. 6 Press [3, 4] to select the setting and press [ENTER]. Icon examples: Surround speaker (LS) Select when the speaker supports low-frequency LS (under 100 Hz) reproduction. Select when the speaker does not support low- LS frequency reproduction. No sound is output from the speaker. If the subwoofer is set so that no sound is output, the front speakers will automatically be set to support low-frequency reproduction. Connect front speakers that can reproduce the bass range below 100 Hz if you do not connect a subwoofer. To set the delay time (b) (only when the speakers are not placed equidistant from the seating position) (Effective only when playing multi-channel discs) For optimum listening with 5.1-channel sound, all the speakers, except for the subwoofer, should be the same distance from the seating position. If you have to place the center or surround speakers closer to the seating position, adjust the delay time to make up for the difference. If distances d (from the center speaker) and f (from the surround speakers) are the same as or greater than e (from the front speakers), leave the delay time as "0", the factory preset. If either distance d or f is less than e, find the difference in the relevant table and change to the recommended setting. d Center speaker Difference LC R Approx. 30 cm (1 feet) de Approx. 60 cm (2 feet) Approx. 90 cm (3 feet) Setting 1.0 ms 2.0 ms 3.0 ms f SW Approx. 120 cm (4 feet) Approx. 150 cm (5 feet) 4.0 ms 5.0 ms LS RS f Surround speakers Difference Setting Approx. 150 cm (5 feet) 5.0 ms Approx. 300 cm (10 feet) 10.0 ms Approx. 450 cm (15 feet) 15.0 ms 7 Press [3, 4, 2, 1] to select "ms" and press [ENTER]. 8 Press [3, 4] to adjust the delay time and press [ENTER]. To adjust the speaker volume level (c) 9 Press [3, 4, 2, 1] to select "Test" and press [ENTER]. A test signal is output from one speaker at a time, starting with the front left speaker and proceeding clockwise. Front (L)_-)Center_-)Front (R) : ; Surround (LS)(-----=Surround (RS) 10 While listening to the test signal Press [3, 4] to adjust the volume of the center and surround speakers. ≥Adjust the volume of the center and surround speakers so that they sound the same as the front speaker. (The front speakers cannot be adjusted here.) ≥No signal is output for the subwoofer. To adjust its volume, play something, then return to this screen and adjust as desired. 11 Press [ENTER]. The test signal stops. To finish the speaker setting Press [3, 4, 2, 1] to select "Complete" and press [ENTER]. RQT7394 15
-
 1
1 -
2
-
3
-
4
-
5
-
6
-
7
-
8
-
9
-
 10
10 -
 11
11 -
 12
12 -
 13
13 -
 14
14 -
 15
15 -
 16
16 -
 17
17 -
 18
18 -
 19
19 -
 20
20 -
21
-
22
-
23
-
24
-
25
-
26
-
27
-
28
-
29
-
30
-
31
-
32
-
33
-
34
-
35
-
36
-
37
-
38
-
39
-
40
-
41
-
42
-
43
-
44
-
45
-
46
-
47
-
48
-
49
-
50
-
51
-
52
-
53
-
54
-
55
-
56
-
57
-
58
-
59
-
60
-
61
-
62
-
63
-
64
-
65
-
66
-
67
-
68
-
69
-
70
-
71
-
72
-
73
-
74
-
75
-
76
-
77
-
78
-
79
-
80
-
81
-
82
-
83
-
84
 |
 |
