Panasonic DMRE500 DMRE500 User Guide - Page 19
and press [ENTER]., to select IP Address
 |
View all Panasonic DMRE500 manuals
Add to My Manuals
Save this manual to your list of manuals |
Page 19 highlights
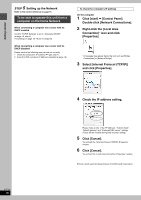
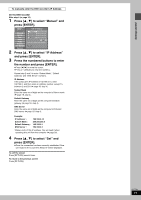
To manually enter the DVD recorder's IP Address On the DVD recorder After step 5 (➡ page 16) 1 Press [3, 4] to select "Manual" and press [ENTER]. SETUP Channel Set Up Disc Video Audio Display TV Screen Network TCP / IP Settings IP Address Subnet Mask Default Gateway DNS Server Set Press "Set" to store the values after input. 2 Press [3, 4] to select "IP Address" and press [ENTER]. 3 Press the numbered buttons to enter the number and press [ENTER]. ≥Press [2, 1] to move the cursor. ≥Press [¢ CANCEL] to clear the numbers. Repeat step 2 and 3 to enter "Subnet Mask", "Default Gateway" and "DNS Server" numbers. IP Address If the computer's IP address is 192.168.0.15, enter 192.168.0. and then enter an arbitrary number, except 15, between 2 and 254 (➡ page 18, step 4). Subnet Mask Enter the same set of digits as the computer's Subnet mask (➡ page 18, step 4). Default Gateway Enter the same set of digits as the computer's Default gateway (➡ page 18, step 4). DNS Server Enter the same set of digits as the computer's Preferred DNS server (➡ page 18, step 4). Example: IP Address§ : 192.168.0.14 Subnet Mask : 255.255.255.0 Default Gateway : 192.168.0.1 DNS Server : 192.168.0.1 §Make a note of this IP address. You will need it when operating this unit from the computer (➡ page 56). 4 Press [3, 4] to select "Set" and press [ENTER]. ≥Once the connection has been correctly established "Now connected to the Local Area Network" will be displayed. To exit the screen Press [RETURN] several times. To return to the previous screen Press [RETURN]. RQT7394 19 Getting started
-
 1
1 -
2
-
3
-
4
-
5
-
6
-
7
-
8
-
9
-
10
-
11
-
12
-
13
-
 14
14 -
 15
15 -
 16
16 -
 17
17 -
 18
18 -
 19
19 -
 20
20 -
 21
21 -
 22
22 -
 23
23 -
 24
24 -
25
-
26
-
27
-
28
-
29
-
30
-
31
-
32
-
33
-
34
-
35
-
36
-
37
-
38
-
39
-
40
-
41
-
42
-
43
-
44
-
45
-
46
-
47
-
48
-
49
-
50
-
51
-
52
-
53
-
54
-
55
-
56
-
57
-
58
-
59
-
60
-
61
-
62
-
63
-
64
-
65
-
66
-
67
-
68
-
69
-
70
-
71
-
72
-
73
-
74
-
75
-
76
-
77
-
78
-
79
-
80
-
81
-
82
-
83
-
84
 |
 |
