Panasonic KX-FLM651 Laser Fax - Page 25
Preparation, To enter your logo, To change uppercase or lowercase letters, To correct a mistake
 |
UPC - 037988809844
View all Panasonic KX-FLM651 manuals
Add to My Manuals
Save this manual to your list of manuals |
Page 25 highlights
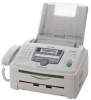
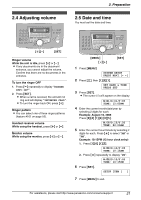
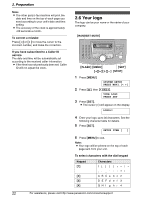
Keypad Characters {5} J KLj k l 5 {6} MN Om n o 6 {7} P QRS p q r s 7 {8} T UVt u v 8 {9} WX Y Z w x y z 9 {0} 0 {#} To change uppercase or lowercase letter. {FLASH} Hyphen {HANDSET MUTE} To insert a space. {STOP} To delete a digit. Note: L To enter another character that is located on the same dial key, press {>} to move the cursor to the next space. To enter your logo Example: "BILL" 1. Press {2} 2 times. LOGO=|B 2. Press {4} 3 times. LOGO=B|I 3. Press {5} 3 times. LOGO=BI|L 4. Press {>} to move the cursor to the next space and press {5} 3 times. LOGO=BILL| To change uppercase or lowercase letters Pressing the {#} key will change to uppercase or lowercase alternately. 1. Press {2} 2 times. LOGO=|B 2. Press {4} 3 times. LOGO=B|I 2. Preparation 3. Press {#}. LOGO=B|i 4. Press {5} 3 times. LOGO=Bi|l To correct a mistake Press {} to move the cursor to the incorrect character, and make the correction. To delete a character Press {} to move the cursor to the character you want to delete and press {STOP}. L To erase all characters, press and hold {STOP}. To insert a character 1. Press {} to move the cursor to the position to the right of where you want to insert the character. 2. Press {HANDSET MUTE} to insert a space and enter the character. To select characters using {A} or {B} Instead of pressing the dial keys, you can select characters using {A} or {B}. 1. Press {B} repeatedly to display the desired character. Characters will be displayed in the following order: 1 Uppercase letters 2 Number 3 Symbol 4 Lowercase letters L If you press {A}, the order will be reversed. 2. Press {>} to insert the character. 3. Return to step 1 to enter the next character. For assistance, please visit http://www.panasonic.com/consumersupport 23
-
 1
1 -
2
-
3
-
4
-
5
-
6
-
7
-
8
-
9
-
10
-
11
-
12
-
13
-
14
-
15
-
16
-
17
-
18
-
19
-
 20
20 -
 21
21 -
 22
22 -
 23
23 -
 24
24 -
 25
25 -
 26
26 -
 27
27 -
 28
28 -
 29
29 -
 30
30 -
31
-
32
-
33
-
34
-
35
-
36
-
37
-
38
-
39
-
40
-
41
-
42
-
43
-
44
-
45
-
46
-
47
-
48
-
49
-
50
-
51
-
52
-
53
-
54
-
55
-
56
-
57
-
58
-
59
-
60
-
61
-
62
-
63
-
64
-
65
-
66
-
67
-
68
-
69
-
70
-
71
-
72
-
73
-
74
-
75
-
76
-
77
-
78
-
79
-
80
-
81
-
82
-
83
-
84
-
85
-
86
-
87
-
88
-
89
-
90
 |
 |