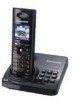
Panasonic KX-TG8231B Digital Cordless Answering System - Page 15
Voice guidance language, Dialing mode, Date and time
 |
UPC - 037988478453
View all Panasonic KX-TG8231B manuals
Add to My Manuals
Save this manual to your list of manuals |
Page 15 highlights
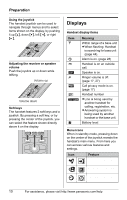
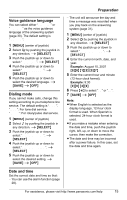
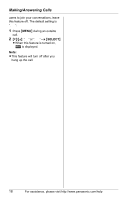
Voice guidance language You can select either "English" or "Español" as the voice guidance language of the answering system (page 30). The default setting is "English". 1 {MENU} (center of joystick) 2 Select I by pushing the joystick in any direction. i {SELECT} 3 Push the joystick up or down to select "Settings". i {SELECT} 4 Push the joystick up or down to select "Voice prompt". i {SELECT} 5 Push the joystick up or down to select the desired language. i {SAVE} i {OFF} Dialing mode If you cannot make calls, change this setting according to your telephone line service. The default setting is "Tone". "Tone": For tone dial service. "Pulse": For rotary/pulse dial service. 1 {MENU} (center of joystick) 2 Select * by pushing the joystick in any direction. i {SELECT} 3 Push the joystick up or down to select "Set tel line". i {SELECT} 4 Push the joystick up or down to select "Set dial mode". i {SELECT} 5 Push the joystick up or down to select the desired setting. i {SAVE} i {OFF} Preparation - The unit will announce the day and time a message was recorded when you play back on the answering system (page 31). 1 {MENU} (center of joystick) 2 Select K by pushing the joystick in any direction. i {SELECT} 3 Push the joystick up or down to select "Date and time". i {SELECT} 4 Enter the current month, date, and year. Example: August 15, 2007 {0}{8} {1}{5} {0}{7} 5 Enter the current hour and minute (12-hour clock format). Example: 9:30 {0}{9} {3}{0} 6 Press {*} to select "AM" or "PM". 7 {SAVE} i {OFF} Note: L When English is selected as the display language, 12-hour clock format is used. When Spanish is selected, 24-hour clock format is used. L If you make a mistake when entering the date and time, push the joystick right, left, up, or down to move the cursor, then make the correction. L The date and time may be incorrect after a power failure. In this case, set the date and time again. Date and time Set the correct date and time so that: - You can use the alarm function (page 28). For assistance, please visit http://www.panasonic.com/help 15
-
 1
1 -
2
-
3
-
4
-
5
-
6
-
7
-
8
-
9
-
 10
10 -
 11
11 -
 12
12 -
 13
13 -
 14
14 -
 15
15 -
 16
16 -
 17
17 -
 18
18 -
 19
19 -
 20
20 -
21
-
22
-
23
-
24
-
25
-
26
-
27
-
28
-
29
-
30
-
31
-
32
-
33
-
34
-
35
-
36
-
37
-
38
-
39
-
40
-
41
-
42
-
43
-
44
-
45
-
46
-
47
-
48
-
49
-
50
-
51
-
52
-
53
-
54
-
55
-
56
 |
 |