Panasonic PVDV73D PVDV73 User Guide - Page 47
Copying from Digital, Equipment dubbing
 |
View all Panasonic PVDV73D manuals
Add to My Manuals
Save this manual to your list of manuals |
Page 47 highlights
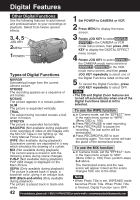
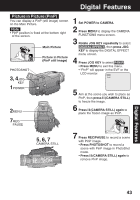
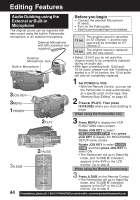
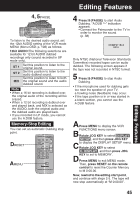
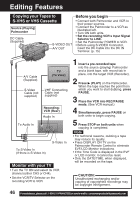
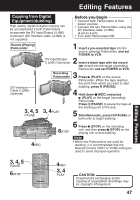
Editing Features Copying from Digital Equipment (dubbing) High quality digital-to-digital copying can be accomplished if both Palmcorders incorporate the DV Input/Output (i.LINK) Connector (DV Interface cable (i.LINK) is not supplied). Before you begin • Connect both Palmcorders to their power sources. • Connect the two Palmcorders using the DV Interface cable (i.LINK) (4-pin to 4-pin). • Turn both Palmcorders ON. Source (Playing) Palmcorder DV Interface Cable (i.LINK) (optional) 3, 4, 5 PAUSE 1 Insert a pre-recorded tape into the source (playing) Palmcorder, and set POWER to VCR. 2 DV Input/Output (i.LINK) Connector Insert a blank tape with the record tab closed into the target (recording) Palmcorder and set POWER to VCR. Recording Palmcorder 3 Press (PLAY) on the source Palmcorder. When the tape reaches the point from which you want to start dubbing, press (PAUSE). 3, 4PLAY 4 Hold down (REC) and press (PLAY) on the target (recording) Palmcorder. Press (PAUSE) to pause the tape at the starting point of the dub. 5 Simultaneously, press (PAUSE) on both units to begin dubbing. 6STOP 6 Press (STOP) on the recording unit, and then press (STOP) on the playing unit to end dubbing. 4REC Note • When two Palmcorders are used for dubbing, it is recommended that the Remote Control VCR1 or VCR2 setting be used to avoid improper-operation. Editing Features 3, 4, 5 PAUSE 6STOP 4REC 3, 4 PLAY CAUTION: Unauthorized exchanging and/or copying of copyrighted recordings may be copyright infringement. 47
-
 1
1 -
2
-
3
-
4
-
5
-
6
-
7
-
8
-
9
-
10
-
11
-
12
-
13
-
14
-
15
-
16
-
17
-
18
-
19
-
20
-
21
-
22
-
23
-
24
-
25
-
26
-
27
-
28
-
29
-
30
-
31
-
32
-
33
-
34
-
35
-
36
-
37
-
38
-
39
-
40
-
41
-
 42
42 -
 43
43 -
 44
44 -
 45
45 -
 46
46 -
 47
47 -
 48
48 -
 49
49 -
 50
50 -
 51
51 -
 52
52 -
53
-
54
-
55
-
56
-
57
-
58
-
59
-
60
-
61
-
62
-
63
-
64
-
65
-
66
-
67
-
68
-
69
-
70
-
71
-
72
-
73
-
74
-
75
-
76
-
77
-
78
-
79
-
80
-
81
-
82
-
83
-
84
-
85
-
86
-
87
-
88
-
89
-
90
-
91
-
92
-
93
-
94
-
95
-
96
-
97
-
98
-
99
-
100
-
101
-
102
-
103
-
104
-
105
-
106
-
107
-
108
-
109
-
110
-
111
-
112
-
113
-
114
-
115
-
116
-
117
-
118
-
119
-
120
 |
 |
