Panasonic PVDV73D PVDV73 User Guide - Page 50
Playback Still Images
 |
View all Panasonic PVDV73D manuals
Add to My Manuals
Save this manual to your list of manuals |
Page 50 highlights
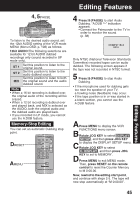
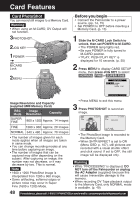
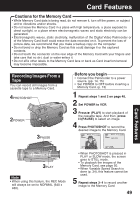
Card Features Playback Still Images You can view the images on the Memory Card. 3, 4 JOG KEY Before you begin • Set POWER to OFF before inserting a recorded Memory Card. (pp. 48, 49) 1 Slide the M-CARD Lock Switch to unlock, then set POWER to M-CARD. • "PLAY: PUSH PLAY KEY" is displayed for 10 seconds. 1POWER M-CARD Lock 2M-PLAY 2 Press (M-PLAY) to display the Multi playback screen. • "PLEASE WAIT" appears on-screen. • Rotate JOG KEY to scroll through Multi image screen pages (6 images per page) and select an image. • The selected image is underlined in green. M-STOP "PLEASE WAIT" is displayed. Note • If the file number is changed, the Palmcorder cannot read the file data. • This product is compliant with DCF (Design rule for Camera File System). Images saved on the Memory Card using other Digital Still Cameras that are compliant with DCF can be viewed on this product. • Press MENU to display CARD SETUP menu screen. • Press (M-STOP) to return to the Card PhotoShot REC Mode. (p. 48) 3 Press JOG KEY to display the selected image as a full-size screen. • "PLEASE WAIT" appears on-screen. 4 Rotate JOG KEY to select BACK (previous image), MULTI (Multi Image screen), or NEXT (next image). Warning • While "PLEASE WAIT" is displayed, DO NOT turn off the Palmcorder or unplug the AC Adaptor (supplied) because this may cause irreversible damage to the Memory Card. • Press (M-STOP) to return to the Multi Playback screen. Note • The input to the Video Monitor and LCD Panel will not be displayed on the picture recorded of the Memory Card. 50 Forassistance, pleasecall: 1-800-211-PANA(7262)orsende-mailto:[email protected]
-
 1
1 -
2
-
3
-
4
-
5
-
6
-
7
-
8
-
9
-
10
-
11
-
12
-
13
-
14
-
15
-
16
-
17
-
18
-
19
-
20
-
21
-
22
-
23
-
24
-
25
-
26
-
27
-
28
-
29
-
30
-
31
-
32
-
33
-
34
-
35
-
36
-
37
-
38
-
39
-
40
-
41
-
42
-
43
-
44
-
 45
45 -
 46
46 -
 47
47 -
 48
48 -
 49
49 -
 50
50 -
 51
51 -
 52
52 -
 53
53 -
 54
54 -
 55
55 -
56
-
57
-
58
-
59
-
60
-
61
-
62
-
63
-
64
-
65
-
66
-
67
-
68
-
69
-
70
-
71
-
72
-
73
-
74
-
75
-
76
-
77
-
78
-
79
-
80
-
81
-
82
-
83
-
84
-
85
-
86
-
87
-
88
-
89
-
90
-
91
-
92
-
93
-
94
-
95
-
96
-
97
-
98
-
99
-
100
-
101
-
102
-
103
-
104
-
105
-
106
-
107
-
108
-
109
-
110
-
111
-
112
-
113
-
114
-
115
-
116
-
117
-
118
-
119
-
120
 |
 |
