Panasonic PVGS36 PVGS36 User Guide - Page 11
POWER SUPPLY, Before Using, Using the, AC Adaptor
 |
View all Panasonic PVGS36 manuals
Add to My Manuals
Save this manual to your list of manuals |
Page 11 highlights
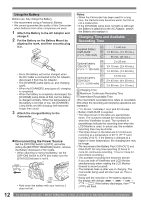
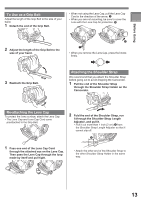
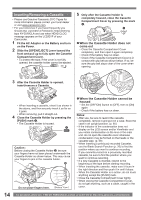
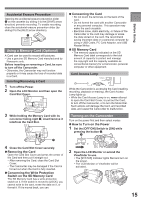
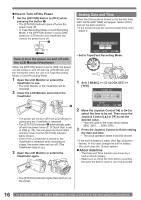
Before Using 15 Audio-Video Output Jack [AV OUT] (pp. 44, 45) • Connecting an AV Cable to this jack activates the Camcorder's built-in speaker. • When connecting the pin plug of the AV Cable to this jack, plug it in as far as it goes. 16 17 30 Mode Dial (p. 18) 31 Recording Start/Stop Button (p. 25) 32 Joystick Control (pp. 18, 20) 33 Light Button [LIGHT] (p. 28) 34 35 18 36 21 19 20 22 16 Cassette Eject Lever [OPEN/EJECT] (p. 14) 17 Cassette Holder (p. 14) 18 Cassette Compartment Cover (p. 14) 19 DV Input/Output Terminal (pp. 45~46, 53) • Connect this to the digital video equipment. 20 USB Jack [ ] (pp. 48, 50) • It is only compatible with USB 2.0 PCI Card and/or connection. 21 Speaker (p. 39) 22 Built-in LED Light (p. 28) 24 23 25 26 27 28 32 29 30 31 33 23 Viewfinder (pp. 15~17, 61) Due to limitations in LCD production technology, there may be some tiny bright or dark spots on the Viewfinder screen. However, this is not a malfunction and does not affect the recorded picture. 24 Eyepiece Corrector Knob (p. 17) 25 Photoshot Button [PHOTO SHOT] (pp. 26, 27) 26 Shoulder Strap Holders (p. 13) 27 Power Switch [OFF/ON] (p. 15) 28 Status Indicator [STATUS] (pp. 15~16, 29) 29 Menu Button [MENU] (p. 20) 34 Grip Belt (p. 13) 35 Tripod Receptacle • This is a hole for attaching the Camcorder to optional tripod. (Please carefully read the Operating Instructions for how to attach the tripod to the Camcorder.) • You cannot open the Card Slot Cover when the tripod is used. Insert the card first and then attach the tripod. 36 Battery Eject Switch [BATTERY RELEASE] (p. 12) Power Supply Using the AC Adaptor • Before connecting or disconnecting the power supply, set the [OFF/ON] Switch on the Camcorder to [OFF] and make sure that [STATUS] Indicator is not lit. (pp. 15~16) 1 Connect the DC Cable to the Camcorder. 2 Connect the DC Cable to the AC Adaptor. 3 Connect the AC Cable to the AC Adaptor and the AC Jack. 1 2 3 11
-
 1
1 -
2
-
3
-
4
-
5
-
 6
6 -
 7
7 -
 8
8 -
 9
9 -
 10
10 -
 11
11 -
 12
12 -
 13
13 -
 14
14 -
 15
15 -
 16
16 -
17
-
18
-
19
-
20
-
21
-
22
-
23
-
24
-
25
-
26
-
27
-
28
-
29
-
30
-
31
-
32
-
33
-
34
-
35
-
36
-
37
-
38
-
39
-
40
-
41
-
42
-
43
-
44
-
45
-
46
-
47
-
48
-
49
-
50
-
51
-
52
-
53
-
54
-
55
-
56
-
57
-
58
-
59
-
60
-
61
-
62
-
63
-
64
-
65
-
66
-
67
-
68
-
69
-
70
-
71
-
72
-
73
-
74
-
75
-
76
 |
 |
