Panasonic PVGS36 PVGS36 User Guide - Page 45
Editing Mode, Copying Onto A Dvd Recorder Or A Vcr (dubbing)
 |
View all Panasonic PVGS36 manuals
Add to My Manuals
Save this manual to your list of manuals |
Page 45 highlights
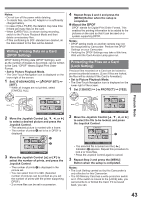
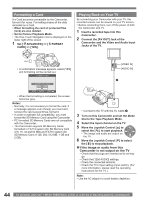
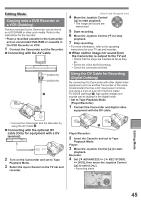
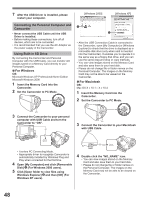
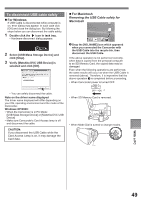
Editing Mode Copying onto a DVD Recorder or a VCR (Dubbing) Pictures recorded by the Camcorder can be stored on a DVD-RAM or other such media. Refer to the instructions for the recorder. • Place a recorded cassette in the Camcorder, and an unrecorded DVD-RAM or cassette in the DVD Recorder or VCR. 1 Connect the Camcorder and the Recorder. „ Connecting with the AV Cable [VIDEO IN] [AUDIO IN] 1 A/V [One-Touch Navigation icon] 4 Move the Joystick Control [▲] to start playback. • The image and sound are reproduced. 5 Start recording. 6 Move the Joystick Control [▼] to stop playback. 7 Stop recording. • For more information, refer to the operating instructions for your TV set and recorder. „ When neither image nor sound from the Camcorder is output to the TV set • Check that the plugs are inserted as far as they go. • Check the [12bit AUDIO] settings. • Check the connected terminal. Using the DV Cable for Recording (Digital Dubbing) By connecting this Camcorder with other digital video equipment (such as another Camcorder of the same format/model) that has a DV input/output Terminal, and using a 4-pin to 4-pin DV Interface Cable PV-DDC9 (optional) 1 , high quality images and sounds can be dubbed in the digital mode. • Set to Tape Playback Mode (Player/Recorder) 1 Connect the Camcorder and digital video equipment with the DV cable. • Connect the Camcorder and the Recorder by using the AV Cable 1 . „ Connecting with the optional DV cable (Only for equipment with a DV terminal) 2 Turn on the Camcorder and set to Tape Playback Mode. 3 Select the input channel on the TV set and recorder. 1 Player/Recorder: 2 Insert the Cassette and set to Tape Playback Mode. Player: 3 Move the Joystick Control [▲] to start playback. Recorder: 4 Set [ ADVANCED] >> [ REC STDBY] >> [YES], then move the Joystick Control [▲] to select [ ]. • Recording starts. SP 3h59m59s29f R 2:00 Editing Mode 12:34:56AM JAN 2 2006 100 45
-
 1
1 -
2
-
3
-
4
-
5
-
6
-
7
-
8
-
9
-
10
-
11
-
12
-
13
-
14
-
15
-
16
-
17
-
18
-
19
-
20
-
21
-
22
-
23
-
24
-
25
-
26
-
27
-
28
-
29
-
30
-
31
-
32
-
33
-
34
-
35
-
36
-
37
-
38
-
39
-
 40
40 -
 41
41 -
 42
42 -
 43
43 -
 44
44 -
 45
45 -
 46
46 -
 47
47 -
 48
48 -
 49
49 -
 50
50 -
51
-
52
-
53
-
54
-
55
-
56
-
57
-
58
-
59
-
60
-
61
-
62
-
63
-
64
-
65
-
66
-
67
-
68
-
69
-
70
-
71
-
72
-
73
-
74
-
75
-
76
 |
 |
