Panasonic WJ-ND400K Setup Information - Page 29
Quick settings 3, Important, Settings, Description
 |
View all Panasonic WJ-ND400K manuals
Add to My Manuals
Save this manual to your list of manuals |
Page 29 highlights
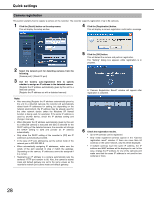
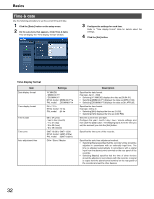
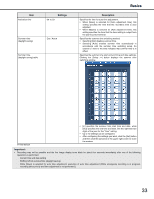
7 Click the [OK] button. This completes registration. Quick settings Important: • Execute [Register the IP address automatically given by this unit to a detected camera] to automatically provide IP addresses to all detected cameras. Note that some cameras may already be operating. Note: • When a camera you want to register is not detected or when you want to change the settings of a camera, refer to "NW camera (page 48)". • Registering a camera forcibly logs out any other users currently logged in to the recorder. • All recording is disabled while auto camera registration is in progress. • Camera auto-registration is unavailable for cameras on a different subnet accessed through a router. • For improved security, some camera models whose settings have been changed from initial defaults are detected for the only first 20 minutes after power is turned on. For details refer to the operating instructions for the camera. • The compression format of registered cameras is set automatically to JPEG or M-JPEG. Quick settings 3 Item Port setup Camera auto-registration ♦Initial default Settings Description Camera port♦ / Client PC port Select the network port to which the camera being registered is connected. Register the IP address automatically given by this unit to a detected camera♦ / Register the IP address set with a detected camera Specifies the IP address given to the detected camera by the recorder. • When [On] is selected for [DHCP] for the recorder [Network setup], no IP address can be given to the camera. 29
-
 1
1 -
2
-
3
-
4
-
5
-
6
-
7
-
8
-
9
-
10
-
11
-
12
-
13
-
14
-
15
-
16
-
17
-
18
-
19
-
20
-
21
-
22
-
23
-
 24
24 -
 25
25 -
 26
26 -
 27
27 -
 28
28 -
 29
29 -
 30
30 -
 31
31 -
 32
32 -
 33
33 -
 34
34 -
35
-
36
-
37
-
38
-
39
-
40
-
41
-
42
-
43
-
44
-
45
-
46
-
47
-
48
-
49
-
50
-
51
-
52
-
53
-
54
-
55
-
56
-
57
-
58
-
59
-
60
-
61
-
62
-
63
-
64
-
65
-
66
-
67
-
68
-
69
-
70
-
71
-
72
-
73
-
74
-
75
-
76
-
77
-
78
-
79
-
80
-
81
-
82
-
83
-
84
-
85
-
86
-
87
-
88
-
89
-
90
-
91
-
92
-
93
-
94
-
95
-
96
-
97
-
98
-
99
-
100
-
101
-
102
 |
 |