Panasonic WJ-ND400K Setup Information - Page 42
Schedules, Program
 |
View all Panasonic WJ-ND400K manuals
Add to My Manuals
Save this manual to your list of manuals |
Page 42 highlights
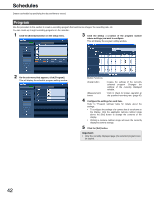
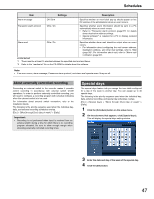
Schedules Create a schedule by specifying the day and time to record. Program Use the procedure in this section to create a recording program that controls live images, the recording rate, etc. You can create up to eight recording programs on the recorder. 1 Click the [Schedule] button on the setup menu. 3 Click the [Setup >>] button of the program number whose settings you want to configure. This will display the program setting window. 2 On the sub-menu that appears, click [Program]. This will display the schedule program setting window. Button Functions [Copy] button [Measurement] button : Copies the settings of the currently selected program. Changes the settings of the currently displayed window. : Click to check for proper operation at the specified recording rate. (page 45) 4 Configure the settings for each item. Refer to "Program settings" table for details about the settings. • To configure the settings of a camera that is not shown on the display, click the applicable camera number range above the [Set] button to change the contents of the display. • Clicking a camera number range will save the currently displayed camera settings. 5 Click the [Set] button. Important: • Only the currently displayed page (the selected program) can be copied. 42
-
 1
1 -
2
-
3
-
4
-
5
-
6
-
7
-
8
-
9
-
10
-
11
-
12
-
13
-
14
-
15
-
16
-
17
-
18
-
19
-
20
-
21
-
22
-
23
-
24
-
25
-
26
-
27
-
28
-
29
-
30
-
31
-
32
-
33
-
34
-
35
-
36
-
 37
37 -
 38
38 -
 39
39 -
 40
40 -
 41
41 -
 42
42 -
 43
43 -
 44
44 -
 45
45 -
 46
46 -
 47
47 -
48
-
49
-
50
-
51
-
52
-
53
-
54
-
55
-
56
-
57
-
58
-
59
-
60
-
61
-
62
-
63
-
64
-
65
-
66
-
67
-
68
-
69
-
70
-
71
-
72
-
73
-
74
-
75
-
76
-
77
-
78
-
79
-
80
-
81
-
82
-
83
-
84
-
85
-
86
-
87
-
88
-
89
-
90
-
91
-
92
-
93
-
94
-
95
-
96
-
97
-
98
-
99
-
100
-
101
-
102
 |
 |
