Pfaff ClassicStyle 2027 Owner's Manual - Page 12
Electrical connection, For the USA and Canada, Connecting the foot control, Main switch, 0 = OFF,
 |
View all Pfaff ClassicStyle 2027 manuals
Add to My Manuals
Save this manual to your list of manuals |
Page 12 highlights
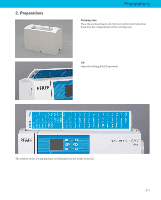
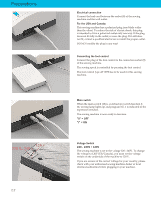
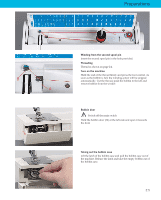
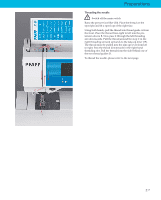
Preparations 120 V 220 V... 240 V 2:2 Electrical connection Connect the lead cord between the socket (8) of the sewing machine and the wall outlet. For the USA and Canada: This sewing machine has a polarized plug (one blade wider than the other). To reduce the risk of electric shock, this plug is intended to Àt in a polarized outlet only one way. If the plug does not Àt fully in the outlet, reverse the plug. If it still does not Àt, contact a qualiÀed electrician to install the proper outlet. DO NOT modify the plug in any way! Connecting the foot control Connect the plug of the foot control to the connection socket (9) of the sewing machine. The sewing speed is controlled by pressing the foot control. The foot control type AT 0070 has to be used for this sewing machine. Main switch When the main switch (10) is switched on (switch function I) the sewing lamp lights up and program No. 1 is indicated in the expression window. The sewing machine is now ready to function. "0" = OFF "I" = ON Voltage Switch 220 - 240V / 120V The sewing machine is set to the voltage 220 - 240V. To change the voltage to 120V (US/Canada), you must set the voltage switch on the underside of the machine to 120 V. If you are unsure of the correct voltage for your country, please check with your authorized sewing machine dealer or local electrical authorities before plugging in your machine.
-
 1
1 -
2
-
3
-
4
-
5
-
6
-
 7
7 -
 8
8 -
 9
9 -
 10
10 -
 11
11 -
 12
12 -
 13
13 -
 14
14 -
 15
15 -
 16
16 -
 17
17 -
18
-
19
-
20
-
21
-
22
-
23
-
24
-
25
-
26
-
27
-
28
-
29
-
30
-
31
-
32
-
33
-
34
-
35
-
36
-
37
-
38
-
39
-
40
-
41
-
42
-
43
-
44
-
45
-
46
-
47
-
48
-
49
-
50
-
51
-
52
 |
 |
