Pfaff ClassicStyle 2027 Owner's Manual - Page 43
Cross-stitch, Hemstitching, Traditional hemstitching
 |
View all Pfaff ClassicStyle 2027 manuals
Add to My Manuals
Save this manual to your list of manuals |
Page 43 highlights
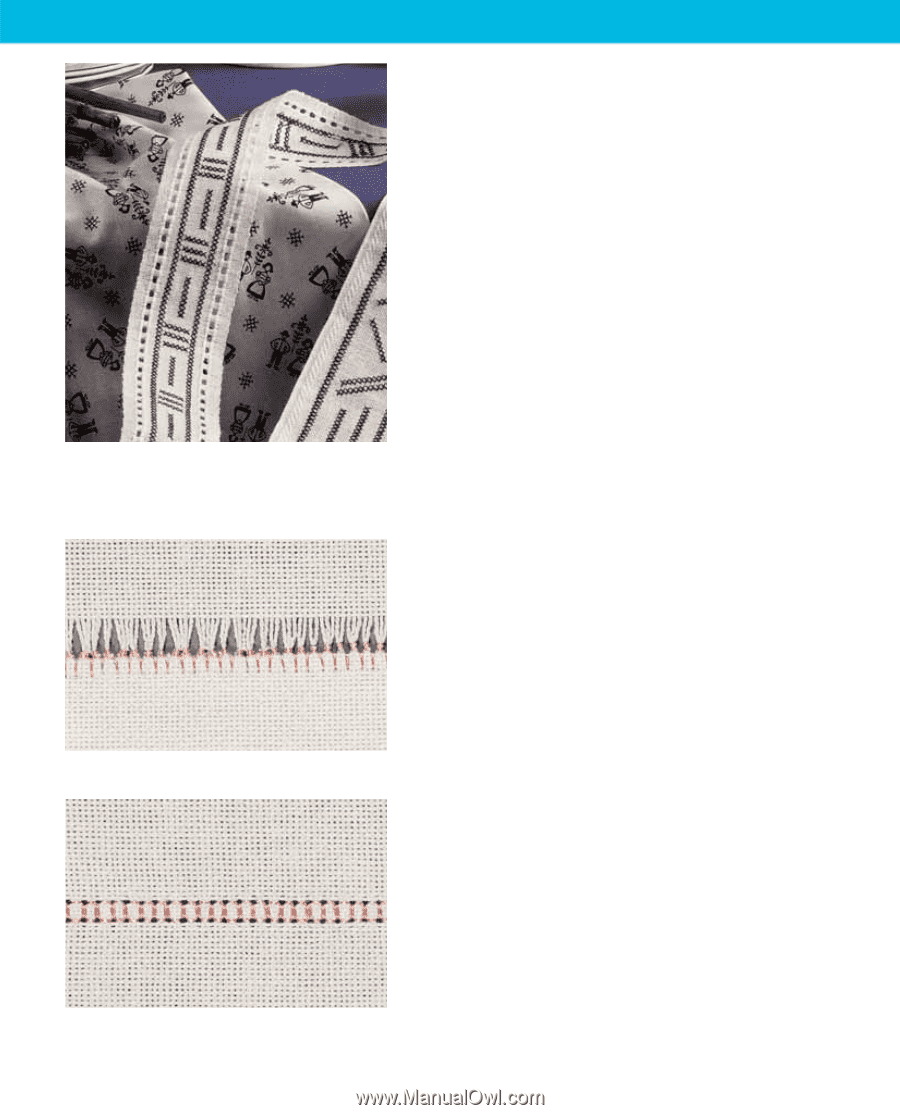
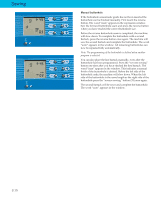
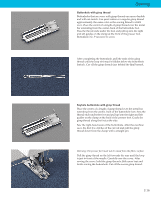
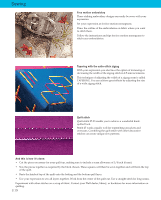
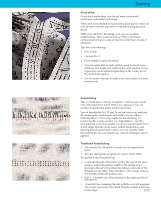
Sewing Cross-stitch Cross-stitch embroidery has always been a wonderful traditional, embroidery technique. What used to be stitched by hand with a great deal of effort can now be sewn with the expression with astonishing ease and speed. With cross-stitch No. 22, design your own cross-stitch combinations. These patterns look as if they were handembroidered and give a special touch to table linen, towels or garments. Tips for cross-stitching: • Sew slowly. • Use foot No. 2. • Place stabilizer under the fabric. • You can embroider on Aida cloth as used for hand crossstitching. The length and width of the cross-stitches of your expression can be altered depending on the count/size of the Aida cloth squares. • Use decorative threads to make your cross-stitch look more professional. Hemstitching This is a technique everyone recognizes - but was previously only embroidered by hand! With your expression you can produce hemstitching much quicker and easier. Special hemstitches No. 25 and 26 are built into your machine. By changing the stitch length and width you can achieve different effects. Use a wing needle for hemstitching. (A normal needle is only used for very light fabrics - size 80.) Hemstitching is most successful on woven natural fabrics from which single threads can be easily pulled. Embroidery and darning thread, particularly cotton, are very suitable. With the hemstitches on your expression, various techniques can be applied. Traditional hemstitching • Use stitches No. 25 and 26 to create lovely hemstitched holes. • Sew the appropriate program on a piece of test fabric. For pulled thread hemstitching: • Count the threads of the fabric within the area of the sewn pattern. Adjust the pattern width so the needle is not piercing a thread to be pulled, but falling to the side of the threads of your fabric. This will allow you to easily remove the threads within the pattern area. • Pull 1 - 3 threads out of the material to the right and left of the pattern. • Overstitch the remaining threads with the selected program. The needle must enter the pulled threads on both sides close to the edges. 3:20
-
 1
1 -
2
-
3
-
4
-
5
-
6
-
7
-
8
-
9
-
10
-
11
-
12
-
13
-
14
-
15
-
16
-
17
-
18
-
19
-
20
-
21
-
22
-
23
-
24
-
25
-
26
-
27
-
28
-
29
-
30
-
31
-
32
-
33
-
34
-
35
-
36
-
37
-
 38
38 -
 39
39 -
 40
40 -
 41
41 -
 42
42 -
 43
43 -
 44
44 -
 45
45 -
 46
46 -
 47
47 -
 48
48 -
49
-
50
-
51
-
52
 |
 |