Philips DVP5990 User manual - Page 13
Basic Connections - hdmi
 |
UPC - 609585146617
View all Philips DVP5990 manuals
Add to My Manuals
Save this manual to your list of manuals |
Page 13 highlights
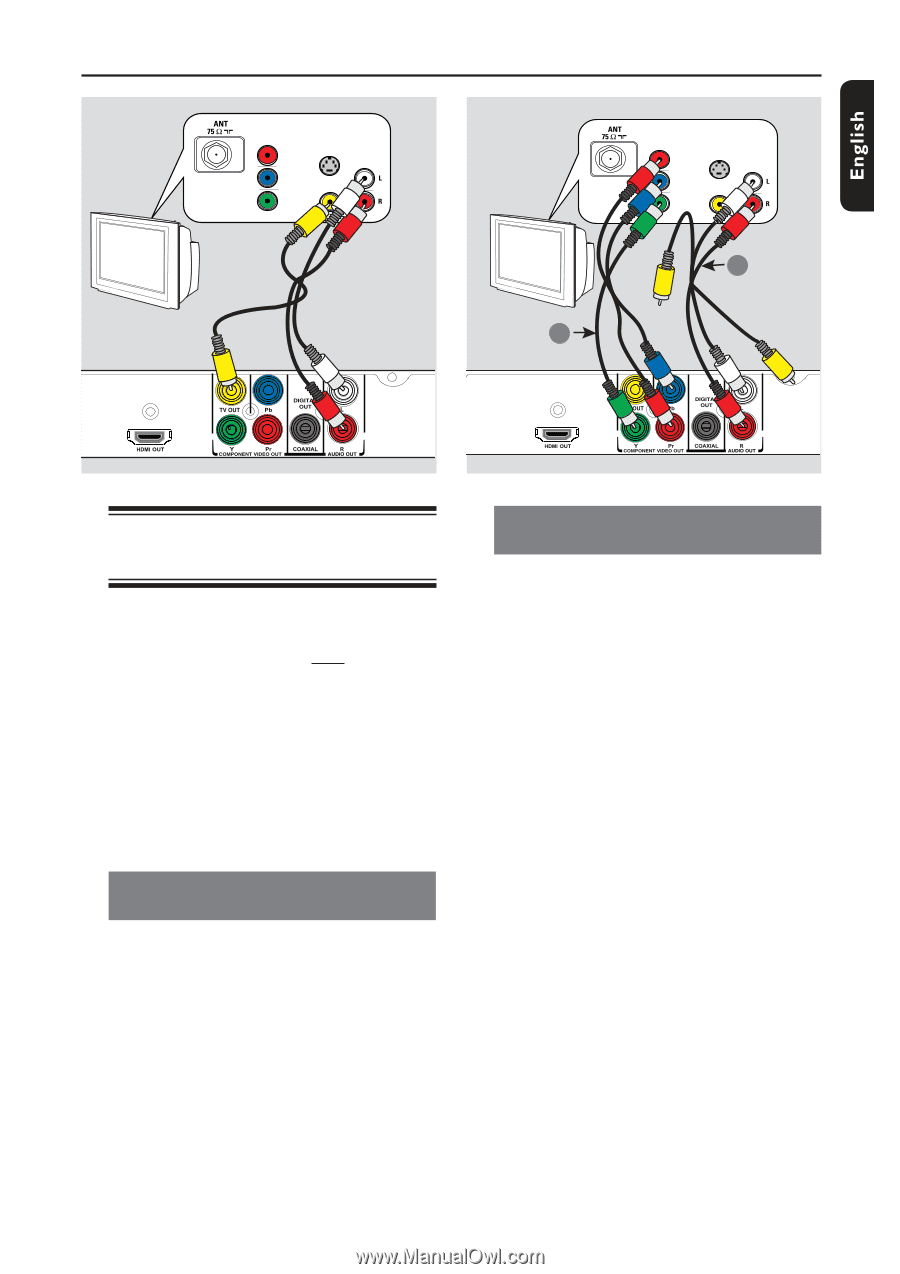
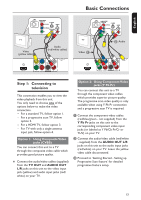
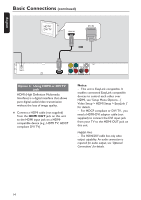
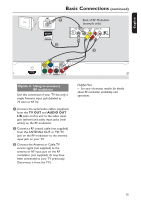
:c\a^h] COMPONENT VIDEO IN S-VIDEO V (Pr/Cr) IN AUDIO IN U (Pb/Cb) VIDEO IN Y TV Video (yellow cable) Audio (red/white cables) Basic Connections TV Video 1 COMPONENT VIDEO IN S-VIDEO V (Pr/Cr) IN AUDIO IN U (Pb/Cb) VIDEO IN Y 2 Audio Step 1: Connecting to television This connection enables you to view the video playback from this unit. You only need to choose one of the options below to make the video connection. - For a standard TV, follow option 1. - For a progressive scan TV, follow option 2. - For a HDMI TV, follow option 3. - For TV with only a single antenna input jack, follow option 4. Option 1: Using Composite Video jacks (CVBS) You can connect this unit to a TV through the composite video cable which provides good picture quality. Connect the audio/video cables (supplied) from the TV OUT and AUDIO OUT L/R jacks on this unit to the video input jack (yellow) and audio input jacks (red/ white) on your TV. Option 2: Using Component Video jacks (Y Pb Pr) You can connect this unit to a TV through the component video cables which provides superior picture quality. The progressive scan video quality is only available when using Y Pb Pr connection and a progressive scan TV is required. A Connect the component video cables (red/blue/green - not supplied) from the Y Pb Pr jacks on this unit to the corresponding component video input jacks (or labeled as Y Pb/Cb Pr/Cr or YUV) on your TV. B Connect the audio/video cable (red/white - supplied) from the AUDIO OUT L/R jacks on this unit to the audio input jacks (red/white) on your TV. Leave the yellow video cable disconnected. C Proceed to 'Getting Started - Setting up Progressive Scan feature' for detailed progressive feature setup. 13
-
 1
1 -
2
-
3
-
4
-
5
-
6
-
7
-
 8
8 -
 9
9 -
 10
10 -
 11
11 -
 12
12 -
 13
13 -
 14
14 -
 15
15 -
 16
16 -
 17
17 -
 18
18 -
19
-
20
-
21
-
22
-
23
-
24
-
25
-
26
-
27
-
28
-
29
-
30
-
31
-
32
-
33
-
34
-
35
-
36
-
37
-
38
-
39
-
40
-
41
-
42
-
43
-
44
-
45
-
46
-
47
-
48
-
49
-
50
-
51
-
52
-
53
-
54
-
55
-
56
-
57
-
58
 |
 |