Pioneer VSX-43 Owner's Manual
Pioneer VSX-43 Manual
 |
View all Pioneer VSX-43 manuals
Add to My Manuals
Save this manual to your list of manuals |
Pioneer VSX-43 manual content summary:
- Pioneer VSX-43 | Owner's Manual - Page 1
VSX-43 Register your product on http://www.pioneerelectronics.com (US) http://www.pioneerelectronics.ca (Canada) • Protect your new investment The details of your purchase will be on file for reference in the event of an insurance claim such as loss or theft. • Receive free tips, updates and service - Pioneer VSX-43 | Owner's Manual - Page 2
user to the presence of important operating and maintenance (servicing) instructions receiver is connected. - Consult the dealer or an experienced radio/TV technician for help. D8-10-1-2_A1_En Information to User Wiring Cable should be used for connection with speaker, and should be routed away from - Pioneer VSX-43 | Owner's Manual - Page 3
with the manufacturer's instructions. 8) Do not , consult an electrician for replacement of the obsolete outlet. connections. D8-10-3a_A1_En 13) Unplug this apparatus during lightning storms or when unused for long periods of time. 14) Refer all servicing to qualified service personnel. Servicing - Pioneer VSX-43 | Owner's Manual - Page 4
network 42 Playing back your favorite songs 42 The Network Setup menu 42 Network Configuration 42 Language 43 Firmware Update 43 Network setting using Safari browser 44 Friendly Name setting using Safari browser 44 Firmware update using Safari browser 44 Factory Reset 45 System Information - Pioneer VSX-43 | Owner's Manual - Page 5
directly 57 Clearing all the remote control settings 57 Controls for TVs 58 Controls for other components 58 Preset Code List 58 11 Additional information Troubleshooting 62 General 62 NETWORK feature 63 HDMI 64 Important information regarding the HDMI connection 64 Windows 7 64 MHL 64 - Pioneer VSX-43 | Owner's Manual - Page 6
• Setup microphone • Remote control • AAA size IEC R03 dry cell batteries (to confirm system operation) x2 • AM loop antenna • FM wire antenna • Warranty card • Quick start guide • Safety Brochure • SPEAKER CAUTION Sheet (English only) • These operating instructions (CD-ROM) Installing the receiver - Pioneer VSX-43 | Owner's Manual - Page 7
(page 27). 9 Remote sensor Receives the signals from the remote control (see Operating range of remote control on page 10). 10 MASTER VOLUME dial 11 STANDBY/ON 12 PHONES jack Use to connect headphones. When the headphones are connected, there is no sound output from the speakers. The listening - Pioneer VSX-43 | Owner's Manual - Page 8
is turned ON, the display will go dark (page 35). 16 iPod iPhone iPad DIRECT CONTROL Change the receiver's input to the iPod and enable iPod operations on the iPod (page 28). 17 iPod/iPhone/iPad terminals Use to connect your Apple iPod/iPhone/iPad or USB mass storage device as an audio source (page - Pioneer VSX-43 | Owner's Manual - Page 9
radio bands (page 32). Press iPod/USB first to access: iPod CTRL - Switches between the iPod controls and the receiver controls (page 27). 8 TUNE /, PRESET /), ENTER Use the arrow buttons when setting up your surround sound system (page 49). Also used to control Blu-ray Disc/DVD menus/options - Pioneer VSX-43 | Owner's Manual - Page 10
- Press while a song is being played back or stopped. The selected song is then registered in the Favorites folder (page 42). 11 SOURCE Press to turn on/off other components connected to the receiver (page 57). 12 TV CONTROL buttons These buttons are dedicated to control the TV assigned to the TV - Pioneer VSX-43 | Owner's Manual - Page 11
with this setup. • You will not be able to connect the B speakers if you connect the front height speakers in the main zone. Further, if you use the B speakers, a 5.1 ch playback will be the maximum in the main zone. (No sound is output from the surround back speaker.) R L Speaker B Main zone Bi - Pioneer VSX-43 | Owner's Manual - Page 12
shocks such as earthquakes. Connecting the speakers The receiver will work with just two stereo speakers (the front speakers in the diagram) but using at least three speakers is recommended, and a complete setup is best for surround sound. Make sure you connect the speaker on the right to the - Pioneer VSX-43 | Owner's Manual - Page 13
right Speaker B - left Subwoofer LINE LEVEL INPUT Front right Center Front left PREOUT SUBWOOFER SURROUND R L SURROUND BACK R L 4 7 62 Surround right FRONT R L CENTER The surround back terminals can also be used for ZONE 2. 5.1 ch surround setting Not connected Not connected 6.1 ch - Pioneer VSX-43 | Owner's Manual - Page 14
2 Front Bi-Amp connection Front right Hight Low Subwoofer Center Front left Hight Front height left Low Front height right Surround right Surround left Connecting your equipment 4 7 62 14 - Pioneer VSX-43 | Owner's Manual - Page 15
output from your TV (no sound will be heard from this receiver). • If the video signal Control with HDMI function (see Control with HDMI function on page 55) • 4K signal transfer - This may not operate properly, depending on the connected equipment. - 4K 24p, 4K 25p and 4K 30p signals are supported - Pioneer VSX-43 | Owner's Manual - Page 16
CYOMPONENT PB VIDEO PR Blue (PB) Red (PR) About video outputs connection This receiver is not loaded with a video converter. When you use HDMI cables for connecting to the input device, the same cables should be used for connecting to the TV. The signals input from the analog (composite) video - Pioneer VSX-43 | Owner's Manual - Page 17
cables (as shown). - If the TV supports the HDMI Audio Return Channel function, the sound of the TV can be input to the receiver via the HDMI terminal, so there is no need to connect an audio cable. In this case, set ARC at HDMI Setup to ON (see HDMI Setup on page 55). Note • In order - Pioneer VSX-43 | Owner's Manual - Page 18
instructions supplied with your player for more information. Important • When the receiver and TV are connected by composite cable, the OSD function allowing display of the receiver OUT Select one This connection is required in order to listen to the sound of the TV over the receiver. 4 7 62 18 - Pioneer VSX-43 | Owner's Manual - Page 19
Connect a Bluetooth ADAPTER to the ADAPTER PORT terminal on the rear panel. • For instructions on playing the Bluetooth wireless technology device, see Pairing the Bluetooth ADAPTER and Bluetooth wireless technology device on page 30. Important • Do not move the receiver with the Bluetooth ADAPTER - Pioneer VSX-43 | Owner's Manual - Page 20
FM reception Use an F connector (not supplied) to connect an external FM antenna. FM UNBAL 75 F connector Connecting an IR receiver If you keep your stereo components in a closed cabinet or shelving unit, or you wish to use the sub zone remote control in another zone, you can use an optional IR - Pioneer VSX-43 | Owner's Manual - Page 21
the receiver's input back to iPod, or turn OFF the HDMI control function (see HDMI Setup on page 55). Connecting a USB device It is possible to play audio and photo files by connecting USB devices to this receiver. Switch the receiver into standby then connect your USB device to the iPod/iPhone - Pioneer VSX-43 | Owner's Manual - Page 22
power is turned on.) • For instructions on playing the MHL-compatible device, see Playing an MHL-compatible device on page 30. Video camera (etc.) Plugging in the receiver Only plug in after you have connected all your components to this receiver, including the speakers. Plug the AC power cord - Pioneer VSX-43 | Owner's Manual - Page 23
, then press ENTER. Home Menu 1 . Auto MCACC 2 . Manual SP Setup 3 . Input Assign 4. Auto Power Down 5. HDMI Setup 6. Network Standby 7. MHL Setup 8. Speaker System 9. 12V Trigger 10. OSD Setup 4 7 62 • Mic In! blinks when the microphone is not connected to MCACC SETUP MIC jack. Try to be as quiet - Pioneer VSX-43 | Owner's Manual - Page 24
with the speaker connection. If selecting RETRY doesn't fix the problem, turn off the power and check the speaker connections. 9 Make sure 'OK' is selected, then press ENTER. If the screen in step 8 is left untouched for 10 seconds and ENTER is not pressed in step 9, the Auto MCACC setup will start - Pioneer VSX-43 | Owner's Manual - Page 25
play. • The input of the receiver will switch over, and you will be able to operate other components using the remote control. To operate the receiver, first press RECEIVER on the remote control sound is coming from the speakers connected to this receiver , if the ARC at HDMI Setup is set to - Pioneer VSX-43 | Owner's Manual - Page 26
/O1 (digital). • Some DVD players don't output DTS signals. For more details, refer to the instruction manual supplied with your DVD player. Tip • In order to enjoy the picture and/or sound from devices connected to each terminal, select the input by doing the following. Video/Audio (HDMI) DVD SAT - Pioneer VSX-43 | Owner's Manual - Page 27
list. For example, you can play all the songs by a particular artist. Basic playback controls This receiver's remote control buttons can be used for basic playback of files stored on an iPod. • Press iPod/USB to switch the remote control to the iPod/ USB operation mode. MUTE AUDIO PARAMETER - Pioneer VSX-43 | Owner's Manual - Page 28
you arrive at what you want to play, then press to start playback. Basic playback controls This receiver's remote control buttons can be used for basic playback of files stored on USB devices. • Press iPod/USB to switch the remote control to the iPod/ USB operation mode. AUDIO PARAMETER TOP MENU - Pioneer VSX-43 | Owner's Manual - Page 29
while listening to music files by returning to the folder/file list display while playing a music file on a USB device then playing the photo files. About playable file formats The USB function of this receiver supports the following file formats. Note that some file formats are not available for - Pioneer VSX-43 | Owner's Manual - Page 30
equipped with Bluetooth wireless technology: Digital music player + Bluetooth audio transmitter (sold commercially) Music data Bluetooth® ADAPTER This receiver Remote control operation Wireless music play When the Bluetooth ADAPTER (Pioneer Model No. AS-BT100 or AS-BT200) is connected to this - Pioneer VSX-43 | Owner's Manual - Page 31
on Bluetooth wireless technology device you use, operation may differ from what is shown in the remote control buttons. iPod CTRL RETURN MUTE 4 7 62 4 While listening to a source, press RECEIVER then press ADV SURR repeatedly to select S.R AIR. AIR JAM Air Jam - a Pioneer-exclusive application - Pioneer VSX-43 | Owner's Manual - Page 32
Jam function cannot be used while an iPod is connected to this receiver. • With this receiver, when an iPod is connected or disconnected while the music of a Bluetooth wireless technology device is playing, the connection with the Bluetooth wireless technology device may be canceled. Listening to - Pioneer VSX-43 | Owner's Manual - Page 33
you haven't done this already. Press PRESET / to select the station preset you want. • You can also use the number buttons on the remote control to recall the station preset. Naming preset stations For easier identification, you can name all of your preset stations. 1 Choose the station preset - Pioneer VSX-43 | Owner's Manual - Page 34
to see how the source is being processed. Listening in surround sound ALC/ STANDARD ALC/ STANDARD SURR Using this receiver, you can listen to any source in surround sound. However, the options available will depend on your speaker setup and the type of source you're listening to. • If the - Pioneer VSX-43 | Owner's Manual - Page 35
left and right speakers sound projection area converges. Front left speaker Front right speaker S.R AIR (Sound Retriever AIR) PHONES SURR Suitable for listening to the sound from a Bluetooth wireless technology device. The S.R AIR listening mode can only selected when the ADAPTER input. When - Pioneer VSX-43 | Owner's Manual - Page 36
Better sound using Phase Control This receiver's Phase Control feature uses phase correction measures to make sure your sound source to a higher value. • If the speaker distance is not properly set, you may not have a maximized Phase Control effect. • The Phase Control mode cannot be set to ON in - Pioneer VSX-43 | Owner's Manual - Page 37
restoring sound pressure and smoothing jagged artifacts left over after compression. OFFc ON DUAL MONOd Specifies how dual mono encoded Dolby Digital soundtracks should be played. CH1 - Channel 1 is heard only CH2 - Channel 2 is heard only CH1 CH2 - Both channels heard from front speakers F.PCM - Pioneer VSX-43 | Owner's Manual - Page 38
prevent the ultralow bass tones from distorting the sound from the speakers. The LFE is not limited when set problems using this with most SACD discs, but if the sound distorts, it is best to switch the gain setting back to 0 dB. g. This feature is only available when the connected display supports - Pioneer VSX-43 | Owner's Manual - Page 39
playback may be interrupted when the volume is adjusted from the controller. In this case, adjust the volume from the receiver or remote control. Using AirPlay on iPod touch, iPhone, iPad, and iTunes AirPlay works with iPhone, iPad, and iPod touch with iOS 4.3.3 or later, Mac with OS X Mountain Lion - Pioneer VSX-43 | Owner's Manual - Page 40
stored on components on the network on page 42. • Favorites - See Playing back your favorite songs on page 42. 4 7 62 Basic playback controls You can perform the following operations with the remote control of this receiver. Note that some buttons are not available for operation depending on the - Pioneer VSX-43 | Owner's Manual - Page 41
a connection to the Internet, as services are not transmitted through the air but are delivered over the World Wide Web. On this receiver you can select Internet radio stations by genre as well as by region. Depending on the Internet line conditions, the sound may not be smooth when playing Internet - Pioneer VSX-43 | Owner's Manual - Page 42
can be set the NETWORK function OSD screen (page 43). • Firmware Update - Use to update the receiver's firmware and check the version (page 43). • Factory Reset - Use to reset all network connection settings to their initial, factory-setting condition (page 45). • System Info - You can check - Pioneer VSX-43 | Owner's Manual - Page 43
receiver in the System Info menu before updating and confirm that the firmware in the USB memory device is a newer version. • Updating may reset the receiver's settings to the initial, factory-setting condition. Whether this is applicable to your receiver can be confirmed at our Pioneer website. 43 - Pioneer VSX-43 | Owner's Manual - Page 44
Playback with NETWORK features 1 Select 'Firmware Update' from the Network Setup menu. The receiver checks whether the USB memory device inserted into the USB port on the receiver's front panel contains updatable firmware. 2 To update, select 'Start'. 3 When 'Updating in progress, don't unplug!' is - Pioneer VSX-43 | Owner's Manual - Page 45
after the update is completed. Factory Reset Use to reset all network connection settings to their initial, factory-setting condition. 1 Select 'Factory Reset' from the Network Setup menu. 2 Select 'Start'. 3 Select 'OK' to confirm. The screen will return automatically to the play screen. 4 7 62 - Pioneer VSX-43 | Owner's Manual - Page 46
only be played on media servers supporting WMDRM. Content owners use WMDRM media through a wired or wireless network in the home. The USER'S OWN RISK, WITHOUT WARRANTY OF ANY KIND. PIONEER DISCLAIMS ALL WARRANTIES, EXPRESS OR IMPLIED, IN CONNECTION WITH ACCESS TO AND USE OF CONTENT SERVICES - Pioneer VSX-43 | Owner's Manual - Page 47
on it are deleted while playing content. • If there are problems within the network environment (heavy network traffic, etc.) content may not be displayed or played properly (playback may be interrupted or stalled). For best performance, a 100BASE-TX connection between player and PC is recommended - Pioneer VSX-43 | Owner's Manual - Page 48
feature of this receiver supports the following file quantization bit number and number of channels are played successively, they are played with no gap. - Gapless playback is not are not supported; specifically, Pro, Lossless, Voice. c. Uncompressed FLAC files are not supported. Pioneer does not - Pioneer VSX-43 | Owner's Manual - Page 49
the 12 V trigger terminal (see The 12 V Trigger Setting on page 53). • OSD Setup - Sets the overlay function ON/OFF. Manual speaker setup This receiver allows you to make detailed settings to optimize the surround sound performance. You only need to make these settings once (unless you change the - Pioneer VSX-43 | Owner's Manual - Page 50
LARGE, or the subwoofer, and bass sounds playing back from those selected as SMALL. It also decides where the cutoff will be for bass sounds in the LFE channel. • For more on selecting the speaker sizes, see Speaker Setting on page 49. 1 Select 'Manual SP Setup' from the Home Menu. 2 Select 'X.Over - Pioneer VSX-43 | Owner's Manual - Page 51
the Manual SP Setup menu. Tip • You can change the channel levels at any time by press RECEIVER , then press CH SELECT and LEV +/- on the remote control. You can also press CH SELECT and use / to select the channel, and then use / to adjust the channel levels. Speaker Distance For good sound - Pioneer VSX-43 | Owner's Manual - Page 52
• Bi-Amp - Enables higher quality playback sound through the front speakers with the connection of biamp speakers. • ZONE 2 - In a separate room (subzone) from which the receiver is located (main zone), one can enjoy playback of a device connected to the receiver (multi-zone function). 3 When you're - Pioneer VSX-43 | Owner's Manual - Page 53
the input function set here, a control signal is output from the receiver's 12 V trigger terminal, and operations such as power coupling with other devices and equipment can be achieved. 1 Select '12V Trigger' from the Home Menu. Home Menu 1 . Auto MCACC 2 . Manual SP Setup 3 . Input Assign 4. Auto - Pioneer VSX-43 | Owner's Manual - Page 54
this receiver. For details, see connection diagram on page 11. You should have a pair of speakers attached to the sub zone amplifier as shown. Using the MULTI-ZONE controls The following steps use the front panel controls to select sources. See MULTI-ZONE remote controls below. SPEAKERS CONTROL - Pioneer VSX-43 | Owner's Manual - Page 55
the TV and receiver are connected by HDMI connections, if the TV supports the HDMI Audio Return Channel function, the sound of the TV is input to the receiver via the HDMI terminal, so there is no need to connect an audio cable. In this case, set ARC at HDMI Setup to ON (see HDMI Setup below). For - Pioneer VSX-43 | Owner's Manual - Page 56
the input for a component connected to the receiver by HDMI connection is selected or when watching the TV.) • Automatic switching of inputs - The receiver's input switches automatically when the Control with HDMI-compatible component is played. - The receiver's input switches automatically when - Pioneer VSX-43 | Owner's Manual - Page 57
on directly by remote control. 4 Repeat steps 2 through 3 to try a different code, or to enter a code for another component you want to control. 5 When you're done, press RECEIVER . Clearing all the remote control settings You can clear all presets and restore the factory default settings. While - Pioneer VSX-43 | Owner's Manual - Page 58
Controls for other components This remote control can control these components (BD, DVD, CD, DVR (BDR), VCR, CD-R) after entering the proper codes (see Controlling Selects channels. (DVR/VCR only) Preset Code List You should have no problem controlling a component if you find the manufacturer in - Pioneer VSX-43 | Owner's Manual - Page 59
10 Controlling the rest of your system TV Pioneer 0004, 0006, 0113, 0233, 0252, 0275, 0291, If operations are not possible using the preset codes below, you may be able to conduct operations with the preset codes for the BD, DVR (BDR, HDR). Pioneer 2014, 2197, 2256 Accurian 2092 Advent 2072 Aiwa - Pioneer VSX-43 | Owner's Manual - Page 60
10 Controlling the rest of your system BD If operations are not possible using the preset codes below, you may be able to conduct operations with the preset codes for the DVD, DVR (BDR, HDR). Pioneer 2034, 2192, 2255, 2258, 2259, 2260, 2281 Denon 2310, 2311, 2312 Hitachi 2307, 2308, 2309 JVC 2290, - Pioneer VSX-43 | Owner's Manual - Page 61
5001, 5053, 5071 Philips 5054 Yamaha 5055 Tuner Pioneer 5060 Laser Disc Player Pioneer 5002, 5003 Casette Deck Pioneer 5058, 5059 Digital Tape Pioneer 5057 MD Pioneer 5056 Network Audio Player Pioneer 5063 Game X-Box 2313 AV Receiver Pioneer 5062 61 Controlling the rest of your system 4 7 62 - Pioneer VSX-43 | Owner's Manual - Page 62
rear panel or another set of wires. If so, re-attach the speaker wires, making sure there are no stray strands. The receiver may have a serious problem. Disconnect from the power and call a Pioneer authorized independent service company. The power suddenly turns on or off, or the input suddenly - Pioneer VSX-43 | Owner's Manual - Page 63
or the Bluetooth wireless technology device. Reset the pairing. Check that the profile is correct. Use a Bluetooth wireless technology device that supports A2DP profile and AVRCP profile. The Air Jam function cannot be used. An iPod is connected to this receiver. Disconnect the iPod from this - Pioneer VSX-43 | Owner's Manual - Page 64
NETWORK to set the remote control to the NETWORK mode (page 46). HDMI No picture or sound. If the problem still persists when connecting your HDMI component directly to your monitor, please consult the component or monitor manual or contact the manufacturer for support. No picture. Video - Pioneer VSX-43 | Owner's Manual - Page 65
Bluetooth technology works with iPhone 5, iPhone 4S, iPhone 4, iPhone 3GS, iPhone 3G, iPhone, iPad (3rd and 4th generation), iPad 2, iPad, iPad mini, and iPod iPod, iPhone, or iPad may affect wireless performance. Apple, AirPlay, iPad, iPhone, iPod, iPod nano, iPod code OR SERVICES; LOSS be played back - Pioneer VSX-43 | Owner's Manual - Page 66
the main unit Use this procedure to reset all the receiver's settings to the factory default. Use the front panel controls to do this. • For instructions on resetting the network connection settings, see Factory Reset on page 45. 1 Switch the receiver into standby. 2 While holding down BAND, press - Pioneer VSX-43 | Owner's Manual - Page 67
lb 9 oz) Furnished Parts Microphone (for Auto MCACC setup 1 Remote control 1 Dry cell batteries (AAA size IEC R03 2 AM loop antenna 1 FM wire antenna 1 Warranty card 1 Quick start guide 1 Safety Brochure 1 These operating instructions (CD-ROM) Note • Specifications and the design are subject - Pioneer VSX-43 | Owner's Manual - Page 68
service location, to purchase replacement parts, operating instructions, or accessories, please go to one of following URLs : Pour enregistrer votre produit, trouver le service 479-4411 PIONEER EUROPE NV Haven 1087, Keetberglaan 1, B-9120 Melsele, Belgium TEL: 03/570.05.11 PIONEER ELECTRONICS
-
 1
1 -
 2
2 -
 3
3 -
 4
4 -
 5
5 -
 6
6 -
 7
7 -
8
-
9
-
10
-
11
-
12
-
13
-
14
-
15
-
16
-
17
-
18
-
19
-
20
-
21
-
22
-
23
-
24
-
25
-
26
-
27
-
28
-
29
-
30
-
31
-
32
-
33
-
34
-
35
-
36
-
37
-
38
-
39
-
40
-
41
-
42
-
43
-
44
-
45
-
46
-
47
-
48
-
49
-
50
-
51
-
52
-
53
-
54
-
55
-
56
-
57
-
58
-
59
-
60
-
61
-
62
-
63
-
64
-
65
-
66
-
67
-
68
 |
 |
Register your product on
http://www.pioneerelectronics.ca (Canada)
•
Protect your new investment
The details of your purchase will be on file for reference in the event of an insurance claim such as loss or theft.
•
Improve product development
Your input helps us continue to design products that meet your needs.
•
Receive a free Pioneer newsletter
Registered customers can opt in to receive a monthly newsletter.
•
Receive free tips, updates and service bulletins on your new product
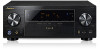
AV Receiver
VSX-43
Operating Instructions