Pioneer VSX-43 Owner's Manual - Page 20
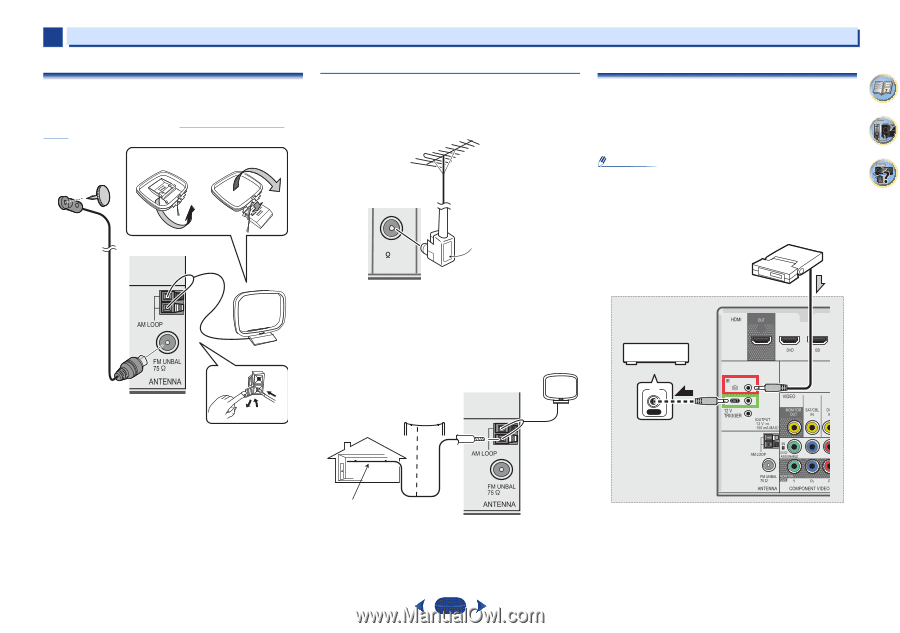
Place the AM antenna on a flat surface and in a direction
 |
View all Pioneer VSX-43 manuals
Add to My Manuals
Save this manual to your list of manuals |
Page 20 highlights
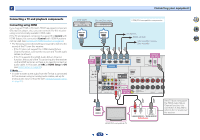
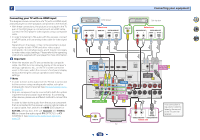
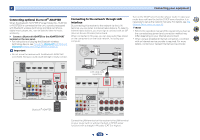
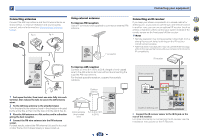
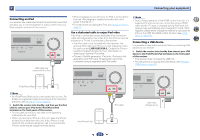
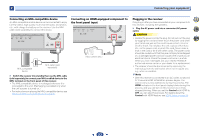
2 Connecting your equipment Connecting antennas Connect the AM loop antenna and the FM wire antenna as shown below. To improve reception and sound quality, connect external antennas (see Using external antennas below). fig. a fig. b 2 Using external antennas To improve FM reception Use an F connector (not supplied) to connect an external FM antenna. FM UNBAL 75 F connector Connecting an IR receiver If you keep your stereo components in a closed cabinet or shelving unit, or you wish to use the sub zone remote control in another zone, you can use an optional IR receiver (such as a Niles or Xantech unit) to control your system instead of the remote sensor on the front panel of this receiver. Note • Remote operation may not be possible if direct light from a strong fluorescent lamp is shining on the IR receiver remote sensor window. • Note that other manufacturers may not use the IR terminology. Refer to the manual that came with your component to check for IR compatibility. 4 7 62 IR receiver To improve AM reception Connect a 5 m to 6 m (16 ft. to 20 ft.) length of vinyl-coated wire to the AM antenna terminal without disconnecting the supplied AM loop antenna. 4 3 For the best possible reception, suspend horizontally outdoors. 1 Outdoor antenna 1 Push open the tabs, then insert one wire fully into each terminal, then release the tabs to secure the AM antenna wires. 2 Fix the AM loop antenna to the attached stand. To fix the stand to the antenna, bend in the direction indicated by the arrow (fig. a) then clip the loop onto the stand (fig. b). 3 Place the AM antenna on a flat surface and in a direction giving the best reception. 4 Connect the FM wire antenna into the FM antenna socket. For best results, extend the FM antenna fully and fix to a wall or door frame. Don't drape loosely or leave coiled up. Indoor antenna (vinyl-coated wire) 5 m to 6 m (16 ft. to 20 ft.) 20 Other component IR IN Closet or shelving unit Connect the IR receiver sensor to the IR IN jack on the rear of this receiver. For more information on connecting the IR receiver, see the Installation Instructions for the IR Receiver.
-
 1
1 -
2
-
3
-
4
-
5
-
6
-
7
-
8
-
9
-
10
-
11
-
12
-
13
-
14
-
 15
15 -
 16
16 -
 17
17 -
 18
18 -
 19
19 -
 20
20 -
 21
21 -
 22
22 -
 23
23 -
 24
24 -
 25
25 -
26
-
27
-
28
-
29
-
30
-
31
-
32
-
33
-
34
-
35
-
36
-
37
-
38
-
39
-
40
-
41
-
42
-
43
-
44
-
45
-
46
-
47
-
48
-
49
-
50
-
51
-
52
-
53
-
54
-
55
-
56
-
57
-
58
-
59
-
60
-
61
-
62
-
63
-
64
-
65
-
66
-
67
-
68
 |
 |