Samsung FPT5894 User Manual (ENGLISH) - Page 71
Zooming-In, Photo, ENTER, Start Slide Show, Rotate, WISELINK, Zoom function information icon
 |
UPC - 036725258945
View all Samsung FPT5894 manuals
Add to My Manuals
Save this manual to your list of manuals |
Page 71 highlights
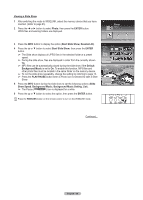
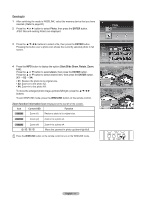
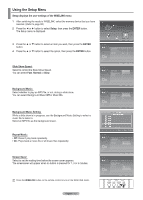
Zooming-In 1 After switching the mode to WISELINK, select the memory device that you have inserted. (Refer to page 65) 2 Press the ◄ or ► button to select Photo, then press the ENTER button. JPEG files and existing folders are displayed. Photo CELLDISK2.0 315MB/495MB Free 3 Press the buttons to select a file, then press the ENTER button. Pressing the button over a photo icon shows the currently selected photo in full screen. 4 Press the INFO button to display the option (Start Slide Show, Rotate, Zoom, List). Press the ▲ or ▼ button to select Zoom, then press the ENTER button. Press the ▲ or ▼ button to select desired item, then press the ENTER button. (X1 → X2 → X4) • X1: Restore the photo to its original size. • X2: Zoom-in to the photo X2. • X4: Zoom-in to the photo X4. To move the enlarged photo image up/down/left/right, press the buttons. To exit WISELINK mode, press the WISELINK button on the remote control. Zoom function information icon (Displayed at the top left of the screen). Icon Current OSD Function Zoom (x1) Restore a photo to its original size. Zoom (x2) Zoom-in to a photo x2. Zoom (x4) / / / Zoom-in to a photo x4. Move the zoomed-in photo up/down/right/left. Press the WISELINK button on the remote control to turn on the WISELINK mode. Photo Music Move Setup Enter Return Photo 400x340 53 KB May 1, 2007 1 / 14 Photo 0001 1/10 Page Photo 0001 File 2 None CELLDISK2.0 315MB/495MB Free File 4 File 5 File 6 File 7 File 8 File 9 File 10 File 11 File 12 File 13 Select Option Move View Return Start Slide Show Rotate : 0˚ Zoom : X1 List Exit Start Slide Show X1 Rotate : 0˚ X2 Zoom : X1 X4 List Exit English - 71 RETURN FAV.CH AUTO PROG. ADD/DEL
-
 1
1 -
2
-
3
-
4
-
5
-
6
-
7
-
8
-
9
-
10
-
11
-
12
-
13
-
14
-
15
-
16
-
17
-
18
-
19
-
20
-
21
-
22
-
23
-
24
-
25
-
26
-
27
-
28
-
29
-
30
-
31
-
32
-
33
-
34
-
35
-
36
-
37
-
38
-
39
-
40
-
41
-
42
-
43
-
44
-
45
-
46
-
47
-
48
-
49
-
50
-
51
-
52
-
53
-
54
-
55
-
56
-
57
-
58
-
59
-
60
-
61
-
62
-
63
-
64
-
65
-
 66
66 -
 67
67 -
 68
68 -
 69
69 -
 70
70 -
 71
71 -
 72
72 -
 73
73 -
 74
74 -
 75
75 -
 76
76 -
77
-
78
-
79
-
80
 |
 |
