Sanyo SYSZ5LMP PLV-Z5 Owners Manual - Page 28
Image Adjustment
 |
UPC - 017133340781
View all Sanyo SYSZ5LMP PLV-Z5 manuals
Add to My Manuals
Save this manual to your list of manuals |
Page 28 highlights
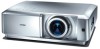
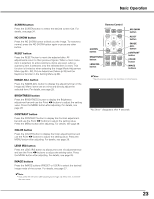
Image Adjustment Image Mode Adjustment Image mode can be adjusted for each input source and the adjustment is kept until the projector is turned off or the image mode is changed. Direct Operation Remote Control Press the IMAGE ADJ. button on the remote control to display the adjustment bar of Image adj. Menu items one at a time and directly adjust the selected item. Use the Point ed buttons to select the desired item and the Point 7 8 buttons to adjust the setting. Press the MENU button after adjusting. If you press the OK button after adjusting each item, it will enter the main menu. Menu Operation 1 Press the Point ed buttons to select the Image adj. Menu and press the Point 8 or OK buttons to access the submenu items. 2 Use the Point ed buttons to select the desired item and press the Point 8 or OK buttons to access the selected item. The adjustment bar is displayed. MENU RESET OK SCREEN IMAGE IMAGE ADJ. BRIGHTNESS CONTRAST BRIGHT CONT. COLOR IMAGE ADJ. button Brightness ➜ Contrast ➜ Color ➜ Tint ➜ Color temp. ➜ Red ➜ Green ➜ Blue ➜ Sharpness ➜ Lamp control ➜ Gamma ➜ Progressive ➜ Lens iris ➜ Lamp iris ➜ Auto black stretch➜ Contrast enhancement ➜ Transient improvement ➜ Gain R/G/B ➜ Offset R/G/B ➜ Gamma R/G/B ➜ Brightness Image adj. Menu 3 Use the Point 7 8 buttons to adjust the setting values and press the OK button. Brightness Press the Point 7 button to decrease the brightness; press the Point 8 button to increase the brightness (from -31 to +31). Contrast Press the Point 7 button to decrease the contrast; press the Point 8 button to increase the contrast (from -31 to +31). Color Press the Point 7 button to decrease the intensity of the color; press the Point 8 button to increase the intensity of the color (from -31 to +31). Tint Use the Point 7 8 buttons to adjust the tint value to obtain a proper color balance (from -31 to +31). Color temp. Use the Point 7 8 buttons to select the desired Color temp. level (High, Mid, Low1, Low2, or Low3). The selected item. Press the Point 8 or OK buttons to access the selected item. The adjustment bar is displayed. ✔Notes: • Tint cannot be selected when the video system is PAL, SECAM, PAL-M, or PAL-N except for 575i. • The Image adj. Menu cannot be operated without an input signal. 28 Use the Point 7 8 buttons to adjust the setting values and press the OK button. If you press the Point d button, the next item can be selected. Go on to the next page....
-
 1
1 -
2
-
3
-
4
-
5
-
6
-
7
-
8
-
9
-
10
-
11
-
12
-
13
-
14
-
15
-
16
-
17
-
18
-
19
-
20
-
21
-
22
-
 23
23 -
 24
24 -
 25
25 -
 26
26 -
 27
27 -
 28
28 -
 29
29 -
 30
30 -
 31
31 -
 32
32 -
 33
33 -
34
-
35
-
36
-
37
-
38
-
39
-
40
-
41
-
42
-
43
-
44
-
45
-
46
-
47
-
48
-
49
-
50
-
51
-
52
-
53
-
54
-
55
-
56
-
57
 |
 |
