Sanyo SYSZ5LMP PLV-Z5 Owners Manual - Page 34
Screen, Screen Size Adjustment
 |
UPC - 017133340781
View all Sanyo SYSZ5LMP PLV-Z5 manuals
Add to My Manuals
Save this manual to your list of manuals |
Page 34 highlights
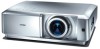
Screen Screen Size Adjustment This projector has the picture screen resize function which enables you to customize the image size. Direct Operation Press the SCREEN button on the remote control to select a screen size from among Full, Full through, Zoom, Caption in, Normal, Normal through, Natural wide 1, and Natural wide 2. Remote Control OK SCREEN IMAGE IMAGE ADJ. BRIGHTNESS CONTRAST BRIGHT CONT. COLOR SCREEN button Full ➜ Full through ➜ Zoom ➜ Caption in ➜ Normal ➜ Normal through ➜ Natural wide 1 ➜ Natural wide 2 ➜ Full Menu Operation 1 Press the Point ed buttons to select the Screen Menu and press the Point 8 or OK buttons to access the submenu items. Screen Menu 2 Use the Point ed buttons to select the desired screen size and press the OK or Point 8 buttons. The selected item is check marked. Full Fit the image to the screen by expanding the width of the image uniformly. This function can be used to project a squeezed video signal at the wide video aspect ratio of 16:9. To get a better quality, select the 16:9 output mode as well if it is available on your video equipment (such as DVD players). Full through Fit the image to the screen by expanding the width of the image and project it in the center of the screen at the wide screen ratio of 16:9. (You can enjoy a high-quality image even though the projected image is smaller.) Zoom Fit the image to the screen size (16:9 aspect ratio) by expanding the width and height of the image uniformly. With the input signals other than 1080i or 720p, this function is used to project a letterboxed picture (the 4:3 aspect ratio picture with a black bar at the top and bottom) at the wide video aspect ratio of 16:9. When the input signal is 1080i or 720p, a letterboxed picture in a 16:9 screen can be projected by expanding at the wide video aspect ratio of 16:9. In the Zoom mode, you can also adjust the display range with the vertical adj. function. See "Vertical adj." on the next page for details. Full Full through Zoom The selected screen size. ✔Note: • The Screen Menu cannot be operated without an input signal. 34 When the input signal is 1080i or 720p.
-
 1
1 -
2
-
3
-
4
-
5
-
6
-
7
-
8
-
9
-
10
-
11
-
12
-
13
-
14
-
15
-
16
-
17
-
18
-
19
-
20
-
21
-
22
-
23
-
24
-
25
-
26
-
27
-
28
-
 29
29 -
 30
30 -
 31
31 -
 32
32 -
 33
33 -
 34
34 -
 35
35 -
 36
36 -
 37
37 -
 38
38 -
 39
39 -
40
-
41
-
42
-
43
-
44
-
45
-
46
-
47
-
48
-
49
-
50
-
51
-
52
-
53
-
54
-
55
-
56
-
57
 |
 |
