Sanyo SYSZ5LMP PLV-Z5 Owners Manual - Page 33
Picture Adjustment, Picture Position and Screen Adjustment
 |
UPC - 017133340781
View all Sanyo SYSZ5LMP PLV-Z5 manuals
Add to My Manuals
Save this manual to your list of manuals |
Page 33 highlights
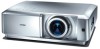
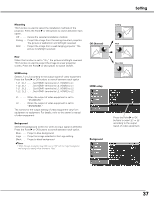
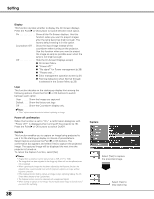
Picture Adjustment Picture Position and Screen Adjustment Some input source employ special signal formats which may not be tuned by the auto-tuning system of this projector. Picture Adjustment enables you to precisely adjust several parameters manually to match those signal formats. The parameters manually adjusted is stored for every input. 1 Press the Point ed buttons to select the Picture adj. Menu and press the Point 8 or OK buttons to access the submenu items. 2 Use the Point ed buttons to select the desired item and press the Point 8 or OK buttons to access the selected item. The adjustment bar is displayed. 3 Use the Point 7 8 buttons to adjust the setting values and press the OK button. Picture adj. Menu Overscan Use the Point 7 8 buttons to adjust the overscan area. It works only to decrease the overscanned portion of the screen (from 0 to +10). Horizontal Use the Point 7 8 buttons to adjust the horizontal picture position (from -100 to +100). Vertical Use the Point 7 8 buttons to adjust the vertical picture position (from -100 to +100). Auto adj. When the input signal is from computers, select Auto adj. and press the Point 8 or OK buttons so that it automatically adjust Fine sync, Total dots, and Horizontal and Vertical positions to conform to your computer. Fine sync Use the Point 7 8 buttons to adjust the value, eliminating a flicker from the image displayed (from 0 to +31). Total dots Use the Point 7 8 buttons to adjust the number of total dots in one horizontal period to match your PC image (from -100 to +100). The selected item. Press the Point 8 or OK buttons to access the selected item. The adjustment bar is displayed. Use the Point 7 8 buttons to adjust the the setting values and press the OK button to return to the submenu. If you press the Point d button, the next item can be selected. ✔Notes: • Overscan can be selected with the video input only. • The adjusting range for the Horizontal and Vertical positions, and Total dots differs depending on the input signal. When the video signal format is 480i or 575i, the adjusting range for the Horizontal position will be from -8 to +8. • The Auto adj. function cannot be operated with the video input, some incompatible computer input and digital signals. • Fine sync and Total dots cannot be operated when the video signal format is 480i or 575i and with some incompatible computer input and digital signals. • The Picture adj. Menu cannot be operated without an input signal. 33
-
 1
1 -
2
-
3
-
4
-
5
-
6
-
7
-
8
-
9
-
10
-
11
-
12
-
13
-
14
-
15
-
16
-
17
-
18
-
19
-
20
-
21
-
22
-
23
-
24
-
25
-
26
-
27
-
 28
28 -
 29
29 -
 30
30 -
 31
31 -
 32
32 -
 33
33 -
 34
34 -
 35
35 -
 36
36 -
 37
37 -
 38
38 -
39
-
40
-
41
-
42
-
43
-
44
-
45
-
46
-
47
-
48
-
49
-
50
-
51
-
52
-
53
-
54
-
55
-
56
-
57
 |
 |
