Schwinn Tango Tandem Seven IPS Schwinn Owner's Manual - Page 28
Getting Started, Handlebar Assembly
 |
View all Schwinn Tango Tandem Seven IPS manuals
Add to My Manuals
Save this manual to your list of manuals |
Page 28 highlights
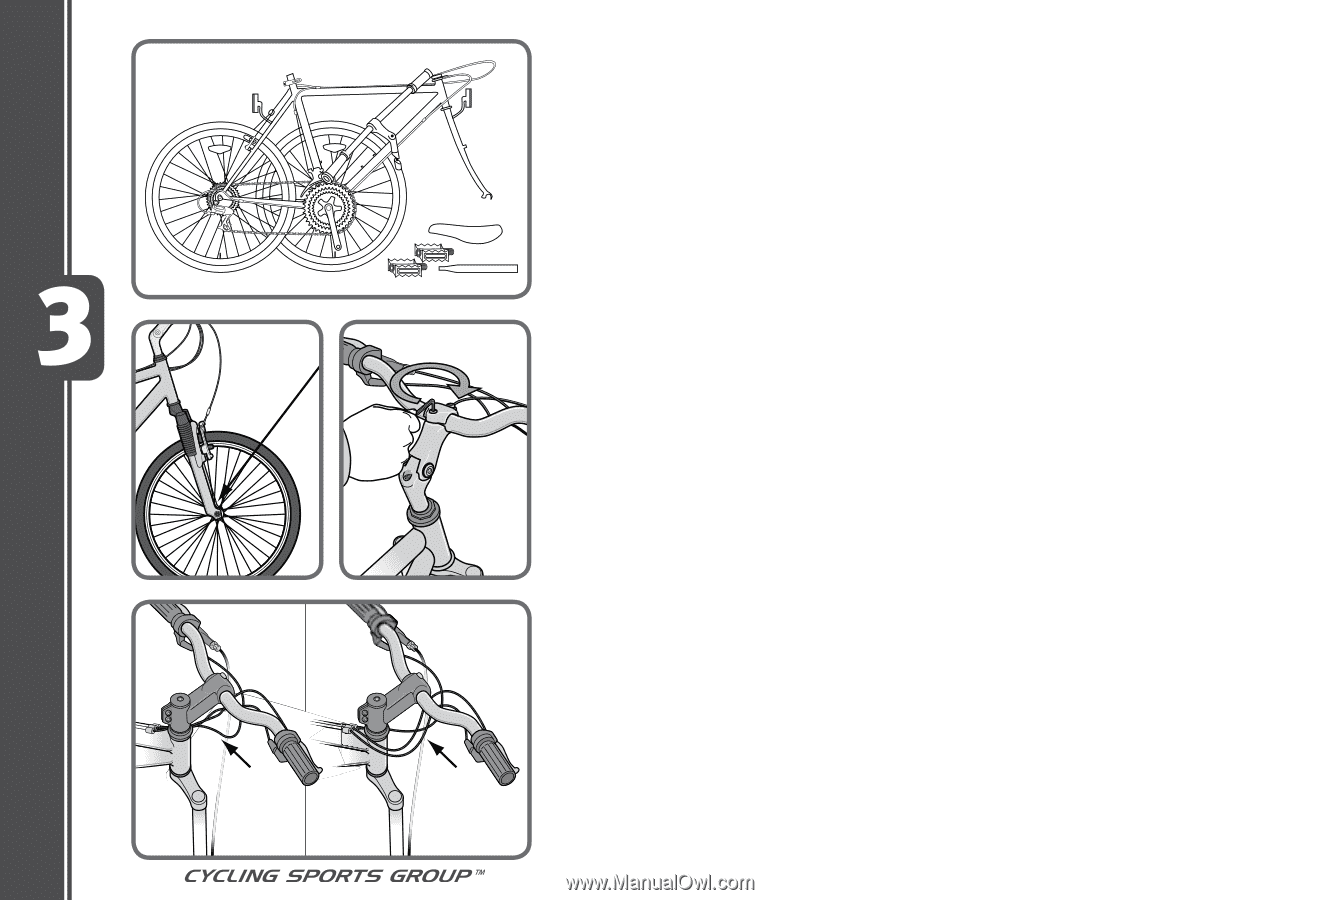
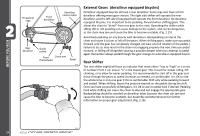
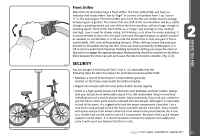
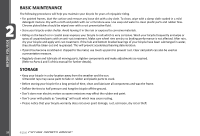
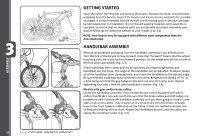
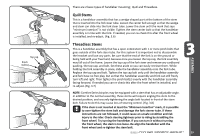
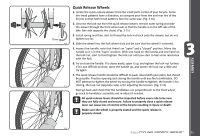
ASSEMBLY 3.3 Incorrect 28 ©2010 3.2 3.4 Correct GETTING STARTED Open the carton from the top and remove the bicycle. Remove the straps and protective wrapping from the bicycle. Inspect the bicycle and all accessories and parts for possible shortages. It is recommended that the threads and all moving parts in the parts package be lubricated prior to installation. Do not discard packing materials until assembly is complete to ensure that no required parts are accidentally discarded. Assemble your bicycle following the steps that pertain to your model. (Fig. 3.2) NOTE: Your bicycle may be equipped with different style components than the ones illustrated. HANDLEBAR ASSEMBLY Remove all protective packaging from the handlebar assembly if not already done. Turn the fork of the bicycle to face forward. Note that "forward" means that the wheel mounting slots are in the furthest forward position. So the wheel axle will be in front of the fork when assembled. (Fig. 3.3) Check handlebar stem clamp bolts to be sure they are properly tightened, and handlebar can not move. The angle of the handlebar can be adjusted. To adjust; loosen all of the handlebar stem clamping bolts, and rotate the handlebar to the desired angle. Be sure that the handlebar stays centered in the stem. Retighten the bolts a LITTLE at a time being sure that the gap between the stem cap and stem stays even. Repeat tightening each bolt a little bit until handlebar is secure. (Fig. 3.4) Models with gear and/or brake cables: Locate the handlebar assembly. If your model bicycle comes equipped with gears and/or handbrakes, you will need to be sure that the brake cables and shift cables are properly routed. Position the handlebar assembly as if you were going to install it, and take a look at the cables. They should run in a smooth arc from the shifter or brake lever to the front brake or cable stop on the frame. If they are twisted or kinked, the shifting and braking will not work. Rotate the handlebars around until the cables are taking the smoothest route. (Fig. 3.5) 3.5
-
 1
1 -
2
-
3
-
4
-
5
-
6
-
7
-
8
-
9
-
10
-
11
-
12
-
13
-
14
-
15
-
16
-
17
-
18
-
19
-
20
-
21
-
22
-
 23
23 -
 24
24 -
 25
25 -
 26
26 -
 27
27 -
 28
28 -
 29
29 -
 30
30 -
 31
31 -
 32
32 -
 33
33 -
34
-
35
-
36
-
37
-
38
-
39
-
40
-
41
-
42
-
43
-
44
-
45
-
46
-
47
-
48
-
49
-
50
-
51
-
52
-
53
-
54
-
55
-
56
-
57
-
58
-
59
-
60
-
61
-
62
-
63
-
64
-
65
-
66
-
67
 |
 |