Schwinn Tango Tandem Seven IPS Schwinn Owner's Manual - Page 61
Adjustment - Front Derailleur
 |
View all Schwinn Tango Tandem Seven IPS manuals
Add to My Manuals
Save this manual to your list of manuals |
Page 61 highlights
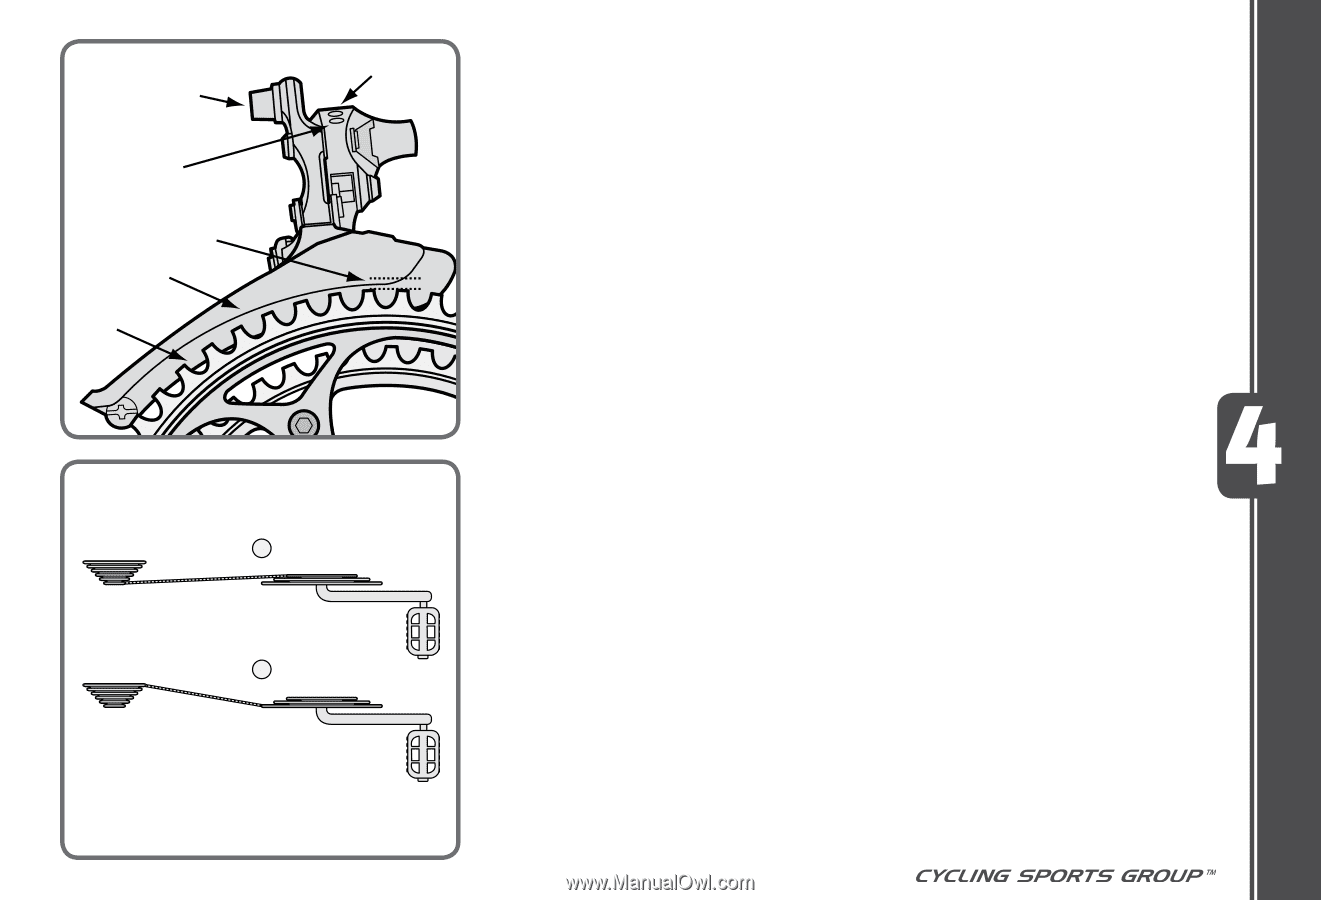
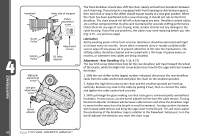
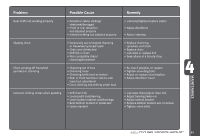
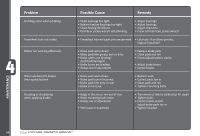
Cable anchor bolt High adjusƟng screw Chainguide clearance of 1-3mm Outer chainguide Inner chainguide Low adjusƟng screw 4.18 1 2 AVOID THESE GEARS! 4. Shift the chain onto the largest sprocket; adjust the low limit screw so the chain and the largest cog are lined up vertically. If you are unable to get the chain to the largest cog, turning the Low limit screw counter-clockwise will enable the chain to move towards the wheel. 5. Shift through the gears ensuring each gear is achieved quietly and without hesitation. NOTE: It may take several adjustments to achieve the desired positioning. Please refer to the troubleshooting section for more assistance. Adjustment - Front Derailleur (Fig. 4.18) 1. Shift the rear shifter to the smallest number indicated, then shift the front shifter to the smallest number indicated. Disconnect the front derailleur cable from the cable anchor bolt and place the chain on the smallest chainwheel. 2. Make sure the front derailleur cage is parallel with the outer chainwheel on the crankset. There must be a 1-3mm gap between the bottom of the derailleur cage and the top of the outer chainwheel teeth to ensure the derailleur will clear the chainwheel when shifting. 3. Adjust the low limit screw so the chain is centered in the middle of derailleur cage. Pull all slack out of the cable by pulling it taut, then reconnect the cable and tighten the cable anchor bolt securely. 4. Shift the front shifter into the largest gear and pedal the bike so the chain jumps to the largest chainwheel. If the chain does not shift onto the largest chainwheel, you will need to turn the High limit screw counter-clockwise until the chain moves to the largest chainwheel. If the chain falls into the pedals, the High limit screw has been turned too far. You will need to readjust the High screw clockwise in 1/4 turn increments until the chain no longer falls off. 5. Shift through each gear ensuring all are achieved quietly and without hesitation. 6. The barrel adjuster for the front derailleur is located on the shift mechanism. Turning clockwise will decrease cable tension and allow the front derailleur cage to move away from the bike, while turning counter-clockwise will increase tension and bring the cage closer to the bike. If you are experiencing problems shifting between gears, use the barrel adjuster to fine-tune the cable tension. NOTE: It may take several adjustments to achieve the desired positioning. MAINTENANCE 4.19 ©2010 61
-
 1
1 -
2
-
3
-
4
-
5
-
6
-
7
-
8
-
9
-
10
-
11
-
12
-
13
-
14
-
15
-
16
-
17
-
18
-
19
-
20
-
21
-
22
-
23
-
24
-
25
-
26
-
27
-
28
-
29
-
30
-
31
-
32
-
33
-
34
-
35
-
36
-
37
-
38
-
39
-
40
-
41
-
42
-
43
-
44
-
45
-
46
-
47
-
48
-
49
-
50
-
51
-
52
-
53
-
54
-
55
-
 56
56 -
 57
57 -
 58
58 -
 59
59 -
 60
60 -
 61
61 -
 62
62 -
 63
63 -
 64
64 -
 65
65 -
 66
66 -
67
 |
 |