Sharp XR-50S XR-55S XR-55X Operation Manual - Page 46
Picture Adjustment Picture Menu, Continued
 |
View all Sharp XR-50S manuals
Add to My Manuals
Save this manual to your list of manuals |
Page 46 highlights
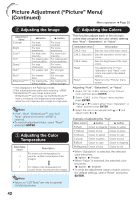
Picture Adjustment ("Picture" Menu) (Continued) Menu operation n Page 39 2 Adjusting the Image Adjustment items Contrast Bright Color*1 Tint*1 Sharp*1 Red*2 Blue*2 BrilliantColor™*2 *3 O button For less contrast. For less brightness. For less color intensity. For making skin tones purplish. For less sharpness. For weaker red. For weaker blue. For making the effect weaker. Q button For more contrast. For more brightness. For more color intensity. For making skin tones greenish. For more sharpness. For stronger red. For stronger blue. For making the effect stronger. *1 Not displayed in the RGB input mode. *2 Not adjustable/selectable when selecting "sRGB". *3 BrilliantColor™ uses Texas Instruments' BrilliantColor™ technology. As the BrilliantColor™ level is increased, the image becomes brighter while the color reproduction is kept at a high level. Note • "Red", "Blue", "BrilliantColorTM" and "CLR Temp" cannot be set when "sRGB" is selected. • To reset all adjustment items, select "Reset" and press ENTER. 3 Adjusting the Color Temperature Selectable items -1 0 Description For lower color temperature for warmer, reddish incandescent-like images. 1 For higher color temperature for cooler, bluish, fluorescent-like images. Note • Values on "CLR Temp" are only for general standard purposes. 4 Adjusting the Colors This function adjusts each of the six main colors that comprise the color wheel, altering their "Hue", "Saturation", or "Value". Selectable items Description C.M.S.-Hue Sets the hue of the main colors. C.M.S.-Saturation Sets the saturation of the main colors C.M.S.-Value Sets the brightness of the main colors. Reset The adjustments of "Hue", "Saturation" and "Value" of all colors are reset to the default setting. Return Returns to the "Picture" menu screen. Adjusting "Hue", "Saturation", or "Value". 1 Select "On" for "C.M.S. Setting" in the "Picture" menu and then press ENTER. 2 Select "C.M.S." in the "Picture" menu and then press ENTER. 3 Press P or R to select either "Hue", "Saturation", or "Value" and then press ENTER. 4 Select the color to be adjusted with P or R and adjust it with O or Q. Example of adjusting the "Hue" Main colors O button Q button R (Red) Closer to magenta Closer to yellow Y (Yellow) Closer to red Closer to green G (Green) Closer to yellow Closer to cyan C (Cyan) Closer to green Closer to blue B (Blue) Closer to cyan Closer to magenta M (Magenta) Closer to blue Closer to red • When "Saturation" is selected, the selected color becomes O: lighter. Q: thicker. • When "Value" is selected, the selected color becomes O: darker. Q: brighter. • To reset the adjustment values of each color to the default settings, select "Reset" and press ENTER. 42
-
 1
1 -
2
-
3
-
4
-
5
-
6
-
7
-
8
-
9
-
10
-
11
-
12
-
13
-
14
-
15
-
16
-
17
-
18
-
19
-
20
-
21
-
22
-
23
-
24
-
25
-
26
-
27
-
28
-
29
-
30
-
31
-
32
-
33
-
34
-
35
-
36
-
37
-
38
-
39
-
40
-
 41
41 -
 42
42 -
 43
43 -
 44
44 -
 45
45 -
 46
46 -
 47
47 -
 48
48 -
 49
49 -
 50
50 -
 51
51 -
52
-
53
-
54
-
55
-
56
-
57
-
58
-
59
-
60
-
61
-
62
-
63
-
64
-
65
-
66
-
67
-
68
-
69
-
70
-
71
-
72
-
73
-
74
-
75
-
76
-
77
-
78
 |
 |
