Sharp XR-50S XR-55S XR-55X Operation Manual - Page 7
For Future Reference
 |
View all Sharp XR-50S manuals
Add to My Manuals
Save this manual to your list of manuals |
Page 7 highlights
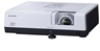
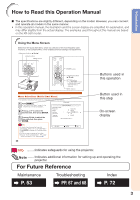
Introduction How to Read this Operation Manual ■ The specifications are slightly different, depending on the model. However, you can connect and operate all models in the same manner. • In this operation manual, the illustration and the screen display are simplified for explanation, and may differ slightly from the actual display. The examples used throughout this manual are based on the XR-55X model. Using the Menu Screen Select from the Quick Start Menu, which is a collection of the most frequently used functions, or the Complete Menu, which enables advanced settings and adjustments. Adjustment buttons (P/R/O/Q) ENTER button MENU button ENTER button Adjustment buttons (P/R/O/Q) RETURN button • Press RETURN to return to the previous screen when the menu is displayed. MENU button Menu Selections (Quick Start Menu) • This operation can also be performed by using the buttons on the projector. 1 Press MENU. • The "Quick Start Menu" screen for the selected Input mode is displayed. 2 Press P or R to select the desired item, then press ENTER. 3 Press P/R/O/Q to adjust the item selected, then press ENTER. Example Quick Start Menu Input Search Start Resolution Resize Keystone ECO+Quiet Language Information 1024×768 Normal 0 Off English Go To Complete Menu... Info • To display the advanced settings and adjustments, select "Go To Complete Menu". Press ENTER to display the Complete Menu screen. • If you do not want to display the Quick Start Menu, set "Go To Complete Menu" - "PRJ-ADJ2" - "Quick Start Menu" to "Off". (See page 51.) SEL./ADJ. ENTER END 38 Buttons used in this operation Button used in this step On-screen display Info .........Indicates safeguards for using the projector. Note ....... Indicates additional information for setting up and operating the projector. For Future Reference Maintenance Troubleshooting Index P. 53 PP. 67 and 68 P. 72 3
-
 1
1 -
 2
2 -
 3
3 -
 4
4 -
 5
5 -
 6
6 -
 7
7 -
 8
8 -
 9
9 -
 10
10 -
 11
11 -
 12
12 -
13
-
14
-
15
-
16
-
17
-
18
-
19
-
20
-
21
-
22
-
23
-
24
-
25
-
26
-
27
-
28
-
29
-
30
-
31
-
32
-
33
-
34
-
35
-
36
-
37
-
38
-
39
-
40
-
41
-
42
-
43
-
44
-
45
-
46
-
47
-
48
-
49
-
50
-
51
-
52
-
53
-
54
-
55
-
56
-
57
-
58
-
59
-
60
-
61
-
62
-
63
-
64
-
65
-
66
-
67
-
68
-
69
-
70
-
71
-
72
-
73
-
74
-
75
-
76
-
77
-
78
 |
 |
