Singer Legacy C440Q Instruction Manual and Troubleshooting Guide - Page 19
Threading, Needle
 |
View all Singer Legacy C440Q manuals
Add to My Manuals
Save this manual to your list of manuals |
Page 19 highlights
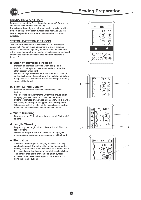
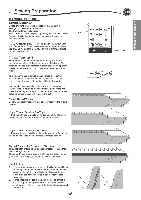
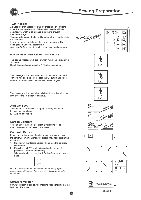
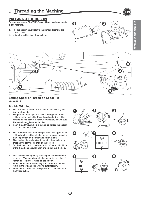
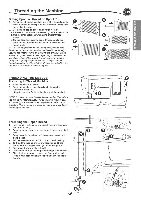
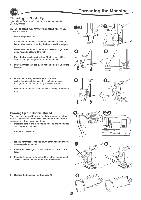
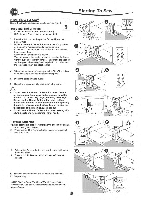
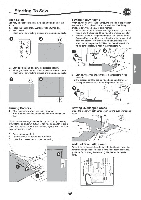
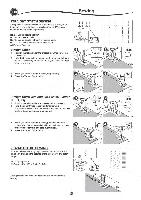
SETTING UP THE MACHINE Threading the Machine Setting Spool of Thread on Spool Pin 1. Pull up the left end of spool pin and set the felt pad and the spool of thread on spool pin so that the thread unrolls from the front of the spool. 2. Set the spool cap on spool pin as far as it will go. a. Reverse spool cap direction according to the size of spool. b. Use the small spool cap when using smaller thread spools. c. Set the thread net over the spool if thread unrolls too easily or if the thread becomes caught or twisted in the thread guide. NOTE: Thread spools come in a variety of styles and sizes. The thread spool cap should allow the thread to feed freely, yet hold the spool securely on the spool pin. Different thread spools can give different results, depending on the spool cap you place in front of the thread. If the thread is not feeding freely or it is getting caught behind the spool pin or in the threading guides, try different sizes of spool cap to find the one that best suits the thread spool being used. O IN* THREADING THE NEEDLE Preparing to Thread Machine 1. Raise the presser foot lifter. 2. Raise the needle to highest position by turning the handwheel toward you. (Keep this position for threading the eye of the needle.) NOTE: It is very important to raise the presser foot lifter before you thread the machine. Not doing so will likely result in poor stitch quality, or excessive thread loops on the underside of the fabric. Always raise the presser foot lifter before you begin threading the machine. EN 0 0 90 0 0 to 4 00000 00000 Threading the Upper Thread 1. Hold thread in both hands and pass thread into the guide from front opening. 0 2. Bring thread backward and pass through the slit from right to left. 3. Bring thread to the left and pull thread down toward you along the slit. I I 4. Pull the thread around the U-turn, then bring it back up. L. 5. To thread the take-up lever, draw thread up and bring thread back down again from right to left along the slit. 6. Pull thread downward along the slit. 7. Draw thread through thread guide from right side opening. 8. Place the thread through needle eye from front to back. Refer to next page for instructions on how to use needle threader.
-
 1
1 -
2
-
3
-
4
-
5
-
6
-
7
-
8
-
9
-
10
-
11
-
12
-
13
-
 14
14 -
 15
15 -
 16
16 -
 17
17 -
 18
18 -
 19
19 -
 20
20 -
 21
21 -
 22
22 -
 23
23 -
 24
24 -
25
-
26
-
27
-
28
-
29
-
30
-
31
-
32
-
33
-
34
-
35
-
36
-
37
-
38
-
39
-
40
-
41
-
42
-
43
-
44
-
45
-
46
-
47
-
48
-
49
-
50
-
51
-
52
-
53
-
54
-
55
-
56
-
57
-
58
-
59
-
60
-
61
-
62
-
63
-
64
-
65
-
66
-
67
-
68
-
69
-
70
-
71
-
72
-
73
-
74
-
75
-
76
-
77
-
78
-
79
-
80
-
81
-
82
-
83
-
84
-
85
-
86
-
87
-
88
-
89
-
90
-
91
-
92
-
93
-
94
-
95
-
96
-
97
-
98
-
99
-
100
-
101
-
102
-
103
-
104
-
105
-
106
-
107
-
108
-
109
-
110
-
111
-
112
-
113
-
114
-
115
-
116
-
117
-
118
-
119
-
120
-
121
-
122
-
123
-
124
-
125
-
126
-
127
-
128
-
129
-
130
-
131
-
132
-
133
-
134
-
135
-
136
-
137
-
138
-
139
-
140
 |
 |
