Singer Legacy C440Q Instruction Manual and Troubleshooting Guide - Page 36
Eyelet
 |
View all Singer Legacy C440Q manuals
Add to My Manuals
Save this manual to your list of manuals |
Page 36 highlights
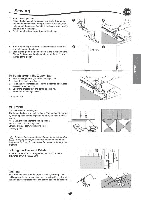
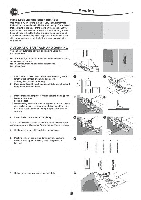
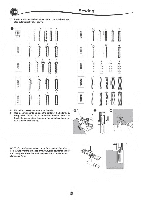
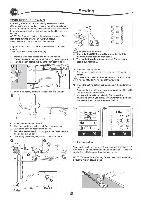
EN 10. Fold the fabric and stitch along the seams on each side, just a needle width from the original stitching line. Remove the basting. c. Wrong side of fabric 11. Fold the fabric along the buttonhole end and stitch triangular ends on the original stitching line. Sewing 12. Press and trim the patch to within 5 mm (3/16") of the stitching. 4 a. Right side of fabric b. Wrong side of fabric NOTE: When sewing lighter weight fabric, reinforce buttonhole area. Cut a patch of fusible interfacing 3 cm (1 1/4") wider and 2 cm (3/4") longer than the buttonhole. Fuse to wrong side over each buttonhole marking. EYELET This stitch pattern is used for making belt holes and other similar applications. 0 30 30 Eyelet Satin Foot (B) 1. Place the fabric under the presser foot and lower the O presser foot. Start the machine. Machine will sew the eyelet and stop automatically. 2. Press the Thread Cutter button and raise the presser foot. 3. Make a hole in the center of the eyelet. NOTE: Eyelet punch is not provided with this machine. /// 7/I O/
-
 1
1 -
2
-
3
-
4
-
5
-
6
-
7
-
8
-
9
-
10
-
11
-
12
-
13
-
14
-
15
-
16
-
17
-
18
-
19
-
20
-
21
-
22
-
23
-
24
-
25
-
26
-
27
-
28
-
29
-
30
-
 31
31 -
 32
32 -
 33
33 -
 34
34 -
 35
35 -
 36
36 -
 37
37 -
 38
38 -
 39
39 -
 40
40 -
 41
41 -
42
-
43
-
44
-
45
-
46
-
47
-
48
-
49
-
50
-
51
-
52
-
53
-
54
-
55
-
56
-
57
-
58
-
59
-
60
-
61
-
62
-
63
-
64
-
65
-
66
-
67
-
68
-
69
-
70
-
71
-
72
-
73
-
74
-
75
-
76
-
77
-
78
-
79
-
80
-
81
-
82
-
83
-
84
-
85
-
86
-
87
-
88
-
89
-
90
-
91
-
92
-
93
-
94
-
95
-
96
-
97
-
98
-
99
-
100
-
101
-
102
-
103
-
104
-
105
-
106
-
107
-
108
-
109
-
110
-
111
-
112
-
113
-
114
-
115
-
116
-
117
-
118
-
119
-
120
-
121
-
122
-
123
-
124
-
125
-
126
-
127
-
128
-
129
-
130
-
131
-
132
-
133
-
134
-
135
-
136
-
137
-
138
-
139
-
140
 |
 |
